Traffic Redirection
In service mesh, iptables and eBPF are two common ways of intercepting traffic.
iptables is a traffic interception tool based on the Linux kernel. It can control traffic by filtering rules. Its advantages include:
- Universality: The iptables tool has been widely used in Linux operating systems, so most Linux users are familiar with its usage.
- Stability: iptables has long been part of the Linux kernel, so it has a high degree of stability.
- Flexibility: iptables can be flexibly configured according to needs to control network traffic.
However, iptables also has some disadvantages:
- Difficult to debug: Due to the complexity of the iptables tool itself, it is relatively difficult to debug.
- Performance issues: Unpredictable latency and reduced performance as the number of services grows.
- Issues with handling complex traffic: When it comes to handling complex traffic, iptables may not be suitable because its rule processing is not flexible enough.
eBPF is an advanced traffic interception tool that can intercept and analyze traffic in the Linux kernel through custom programs. The advantages of eBPF include:
- Flexibility: eBPF can use custom programs to intercept and analyze traffic, so it has higher flexibility.
- Scalability: eBPF can dynamically load and unload programs, so it has higher scalability.
- Efficiency: eBPF can perform processing in the kernel space, so it has higher performance.
However, eBPF also has some disadvantages:
- Higher learning curve: eBPF is relatively new compared to iptables, so it requires some learning costs.
- Complexity: Developing custom eBPF programs may be more complex.
Overall, iptables is more suitable for simple traffic filtering and management, while eBPF is more suitable for complex traffic interception and analysis scenarios that require higher flexibility and performance.
1 - Iptables Redirection
Redirect traffic to sidecar proxy with iptables.
FSM leverages iptables to intercept and redirect traffic to and from pods participating in the service mesh to the Pipy proxy sidecar container running on each pod. Traffic redirected to the Pipy proxy sidecar is filtered and routed based on service mesh traffic policies.
For more details of comparison between iptables and eBPF, you can refer to Traffic Redirection.
How it works
FSM sidecar injector service fsm-injector injects an Pipy proxy sidecar on every pod created within the service mesh. Along with the Pipy proxy sidecar, fsm-injector also injects an init container, a specialized container that runs before any application containers in a pod. The injected init container is responsible for bootstrapping the application pods with traffic redirection rules such that all outbound TCP traffic from a pod and all inbound traffic TCP traffic to a pod are redirected to the pipy proxy sidecar running on that pod. This redirection is set up by the init container by running a set of iptables commands.
Ports reserved for traffic redirection
FSM reserves a set of port numbers to perform traffic redirection and provide admin access to the Pipy proxy sidecar. It is essential to note that these port numbers must not be used by application containers running in the mesh. Using any of these reserved port numbers will lead to the Pipy proxy sidecar not functioning correctly.
Following are the port numbers that are reserved for use by FSM:
15000: used by the Pipy admin interface exposed over localhost to return current configuration files.15001: used by the Pipy outbound listener to accept and proxy outbound traffic sent by applications within the pod15003: used by the Pipy inbound listener to accept and proxy inbound traffic entering the pod destined to applications within the pod15010: used by the Pipy inbound Prometheus listener to accept and proxy inbound traffic pertaining to scraping Pipy’s Prometheus metrics15901: used by Pipy to serve rewritten HTTP liveness probes15902: used by Pipy to serve rewritten HTTP readiness probes15903: used by Pipy to serve rewritten HTTP startup probes
The following are the port numbers that are reserved for use by FSM and allow traffic to bypass Pipy:
15904: used by fsm-healthcheck to serve tcpSocket health probes rewritten to httpGet health probes
Application User ID (UID) reserved for traffic redirection
FSM reserves the user ID (UID) value 1500 for the Pipy proxy sidecar container. This user ID is of utmost importance while performing traffic interception and redirection to ensure the redirection does not result in a loop. The user ID value 1500 is used to program redirection rules to ensure redirected traffic from Pipy is not redirected back to itself!
Application containers must not used the reserved user ID value of 1500.
Types of traffic intercepted
Currently, FSM programs the Pipy proxy sidecar on each pod to only intercept inbound and outbound TCP traffic. This includes raw TCP traffic and any application traffic that uses TCP as the underlying transport protocol, such as HTTP, gRPC etc. This implies UDP and ICMP traffic which can be intercepted by iptables are not intercepted and redirected to the Pipy proxy sidecar.
Iptables chains and rules
FSM’s fsm-injector service programs the init container to set up a set of iptables chains and rules to perform traffic interception and redirection. The following section provides details on the responsibility of these chains and rules.
FSM leverages four chains to perform traffic interception and redirection:
PROXY_INBOUND: chain to intercept inbound traffic entering the podPROXY_IN_REDIRECT: chain to redirect intercepted inbound traffic to the sidecar proxy’s inbound listenerPROXY_OUTPUT: chain to intercept outbound traffic from applications within the podPROXY_REDIRECT: chain to redirect intercepted outbound traffic to the sidecar proxy’s outbound listener
Each of the chains above are programmed with rules to intercept and redirect application traffic via the Pipy proxy sidecar.
Outbound IP range exclusions
Outbound TCP based traffic from applications is by default intercepted using the iptables rules programmed by FSM, and redirected to the Pipy proxy sidecar. In some cases, it might be desirable to not subject certain IP ranges to be redirected and routed by the Pipy proxy sidecar based on service mesh policies. A common use case to exclude IP ranges is to not route non-application logic based traffic via the Pipy proxy, such as traffic destined to the Kubernetes API server, or traffic destined to a cloud provider’s instance metadata service. In such scenarios, excluding certain IP ranges from being subject to service mesh traffic routing policies becomes necessary.
Outbound IP ranges can be excluded at a global mesh scope or per pod scope.
1. Global outbound IP range exclusions
FSM provides the means to specify a global list of IP ranges to exclude from outbound traffic interception applicable to all pods in the mesh, as follows:
During FSM install using the --set option:
# To exclude the IP ranges 1.1.1.1/32 and 2.2.2.2/24 from outbound interception
fsm install --set=fsm.outboundIPRangeExclusionList="{1.1.1.1/32,2.2.2.2/24}"
By setting the outboundIPRangeExclusionList field in the fsm-mesh-config resource:
## Assumes FSM is installed in the fsm-system namespace
kubectl patch meshconfig fsm-mesh-config -n fsm-system -p '{"spec":{"traffic":{"outboundIPRangeExclusionList":["1.1.1.1/32", "2.2.2.2/24"]}}}'  --type=merge
When IP ranges are set for exclusion post-install, make sure to restart the pods in monitored namespaces for this change to take effect.
Globally excluded IP ranges are stored in the fsm-mesh-config MeshConfig custom resource and are read at the time of sidecar injection by fsm-injector. These dynamically configurable IP ranges are programmed by the init container along with the static rules used to intercept and redirect traffic via the Pipy proxy sidecar. Excluded IP ranges will not be intercepted for traffic redirection to the Pipy proxy sidecar. Refer to the outbound IP range exclusion demo to learn more.
2. Pod scoped outbound IP range exclusions
Outbound IP range exclusions can be configured at pod scope by annotating the pod to specify a comma separated list of IP CIDR ranges as flomesh.io/outbound-ip-range-exclusion-list=<comma separated list of IP CIDRs>.
# To exclude the IP ranges 10.244.0.0/16 and 10.96.0.0/16 from outbound interception on the pod
kubectl annotate pod <pod> flomesh.io/outbound-ip-range-exclusion-list="10.244.0.0/16,10.96.0.0/16"
When IP ranges are annotated post pod creation, make sure to restart the corresponding pods for this change to take effect.
Outbound IP range inclusions
Outbound TCP based traffic from applications is by default intercepted using the iptables rules programmed by FSM, and redirected to the Pipy proxy sidecar. In some cases, it might be desirable to only subject certain IP ranges to be redirected and routed by the Pipy proxy sidecar based on service mesh policies, and have remaining traffic not proxied to the sidecar. In such scenarios, inclusion IP ranges can be specified.
Outbound inclusion IP ranges can be specified at a global mesh scope or per pod scope.
1. Global outbound IP range inclusions
FSM provides the means to specify a global list of IP ranges to include for outbound traffic interception applicable to all pods in the mesh, as follows:
During FSM install using the --set option:
# To include the IP ranges 1.1.1.1/32 and 2.2.2.2/24 for outbound interception
fsm install --set=fsm.outboundIPRangeInclusionList="[1.1.1.1/32,2.2.2.2/24]"
By setting the outboundIPRangeInclusionList field in the fsm-mesh-config resource:
## Assumes FSM is installed in the fsm-system namespace
kubectl patch meshconfig fsm-mesh-config -n fsm-system -p '{"spec":{"traffic":{"outboundIPRangeInclusionList":["1.1.1.1/32", "2.2.2.2/24"]}}}'  --type=merge
When IP ranges are set for inclusion post-install, make sure to restart the pods in monitored namespaces for this change to take effect.
Globally included IP ranges are stored in the fsm-mesh-config MeshConfig custom resource and are read at the time of sidecar injection by fsm-injector. These dynamically configurable IP ranges are programmed by the init container along with the static rules used to intercept and redirect traffic via the Pipy proxy sidecar. IP addresses outside the specified inclusion IP ranges will not be intercepted for traffic redirection to the Pipy proxy sidecar.
2. Pod scoped outbound IP range inclusions
Outbound IP range inclusions can be configured at pod scope by annotating the pod to specify a comma separated list of IP CIDR ranges as flomesh.io/outbound-ip-range-inclusion-list=<comma separated list of IP CIDRs>.
# To include the IP ranges 10.244.0.0/16 and 10.96.0.0/16 for outbound interception on the pod
kubectl annotate pod <pod> flomesh.io/outbound-ip-range-inclusion-list="10.244.0.0/16,10.96.0.0/16"
When IP ranges are annotated post pod creation, make sure to restart the corresponding pods for this change to take effect.
Outbound port exclusions
Outbound TCP based traffic from applications is by default intercepted using the iptables rules programmed by FSM, and redirected to the Pipy proxy sidecar. In some cases, it might be desirable to not subject certain ports to be redirected and routed by the Pipy proxy sidecar based on service mesh policies. A common use case to exclude ports is to not route non-application logic based traffic via the Pipy proxy, such as control plane traffic. In such scenarios, excluding certain ports from being subject to service mesh traffic routing policies becomes necessary.
Outbound ports can be excluded at a global mesh scope or per pod scope.
1. Global outbound port exclusions
FSM provides the means to specify a global list of ports to exclude from outbound traffic interception applicable to all pods in the mesh, as follows:
During FSM install using the --set option:
# To exclude the ports 6379 and 7070 from outbound sidecar interception
fsm install --set=fsm.outboundPortExclusionList="{6379,7070}"
By setting the outboundPortExclusionList field in the fsm-mesh-config resource:
## Assumes FSM is installed in the fsm-system namespace
kubectl patch meshconfig fsm-mesh-config -n fsm-system -p '{"spec":{"traffic":{"outboundPortExclusionList":[6379, 7070]}}}'  --type=merge
When ports are set for exclusion post-install, make sure to restart the pods in monitored namespaces for this change to take effect.
Globally excluded ports are are stored in the fsm-mesh-config MeshConfig custom resource and are read at the time of sidecar injection by fsm-injector. These dynamically configurable ports are programmed by the init container along with the static rules used to intercept and redirect traffic via the Pipy proxy sidecar. Excluded ports will not be intercepted for traffic redirection to the Pipy proxy sidecar.
2. Pod scoped outbound port exclusions
Outbound port exclusions can be configured at pod scope by annotating the pod with a comma separated list of ports as flomesh.io/outbound-port-exclusion-list=<comma separated list of ports>:
# To exclude the ports 6379 and 7070 from outbound interception on the pod
kubectl annotate pod <pod> flomesh.io/outbound-port-exclusion-list=6379,7070
When ports are annotated post pod creation, make sure to restart the corresponding pods for this change to take effect.
Inbound port exclusions
Similar to outbound port exclusions described above, inbound traffic on pods can be excluded from being proxied to the sidecar based on the ports the traffic is directed to.
1. Global inbound port exclusions
FSM provides the means to specify a global list of ports to exclude from inbound traffic interception applicable to all pods in the mesh, as follows:
During FSM install using the --set option:
# To exclude the ports 6379 and 7070 from inbound sidecar interception
fsm install --set=fsm.inboundPortExclusionList="[6379,7070]"
By setting the inboundPortExclusionList field in the fsm-mesh-config resource:
## Assumes FSM is installed in the fsm-system namespace
kubectl patch meshconfig fsm-mesh-config -n fsm-system -p '{"spec":{"traffic":{"inboundPortExclusionList":[6379, 7070]}}}'  --type=merge
When ports are set for exclusion post-install, make sure to restart the pods in monitored namespaces for this change to take effect.
2. Pod scoped inbound port exclusions
Inbound port exclusions can be configured at pod scope by annotating the pod with a comma separated list of ports as flomesh.io/inbound-port-exclusion-list=<comma separated list of ports>:
# To exclude the ports 6379 and 7070 from inbound sidecar interception on the pod
kubectl annotate pod <pod> flomesh.io/inbound-port-exclusion-list=6379,7070
When ports are annotated post pod creation, make sure to restart the corresponding pods for this change to take effect.
2 - eBPF Redirection
Using eBPF for traffic interception and communication.
FSM comes with eBPF functionality and provides users an options to use eBPF over default iptables.
The minimum kernel version is 5.4.
This guide shows how to start using this new functionality and enjoy the benefits eBPF. If you want to directly jump into quick start, refer to eBPF setup quickstart guide
For more details of comparison between iptables and eBPF, you can refer to Traffic Redirection.
Architecture
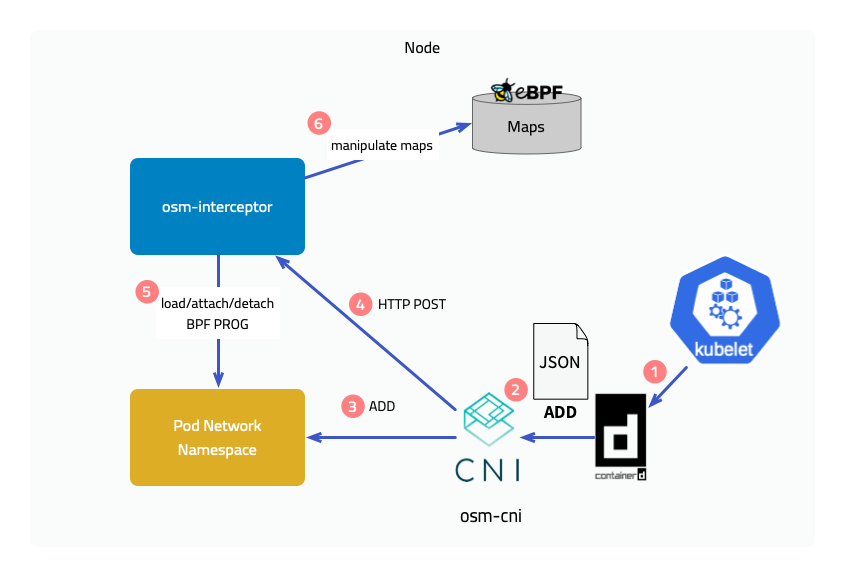
To provide eBPF features, Flomesh Service Mesh provides the fsm-cni CNI implementation and fsm-interceptor running on each node, where fsm-cni is compatible with mainstream CNI plugins.
When kubelet creates a pod on a node, it calls the CNI interface through the container runtime CRI to create the pod’s network namespace. After the pod’s network namespace is created, fsm-cni calls the interface of fsm-interceptor to load the BPF program and attach it to the hook point. In addition, fsm-interceptor also maintains pod information in eBPF Maps.
Implementation Principles
Next, we will introduce the implementation principles of the two features brought by the introduction of eBPF, but please note that many processing details will be ignored here.
Traffic interception
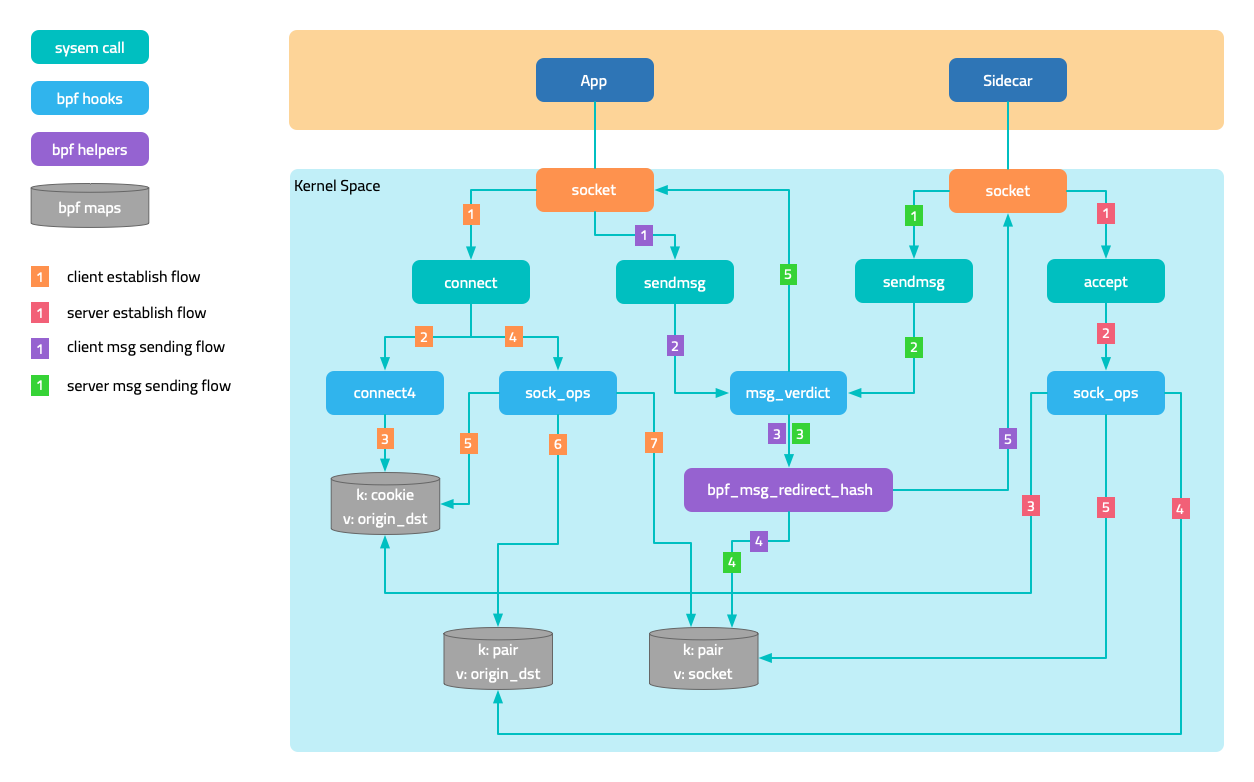
Outbound traffic
The figure below shows the interception of outbound traffic. Attach a BPF program to the socket operation connect, and in the program determine whether the current pod is managed by the service mesh, that is, whether it has a sidecar injected, and then modify the destination address to 127.0.0.1 and the destination port to the sidecar’s outbound port 15003. It is not enough to just modify it. The original destination address and port should also be saved in a map, using the socket’s cookie as the key.
After the connection with the sidecar is established, the original destination is saved in another map through a program attached to the mount point sock_ops, using local address + port and remote address + port as the key. When the sidecar accesses the target application later, it obtains the original destination through the getsockopt operation on the socket. Yes, a eBPF program is also attached to getsockopt, which retrieves the original destination address from the map and returns it.
Inbound traffic
For the interception of inbound traffic, the traffic originally intended for the application port is forwarded to the sidecar’s inbound port 15003. There are two cases:
- In the first case, the requester and the service are located on the same node. After the requester’s sidecar connect operation is intercepted, the destination port is changed to
15003. - In the second case, the requester and the service are located on different nodes. When the handshake packet reaches the service’s network namespace, it is intercepted by the BPF program attached to the tc (traffic control) ingress, and the port is modified to
15003, achieving a functionality similar to DNAT.
Network communication acceleration
In Kubernetes networks, network packets unavoidably undergo multiple kernel network protocol stack processing. eBPF accelerates network communication by bypassing unnecessary kernel network protocol stack processing and directly exchanging data between two sockets that are peers.
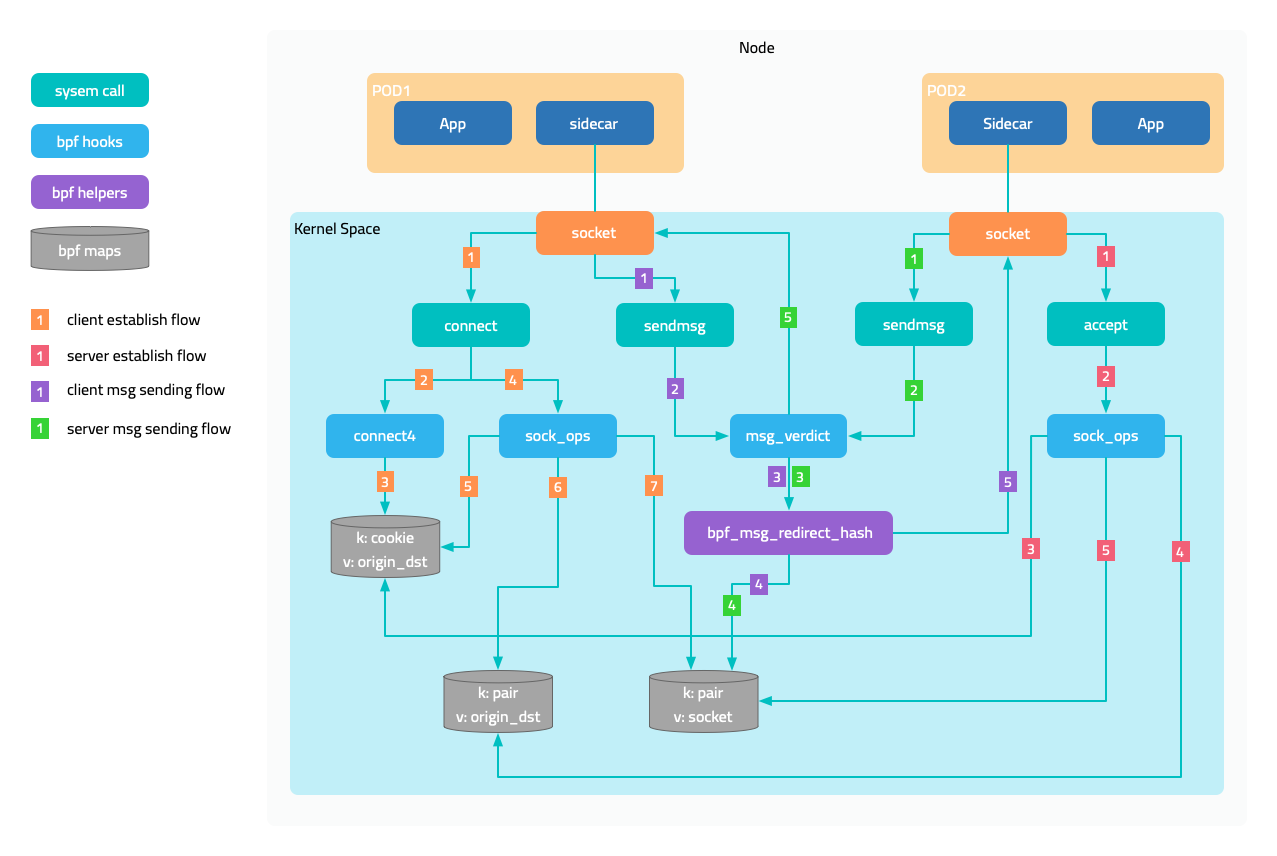
The figure in the traffic interception section shows the sending and receiving trajectories of messages. When the program attached to sock_ops discovers that the connection is successfully established, it saves the socket in a map, using local address + port and remote address + port as the key. As the two sockets are peers, their local and remote information is opposite, so when a socket sends a message, it can directly address the peer socket from the map.
This solution also applies to communication between two pods on the same node.
Prerequisites
- Ubuntu 20.04
- Kernel 5.15.0-1034
- 2c4g VM * 3:master、node1、node2
Install CNI Plugin
Execute the following command on all nodes to download the CNI plugin.
sudo mkdir -p /opt/cni/bin
curl -sSL https://github.com/containernetworking/plugins/releases/download/v1.1.1/cni-plugins-linux-amd64-v1.1.1.tgz | sudo tar -zxf - -C /opt/cni/bin
Master Node
Get the IP address of the master node. (Your machine IP might be different)
export MASTER_IP=10.0.2.6
Kubernetes cluster uses the k3s distribution, but when installing the cluster, you need to disable the flannel integrated by k3s and use independently installed flannel for validation. This is because k3s’s doesn’t follow Flannel directory structure /opt/cni/bin and store its CNI bin directory at /var/lib/rancher/k3s/data/xxx/bin where xxx is some randomly generated text.
curl -sfL https://get.k3s.io | sh -s - --disable traefik --disable servicelb --flannel-backend=none --advertise-address $MASTER_IP --write-kubeconfig-mode 644 --write-kubeconfig ~/.kube/config
Install Flannel. Note that the default Pod CIDR of Flannel is 10.244.0.0/16, and we will modify it to k3s’s default 10.42.0.0/16.
curl -s https://raw.githubusercontent.com/flannel-io/flannel/master/Documentation/kube-flannel.yml | sed 's|10.244.0.0/16|10.42.0.0/16|g' | kubectl apply -f -
Get the access token of the API server for initializing worker nodes.
sudo cat /var/lib/rancher/k3s/server/node-token
Worker Node
Use the IP address of the master node and the token obtained earlier to initialize the node.
export INSTALL_K3S_VERSION=v1.23.8+k3s2
export NODE_TOKEN=K107c1890ae060d191d347504740566f9c506b95ea908ba4795a7a82ea2c816e5dc::server:2757787ec4f9975ab46b5beadda446b7
curl -sfL https://get.k3s.io | K3S_URL=https://${MASTER_IP}:6443 K3S_TOKEN=${NODE_TOKEN} sh -
Download FSM CLI
system=$(uname -s | tr [:upper:] [:lower:])
arch=$(dpkg --print-architecture)
release=v1.3.3
curl -L https://github.com/flomesh-io/fsm/releases/download/${release}/fsm-${release}-${system}-${arch}.tar.gz | tar -vxzf -
./${system}-${arch}/fsm version
sudo cp ./${system}-${arch}/fsm /usr/local/bin/
Install FSM
export fsm_namespace=fsm-system
export fsm_mesh_name=fsm

fsm install \
    --mesh-name "$fsm_mesh_name" \
    --fsm-namespace "$fsm_namespace" \
    --set=fsm.trafficInterceptionMode=ebpf \
    --set=fsm.fsmInterceptor.debug=true \
    --timeout=900s
Deploy Sample Application
#Sample services
kubectl create namespace ebpf
fsm namespace add ebpf

kubectl apply -n ebpf -f https://raw.githubusercontent.com/flomesh-io/fsm-docs/main/manifests/samples/interceptor/curl.yaml
kubectl apply -n ebpf -f https://raw.githubusercontent.com/flomesh-io/fsm-docs/main/manifests/samples/interceptor/pipy-ok.yaml

#Schedule Pods to Different Nodes
kubectl patch deployments curl -n ebpf -p '{"spec":{"template":{"spec":{"nodeName":"node1"}}}}'
kubectl patch deployments pipy-ok-v1 -n ebpf -p '{"spec":{"template":{"spec":{"nodeName":"node1"}}}}'
kubectl patch deployments pipy-ok-v2 -n ebpf -p '{"spec":{"template":{"spec":{"nodeName":"node2"}}}}'

sleep 5

#Wait for dependent Pods to start successfully
kubectl wait --for=condition=ready pod -n ebpf -l app=curl --timeout=180s
kubectl wait --for=condition=ready pod -n ebpf -l app=pipy-ok -l version=v1 --timeout=180s
kubectl wait --for=condition=ready pod -n ebpf -l app=pipy-ok -l version=v2 --timeout=180s
Testing
During testing, you can view the debug logs of BPF program execution by viewing the kernel tracing logs on the worker node using the following command. To avoid interference caused by sidecar communication with the control plane, first obtain the IP address of the control plane.
kubectl get svc -n fsm-system fsm-controller -o jsonpath='{.spec.clusterIP}'
10.43.241.189
Execute the following command on both worker nodes.
sudo cat /sys/kernel/debug/tracing/trace_pipe | grep bpf_trace_printk | grep -v '10.43.241.189'
Execute the following command on both worker nodes.
curl_client="$(kubectl get pod -n ebpf -l app=curl -o jsonpath='{.items[0].metadata.name}')"
kubectl exec ${curl_client} -n ebpf -c curl -- curl -s pipy-ok:8080
You should receive results similar to the following, and the kernel tracing logs should also output the debug logs of the BPF program accordingly (the content is quite long, so it will not be shown here).
Hi, I am pipy ok v1 !
Hi, I am pipy ok v2 !