This is the multi-page printable view of this section. Click here to print.
Traffic Management
- 1: Permissive Mode
- 2: Traffic Redirection
- 2.1: Iptables Redirection
- 2.2: eBPF Redirection
- 3: Traffic Splitting
- 4: Circuit Breaking
- 5: Retry
- 6: Rate Limiting
- 7: Ingress
- 7.1: Ingress to Mesh
- 7.2: Service Loadbalancer
- 7.3: FSM Ingress Controller
- 7.3.1: Installation
- 7.3.2: Basics
- 7.3.3: Advanced TLS
- 7.3.4: TLS Passthrough
- 7.4: FSM Gateway
- 7.4.1: Installation
- 7.4.2: HTTP Routing
- 7.4.3: HTTP URL Rewrite
- 7.4.4: HTTP Redirect
- 7.4.5: HTTP Request Header Manipulate
- 7.4.6: HTTP Response Header Manipulate
- 7.4.7: TCP Routing
- 7.4.8: TLS Termination
- 7.4.9: TLS Passthrough
- 7.4.10: gRPC Routing
- 7.4.11: UDP Routing
- 7.4.12: Fault Injection
- 7.4.13: Access Control
- 7.4.14: Rate Limit
- 7.4.15: Retry
- 7.4.16: Session Sticky
- 7.4.17: Health Check
- 7.4.18: Loadbalancing Algorithm
- 7.4.19: Upstream TLS
- 7.4.20: Gateway mTLS
- 7.4.21: Traffic Mirroring
- 8: Egress
- 8.1: Egress
- 8.2: Egress Gateway
- 9: Multi-cluster services
1 - Permissive Mode
Permissive traffic policy mode in FSM is a mode where SMI traffic access policy enforcement is bypassed. In this mode, FSM automatically discovers services that are a part of the service mesh and programs traffic policy rules on each Pipy proxy sidecar to be able to communicate with these services.
When to use permissive traffic policy mode
Since permissive traffic policy mode bypasses SMI traffic access policy enforcement, it is suitable for use when connectivity between applications within the service mesh should flow as before the applications were enrolled into the mesh. This mode is suitable in environments where explicitly defining traffic access policies for connectivity between applications is not feasible.
A common use case to enable permissive traffic policy mode is to support gradual onboarding of applications into the mesh without breaking application connectivity. Traffic routing between application services is automatically set up by FSM controller through service discovery. Wildcard traffic policies are set up on each Pipy proxy sidecar to allow traffic flow to services within the mesh.
The alternative to permissive traffic policy mode is SMI traffic policy mode, where traffic between applications is denied by default and explicit SMI traffic policies are necessary to allow application connectivity. When policy enforcement is necessary, SMI traffic policy mode must be used instead.
Configuring permissive traffic policy mode
Permissive traffic policy mode can be enabled or disabled at the time of FSM install, or after FSM has been installed.
Enabling permissive traffic policy mode
Enabling permissive traffic policy mode implicitly disables SMI traffic policy mode.
During FSM install using the --set flag:
fsm install --set fsm.enablePermissiveTrafficPolicy=true
After FSM has been installed:
# Assumes FSM is installed in the fsm-system namespace
kubectl patch meshconfig fsm-mesh-config -n fsm-system -p '{"spec":{"traffic":{"enablePermissiveTrafficPolicyMode":true}}}'  --type=merge
Disabling permissive traffic policy mode
Disabling permissive traffic policy mode implicitly enables SMI traffic policy mode.
During FSM install using the --set flag:
fsm install --set fsm.enablePermissiveTrafficPolicy=false
After FSM has been installed:
# Assumes FSM is installed in the fsm-system namespace
kubectl patch meshconfig fsm-mesh-config -n fsm-system -p '{"spec":{"traffic":{"enablePermissiveTrafficPolicyMode":false}}}'  --type=merge
How it works
When permissive traffic policy mode is enabled, FSM controller discovers all services that are a part of the mesh and programs wildcard traffic routing rules on each Pipy proxy sidecar to reach every other service in the mesh. Additionally, each proxy fronting workloads that are associated with a service is configured to accept all traffic destined to the service. Depending on the application protocol of the service (HTTP, TCP, gRPC etc.), appropriate traffic routing rules are configured on the Pipy sidecar to allow all traffic for that particular type.
Refer to the Permissive traffic policy mode demo to learn more.
Pipy configurations
In permissive mode, FSM controller programs wildcard routes for client applications to communicate with services. Following are the Pipy inbound and outbound filter and route configuration snippets from the curl and httpbin sidecar proxies.
Outbound Pipy configuration on the
curlclient pod:Outbound HTTP filter chain corresponding to the
httpbinservice:{ "Outbound": { "TrafficMatches": { "14001": [ { "DestinationIPRanges": [ "10.43.103.59/32" ], "Port": 14001, "Protocol": "http", "HttpHostPort2Service": { "httpbin": "httpbin.app.svc.cluster.local", "httpbin.app": "httpbin.app.svc.cluster.local", "httpbin.app.svc": "httpbin.app.svc.cluster.local", "httpbin.app.svc.cluster": "httpbin.app.svc.cluster.local", "httpbin.app.svc.cluster.local": "httpbin.app.svc.cluster.local", "httpbin.app.svc.cluster.local:14001": "httpbin.app.svc.cluster.local", "httpbin.app.svc.cluster:14001": "httpbin.app.svc.cluster.local", "httpbin.app.svc:14001": "httpbin.app.svc.cluster.local", "httpbin.app:14001": "httpbin.app.svc.cluster.local", "httpbin:14001": "httpbin.app.svc.cluster.local" }, "HttpServiceRouteRules": { "httpbin.app.svc.cluster.local": { ".*": { "Headers": null, "Methods": null, "TargetClusters": { "app/httpbin|14001": 100 }, "AllowedServices": null } } }, "TargetClusters": null, "AllowedEgressTraffic": false, "ServiceIdentity": "default.app.cluster.local" } ] } } }Outbound route configuration:
"HttpServiceRouteRules": {
        "httpbin.app.svc.cluster.local": {
          ".*": {
            "Headers": null,
            "Methods": null,
            "TargetClusters": {
              "app/httpbin|14001": 100
            },
            "AllowedServices": null
          }
        }
      }
Inbound Pipy configuration on the
httpbinservice pod:Inbound HTTP filter chain corresponding to the
httpbinservice:{ "Inbound": { "TrafficMatches": { "14001": { "SourceIPRanges": null, "Port": 14001, "Protocol": "http", "HttpHostPort2Service": { "httpbin": "httpbin.app.svc.cluster.local", "httpbin.app": "httpbin.app.svc.cluster.local", "httpbin.app.svc": "httpbin.app.svc.cluster.local", "httpbin.app.svc.cluster": "httpbin.app.svc.cluster.local", "httpbin.app.svc.cluster.local": "httpbin.app.svc.cluster.local", "httpbin.app.svc.cluster.local:14001": "httpbin.app.svc.cluster.local", "httpbin.app.svc.cluster:14001": "httpbin.app.svc.cluster.local", "httpbin.app.svc:14001": "httpbin.app.svc.cluster.local", "httpbin.app:14001": "httpbin.app.svc.cluster.local", "httpbin:14001": "httpbin.app.svc.cluster.local" }, "HttpServiceRouteRules": { "httpbin.app.svc.cluster.local": { ".*": { "Headers": null, "Methods": null, "TargetClusters": { "app/httpbin|14001|local": 100 }, "AllowedServices": null } } }, "TargetClusters": null, "AllowedEndpoints": null } } } }Inbound route configuration:
"HttpServiceRouteRules": {
  "httpbin.app.svc.cluster.local": {
    ".*": {
      "Headers": null,
      "Methods": null,
      "TargetClusters": {
        "app/httpbin|14001|local": 100
      },
      "AllowedServices": null
    }
  }
}
2 - Traffic Redirection
iptables is a traffic interception tool based on the Linux kernel. It can control traffic by filtering rules. Its advantages include:
- Universality: The iptables tool has been widely used in Linux operating systems, so most Linux users are familiar with its usage.
- Stability: iptables has long been part of the Linux kernel, so it has a high degree of stability.
- Flexibility: iptables can be flexibly configured according to needs to control network traffic.
However, iptables also has some disadvantages:
- Difficult to debug: Due to the complexity of the iptables tool itself, it is relatively difficult to debug.
- Performance issues: Unpredictable latency and reduced performance as the number of services grows.
- Issues with handling complex traffic: When it comes to handling complex traffic, iptables may not be suitable because its rule processing is not flexible enough.
eBPF is an advanced traffic interception tool that can intercept and analyze traffic in the Linux kernel through custom programs. The advantages of eBPF include:
- Flexibility: eBPF can use custom programs to intercept and analyze traffic, so it has higher flexibility.
- Scalability: eBPF can dynamically load and unload programs, so it has higher scalability.
- Efficiency: eBPF can perform processing in the kernel space, so it has higher performance.
However, eBPF also has some disadvantages:
- Higher learning curve: eBPF is relatively new compared to iptables, so it requires some learning costs.
- Complexity: Developing custom eBPF programs may be more complex.
Overall, iptables is more suitable for simple traffic filtering and management, while eBPF is more suitable for complex traffic interception and analysis scenarios that require higher flexibility and performance.
2.1 - Iptables Redirection
FSM leverages iptables to intercept and redirect traffic to and from pods participating in the service mesh to the Pipy proxy sidecar container running on each pod. Traffic redirected to the Pipy proxy sidecar is filtered and routed based on service mesh traffic policies.
For more details of comparison between iptables and eBPF, you can refer to Traffic Redirection.
How it works
FSM sidecar injector service fsm-injector injects an Pipy proxy sidecar on every pod created within the service mesh. Along with the Pipy proxy sidecar, fsm-injector also injects an init container, a specialized container that runs before any application containers in a pod. The injected init container is responsible for bootstrapping the application pods with traffic redirection rules such that all outbound TCP traffic from a pod and all inbound traffic TCP traffic to a pod are redirected to the pipy proxy sidecar running on that pod. This redirection is set up by the init container by running a set of iptables commands.
Ports reserved for traffic redirection
FSM reserves a set of port numbers to perform traffic redirection and provide admin access to the Pipy proxy sidecar. It is essential to note that these port numbers must not be used by application containers running in the mesh. Using any of these reserved port numbers will lead to the Pipy proxy sidecar not functioning correctly.
Following are the port numbers that are reserved for use by FSM:
15000: used by the Pipy admin interface exposed overlocalhostto return current configuration files.15001: used by the Pipy outbound listener to accept and proxy outbound traffic sent by applications within the pod15003: used by the Pipy inbound listener to accept and proxy inbound traffic entering the pod destined to applications within the pod15010: used by the Pipy inbound Prometheus listener to accept and proxy inbound traffic pertaining to scraping Pipy’s Prometheus metrics15901: used by Pipy to serve rewritten HTTP liveness probes15902: used by Pipy to serve rewritten HTTP readiness probes15903: used by Pipy to serve rewritten HTTP startup probes
The following are the port numbers that are reserved for use by FSM and allow traffic to bypass Pipy:
15904: used byfsm-healthcheckto servetcpSockethealth probes rewritten tohttpGethealth probes
Application User ID (UID) reserved for traffic redirection
FSM reserves the user ID (UID) value 1500 for the Pipy proxy sidecar container. This user ID is of utmost importance while performing traffic interception and redirection to ensure the redirection does not result in a loop. The user ID value 1500 is used to program redirection rules to ensure redirected traffic from Pipy is not redirected back to itself!
Application containers must not used the reserved user ID value of 1500.
Types of traffic intercepted
Currently, FSM programs the Pipy proxy sidecar on each pod to only intercept inbound and outbound TCP traffic. This includes raw TCP traffic and any application traffic that uses TCP as the underlying transport protocol, such as HTTP, gRPC etc. This implies UDP and ICMP traffic which can be intercepted by iptables are not intercepted and redirected to the Pipy proxy sidecar.
Iptables chains and rules
FSM’s fsm-injector service programs the init container to set up a set of iptables chains and rules to perform traffic interception and redirection. The following section provides details on the responsibility of these chains and rules.
FSM leverages four chains to perform traffic interception and redirection:
PROXY_INBOUND: chain to intercept inbound traffic entering the podPROXY_IN_REDIRECT: chain to redirect intercepted inbound traffic to the sidecar proxy’s inbound listenerPROXY_OUTPUT: chain to intercept outbound traffic from applications within the podPROXY_REDIRECT: chain to redirect intercepted outbound traffic to the sidecar proxy’s outbound listener
Each of the chains above are programmed with rules to intercept and redirect application traffic via the Pipy proxy sidecar.
Outbound IP range exclusions
Outbound TCP based traffic from applications is by default intercepted using the iptables rules programmed by FSM, and redirected to the Pipy proxy sidecar. In some cases, it might be desirable to not subject certain IP ranges to be redirected and routed by the Pipy proxy sidecar based on service mesh policies. A common use case to exclude IP ranges is to not route non-application logic based traffic via the Pipy proxy, such as traffic destined to the Kubernetes API server, or traffic destined to a cloud provider’s instance metadata service. In such scenarios, excluding certain IP ranges from being subject to service mesh traffic routing policies becomes necessary.
Outbound IP ranges can be excluded at a global mesh scope or per pod scope.
1. Global outbound IP range exclusions
FSM provides the means to specify a global list of IP ranges to exclude from outbound traffic interception applicable to all pods in the mesh, as follows:
During FSM install using the
--setoption:# To exclude the IP ranges 1.1.1.1/32 and 2.2.2.2/24 from outbound interception fsm install --set=fsm.outboundIPRangeExclusionList="{1.1.1.1/32,2.2.2.2/24}"By setting the
outboundIPRangeExclusionListfield in thefsm-mesh-configresource:## Assumes FSM is installed in the fsm-system namespace kubectl patch meshconfig fsm-mesh-config -n fsm-system -p '{"spec":{"traffic":{"outboundIPRangeExclusionList":["1.1.1.1/32", "2.2.2.2/24"]}}}' --type=mergeWhen IP ranges are set for exclusion post-install, make sure to restart the pods in monitored namespaces for this change to take effect.
Globally excluded IP ranges are stored in the fsm-mesh-config MeshConfig custom resource and are read at the time of sidecar injection by fsm-injector. These dynamically configurable IP ranges are programmed by the init container along with the static rules used to intercept and redirect traffic via the Pipy proxy sidecar. Excluded IP ranges will not be intercepted for traffic redirection to the Pipy proxy sidecar. Refer to the outbound IP range exclusion demo to learn more.
2. Pod scoped outbound IP range exclusions
Outbound IP range exclusions can be configured at pod scope by annotating the pod to specify a comma separated list of IP CIDR ranges as flomesh.io/outbound-ip-range-exclusion-list=<comma separated list of IP CIDRs>.
# To exclude the IP ranges 10.244.0.0/16 and 10.96.0.0/16 from outbound interception on the pod
kubectl annotate pod <pod> flomesh.io/outbound-ip-range-exclusion-list="10.244.0.0/16,10.96.0.0/16"
When IP ranges are annotated post pod creation, make sure to restart the corresponding pods for this change to take effect.
Outbound IP range inclusions
Outbound TCP based traffic from applications is by default intercepted using the iptables rules programmed by FSM, and redirected to the Pipy proxy sidecar. In some cases, it might be desirable to only subject certain IP ranges to be redirected and routed by the Pipy proxy sidecar based on service mesh policies, and have remaining traffic not proxied to the sidecar. In such scenarios, inclusion IP ranges can be specified.
Outbound inclusion IP ranges can be specified at a global mesh scope or per pod scope.
1. Global outbound IP range inclusions
FSM provides the means to specify a global list of IP ranges to include for outbound traffic interception applicable to all pods in the mesh, as follows:
During FSM install using the
--setoption:# To include the IP ranges 1.1.1.1/32 and 2.2.2.2/24 for outbound interception fsm install --set=fsm.outboundIPRangeInclusionList="[1.1.1.1/32,2.2.2.2/24]"By setting the
outboundIPRangeInclusionListfield in thefsm-mesh-configresource:## Assumes FSM is installed in the fsm-system namespace kubectl patch meshconfig fsm-mesh-config -n fsm-system -p '{"spec":{"traffic":{"outboundIPRangeInclusionList":["1.1.1.1/32", "2.2.2.2/24"]}}}' --type=mergeWhen IP ranges are set for inclusion post-install, make sure to restart the pods in monitored namespaces for this change to take effect.
Globally included IP ranges are stored in the fsm-mesh-config MeshConfig custom resource and are read at the time of sidecar injection by fsm-injector. These dynamically configurable IP ranges are programmed by the init container along with the static rules used to intercept and redirect traffic via the Pipy proxy sidecar. IP addresses outside the specified inclusion IP ranges will not be intercepted for traffic redirection to the Pipy proxy sidecar.
2. Pod scoped outbound IP range inclusions
Outbound IP range inclusions can be configured at pod scope by annotating the pod to specify a comma separated list of IP CIDR ranges as flomesh.io/outbound-ip-range-inclusion-list=<comma separated list of IP CIDRs>.
# To include the IP ranges 10.244.0.0/16 and 10.96.0.0/16 for outbound interception on the pod
kubectl annotate pod <pod> flomesh.io/outbound-ip-range-inclusion-list="10.244.0.0/16,10.96.0.0/16"
When IP ranges are annotated post pod creation, make sure to restart the corresponding pods for this change to take effect.
Outbound port exclusions
Outbound TCP based traffic from applications is by default intercepted using the iptables rules programmed by FSM, and redirected to the Pipy proxy sidecar. In some cases, it might be desirable to not subject certain ports to be redirected and routed by the Pipy proxy sidecar based on service mesh policies. A common use case to exclude ports is to not route non-application logic based traffic via the Pipy proxy, such as control plane traffic. In such scenarios, excluding certain ports from being subject to service mesh traffic routing policies becomes necessary.
Outbound ports can be excluded at a global mesh scope or per pod scope.
1. Global outbound port exclusions
FSM provides the means to specify a global list of ports to exclude from outbound traffic interception applicable to all pods in the mesh, as follows:
During FSM install using the
--setoption:# To exclude the ports 6379 and 7070 from outbound sidecar interception fsm install --set=fsm.outboundPortExclusionList="{6379,7070}"By setting the
outboundPortExclusionListfield in thefsm-mesh-configresource:## Assumes FSM is installed in the fsm-system namespace kubectl patch meshconfig fsm-mesh-config -n fsm-system -p '{"spec":{"traffic":{"outboundPortExclusionList":[6379, 7070]}}}' --type=mergeWhen ports are set for exclusion post-install, make sure to restart the pods in monitored namespaces for this change to take effect.
Globally excluded ports are are stored in the fsm-mesh-config MeshConfig custom resource and are read at the time of sidecar injection by fsm-injector. These dynamically configurable ports are programmed by the init container along with the static rules used to intercept and redirect traffic via the Pipy proxy sidecar. Excluded ports will not be intercepted for traffic redirection to the Pipy proxy sidecar.
2. Pod scoped outbound port exclusions
Outbound port exclusions can be configured at pod scope by annotating the pod with a comma separated list of ports as flomesh.io/outbound-port-exclusion-list=<comma separated list of ports>:
# To exclude the ports 6379 and 7070 from outbound interception on the pod
kubectl annotate pod <pod> flomesh.io/outbound-port-exclusion-list=6379,7070
When ports are annotated post pod creation, make sure to restart the corresponding pods for this change to take effect.
Inbound port exclusions
Similar to outbound port exclusions described above, inbound traffic on pods can be excluded from being proxied to the sidecar based on the ports the traffic is directed to.
1. Global inbound port exclusions
FSM provides the means to specify a global list of ports to exclude from inbound traffic interception applicable to all pods in the mesh, as follows:
During FSM install using the
--setoption:# To exclude the ports 6379 and 7070 from inbound sidecar interception fsm install --set=fsm.inboundPortExclusionList="[6379,7070]"By setting the
inboundPortExclusionListfield in thefsm-mesh-configresource:## Assumes FSM is installed in the fsm-system namespace kubectl patch meshconfig fsm-mesh-config -n fsm-system -p '{"spec":{"traffic":{"inboundPortExclusionList":[6379, 7070]}}}' --type=mergeWhen ports are set for exclusion post-install, make sure to restart the pods in monitored namespaces for this change to take effect.
2. Pod scoped inbound port exclusions
Inbound port exclusions can be configured at pod scope by annotating the pod with a comma separated list of ports as flomesh.io/inbound-port-exclusion-list=<comma separated list of ports>:
# To exclude the ports 6379 and 7070 from inbound sidecar interception on the pod
kubectl annotate pod <pod> flomesh.io/inbound-port-exclusion-list=6379,7070
When ports are annotated post pod creation, make sure to restart the corresponding pods for this change to take effect.
2.2 - eBPF Redirection
FSM comes with eBPF functionality and provides users an options to use eBPF over default iptables.
The minimum kernel version is 5.4.
This guide shows how to start using this new functionality and enjoy the benefits eBPF. If you want to directly jump into quick start, refer to eBPF setup quickstart guide
For more details of comparison between iptables and eBPF, you can refer to Traffic Redirection.
Architecture
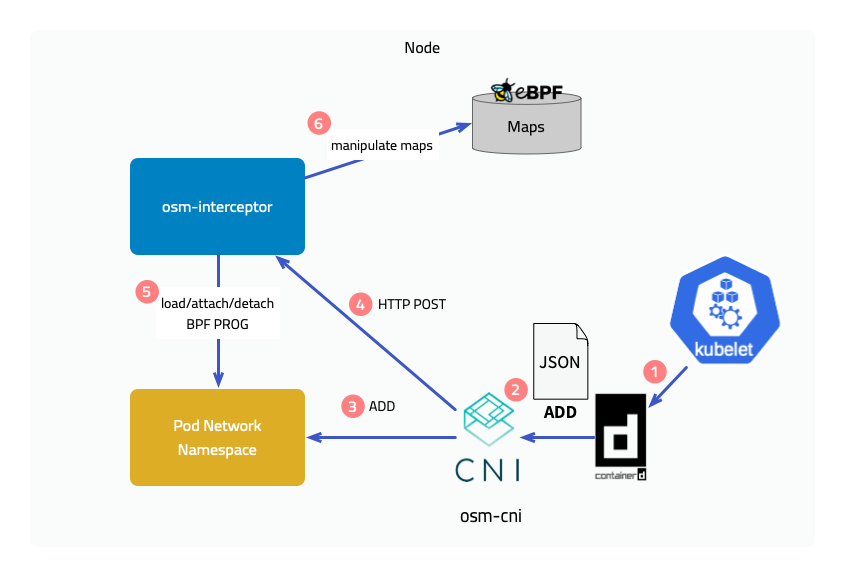
To provide eBPF features, Flomesh Service Mesh provides the fsm-cni CNI implementation and fsm-interceptor running on each node, where fsm-cni is compatible with mainstream CNI plugins.
When kubelet creates a pod on a node, it calls the CNI interface through the container runtime CRI to create the pod’s network namespace. After the pod’s network namespace is created, fsm-cni calls the interface of fsm-interceptor to load the BPF program and attach it to the hook point. In addition, fsm-interceptor also maintains pod information in eBPF Maps.
Implementation Principles
Next, we will introduce the implementation principles of the two features brought by the introduction of eBPF, but please note that many processing details will be ignored here.
Traffic interception
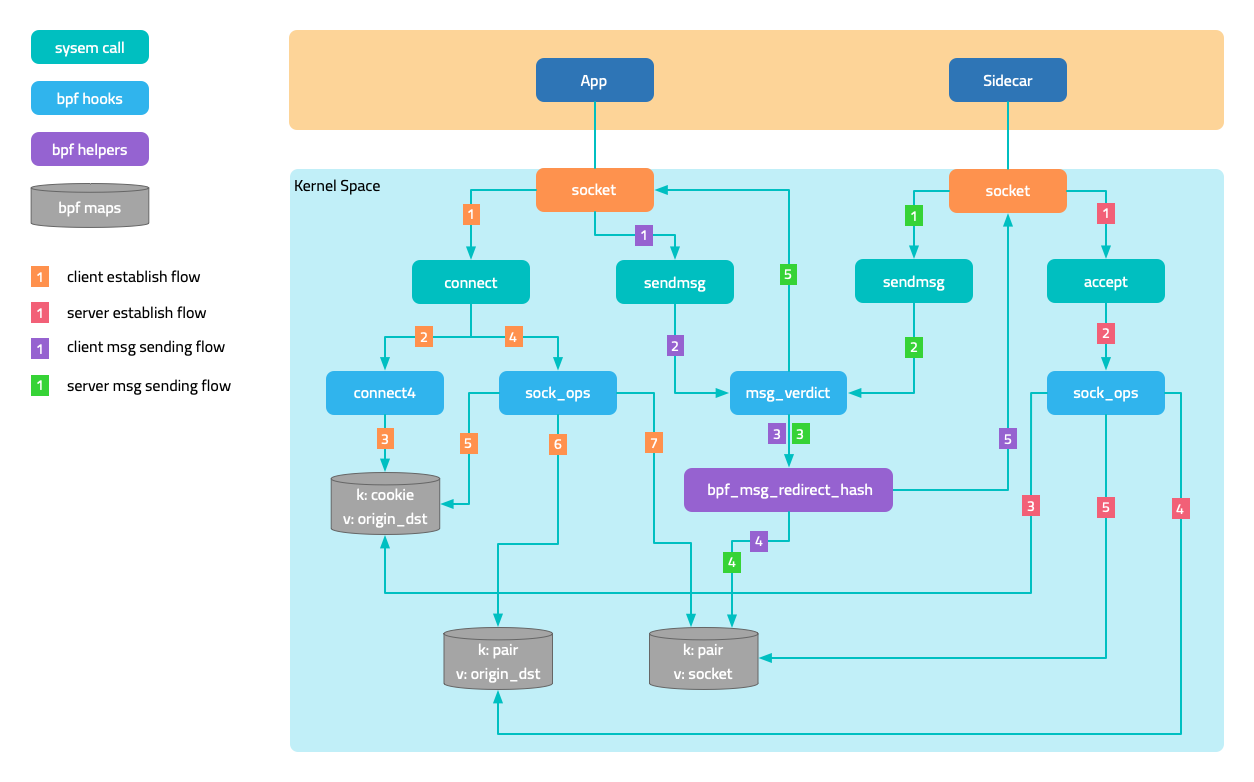
Outbound traffic
The figure below shows the interception of outbound traffic. Attach a BPF program to the socket operation connect, and in the program determine whether the current pod is managed by the service mesh, that is, whether it has a sidecar injected, and then modify the destination address to 127.0.0.1 and the destination port to the sidecar’s outbound port 15003. It is not enough to just modify it. The original destination address and port should also be saved in a map, using the socket’s cookie as the key.
After the connection with the sidecar is established, the original destination is saved in another map through a program attached to the mount point sock_ops, using local address + port and remote address + port as the key. When the sidecar accesses the target application later, it obtains the original destination through the getsockopt operation on the socket. Yes, a eBPF program is also attached to getsockopt, which retrieves the original destination address from the map and returns it.
Inbound traffic
For the interception of inbound traffic, the traffic originally intended for the application port is forwarded to the sidecar’s inbound port 15003. There are two cases:
- In the first case, the requester and the service are located on the same node. After the requester’s sidecar connect operation is intercepted, the destination port is changed to
15003. - In the second case, the requester and the service are located on different nodes. When the handshake packet reaches the service’s network namespace, it is intercepted by the BPF program attached to the tc (traffic control) ingress, and the port is modified to
15003, achieving a functionality similar to DNAT.
Network communication acceleration
In Kubernetes networks, network packets unavoidably undergo multiple kernel network protocol stack processing. eBPF accelerates network communication by bypassing unnecessary kernel network protocol stack processing and directly exchanging data between two sockets that are peers.
The figure in the traffic interception section shows the sending and receiving trajectories of messages. When the program attached to sock_ops discovers that the connection is successfully established, it saves the socket in a map, using local address + port and remote address + port as the key. As the two sockets are peers, their local and remote information is opposite, so when a socket sends a message, it can directly address the peer socket from the map.
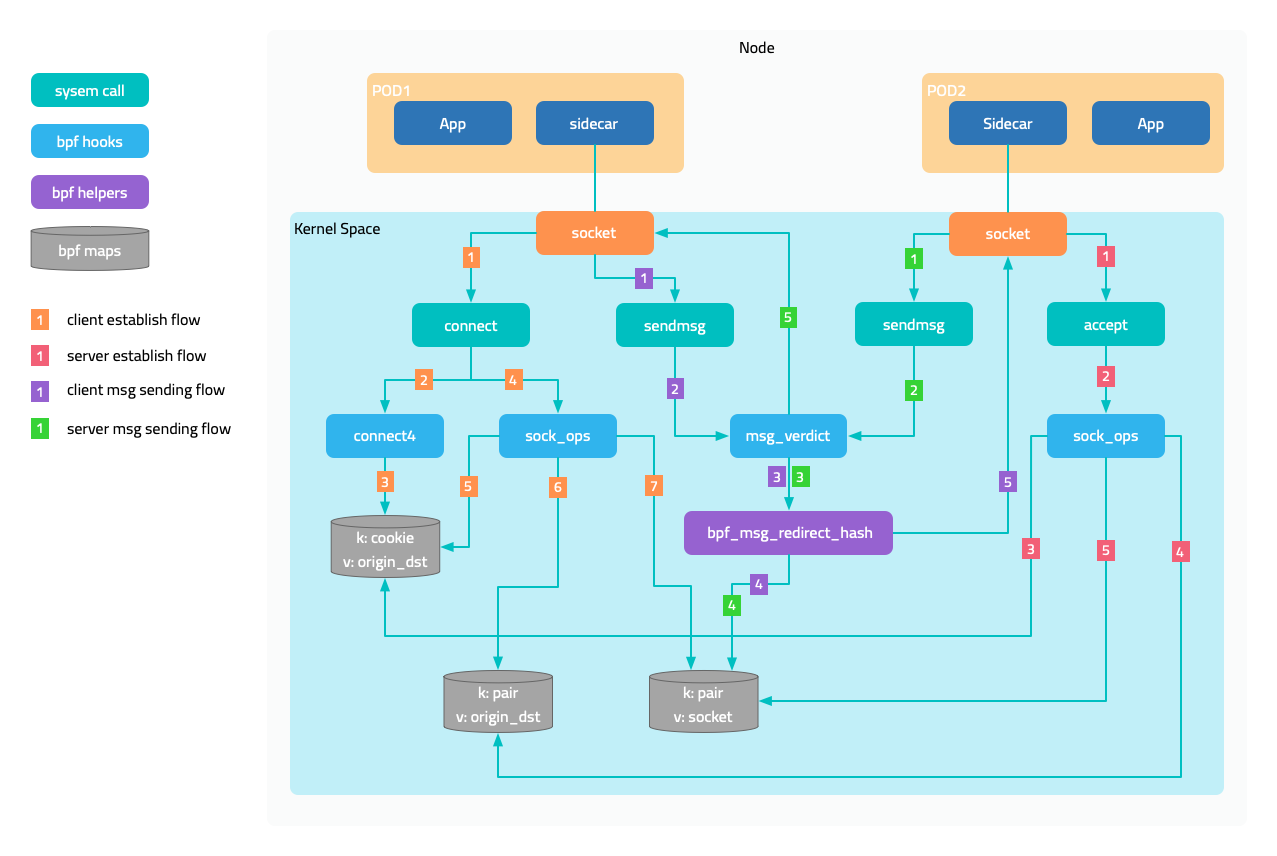
This solution also applies to communication between two pods on the same node.
Prerequisites
- Ubuntu 20.04
- Kernel 5.15.0-1034
- 2c4g VM * 3:master、node1、node2
Install CNI Plugin
Execute the following command on all nodes to download the CNI plugin.
sudo mkdir -p /opt/cni/bin
curl -sSL https://github.com/containernetworking/plugins/releases/download/v1.1.1/cni-plugins-linux-amd64-v1.1.1.tgz | sudo tar -zxf - -C /opt/cni/bin
Master Node
Get the IP address of the master node. (Your machine IP might be different)
export MASTER_IP=10.0.2.6
Kubernetes cluster uses the k3s distribution, but when installing the cluster, you need to disable the flannel integrated by k3s and use independently installed flannel for validation. This is because k3s’s doesn’t follow Flannel directory structure /opt/cni/bin and store its CNI bin directory at /var/lib/rancher/k3s/data/xxx/bin where xxx is some randomly generated text.
curl -sfL https://get.k3s.io | sh -s - --disable traefik --disable servicelb --flannel-backend=none --advertise-address $MASTER_IP --write-kubeconfig-mode 644 --write-kubeconfig ~/.kube/config
Install Flannel. Note that the default Pod CIDR of Flannel is 10.244.0.0/16, and we will modify it to k3s’s default 10.42.0.0/16.
curl -s https://raw.githubusercontent.com/flannel-io/flannel/master/Documentation/kube-flannel.yml | sed 's|10.244.0.0/16|10.42.0.0/16|g' | kubectl apply -f -
Get the access token of the API server for initializing worker nodes.
sudo cat /var/lib/rancher/k3s/server/node-token
Worker Node
Use the IP address of the master node and the token obtained earlier to initialize the node.
export INSTALL_K3S_VERSION=v1.23.8+k3s2
export NODE_TOKEN=K107c1890ae060d191d347504740566f9c506b95ea908ba4795a7a82ea2c816e5dc::server:2757787ec4f9975ab46b5beadda446b7
curl -sfL https://get.k3s.io | K3S_URL=https://${MASTER_IP}:6443 K3S_TOKEN=${NODE_TOKEN} sh -
Download FSM CLI
system=$(uname -s | tr [:upper:] [:lower:])
arch=$(dpkg --print-architecture)
release=v1.3.3
curl -L https://github.com/flomesh-io/fsm/releases/download/${release}/fsm-${release}-${system}-${arch}.tar.gz | tar -vxzf -
./${system}-${arch}/fsm version
sudo cp ./${system}-${arch}/fsm /usr/local/bin/
Install FSM
export fsm_namespace=fsm-system
export fsm_mesh_name=fsm

fsm install \
    --mesh-name "$fsm_mesh_name" \
    --fsm-namespace "$fsm_namespace" \
    --set=fsm.trafficInterceptionMode=ebpf \
    --set=fsm.fsmInterceptor.debug=true \
    --timeout=900s
Deploy Sample Application
#Sample services
kubectl create namespace ebpf
fsm namespace add ebpf

kubectl apply -n ebpf -f https://raw.githubusercontent.com/flomesh-io/fsm-docs/main/manifests/samples/interceptor/curl.yaml
kubectl apply -n ebpf -f https://raw.githubusercontent.com/flomesh-io/fsm-docs/main/manifests/samples/interceptor/pipy-ok.yaml

#Schedule Pods to Different Nodes
kubectl patch deployments curl -n ebpf -p '{"spec":{"template":{"spec":{"nodeName":"node1"}}}}'
kubectl patch deployments pipy-ok-v1 -n ebpf -p '{"spec":{"template":{"spec":{"nodeName":"node1"}}}}'
kubectl patch deployments pipy-ok-v2 -n ebpf -p '{"spec":{"template":{"spec":{"nodeName":"node2"}}}}'

sleep 5

#Wait for dependent Pods to start successfully
kubectl wait --for=condition=ready pod -n ebpf -l app=curl --timeout=180s
kubectl wait --for=condition=ready pod -n ebpf -l app=pipy-ok -l version=v1 --timeout=180s
kubectl wait --for=condition=ready pod -n ebpf -l app=pipy-ok -l version=v2 --timeout=180s
Testing
During testing, you can view the debug logs of BPF program execution by viewing the kernel tracing logs on the worker node using the following command. To avoid interference caused by sidecar communication with the control plane, first obtain the IP address of the control plane.
kubectl get svc -n fsm-system fsm-controller -o jsonpath='{.spec.clusterIP}'
10.43.241.189
Execute the following command on both worker nodes.
sudo cat /sys/kernel/debug/tracing/trace_pipe | grep bpf_trace_printk | grep -v '10.43.241.189'
Execute the following command on both worker nodes.
curl_client="$(kubectl get pod -n ebpf -l app=curl -o jsonpath='{.items[0].metadata.name}')"
kubectl exec ${curl_client} -n ebpf -c curl -- curl -s pipy-ok:8080
You should receive results similar to the following, and the kernel tracing logs should also output the debug logs of the BPF program accordingly (the content is quite long, so it will not be shown here).
Hi, I am pipy ok v1 !
Hi, I am pipy ok v2 !
3 - Traffic Splitting
The SMI Traffic Split API can be used to split outgoing traffic to multiple service backends. This can be used to orchestrate canary releases for multiple versions of the software.
What is supported
FSM implements the SMI traffic split v1alpha4 version.
It supports the following:
- Traffic splitting in both SMI and Permissive traffic policy modes
- HTTP and TCP traffic splitting
- Traffic splitting for canary or blue-green deployments
How it works
Outbound traffic destined to a Kubernetes service can be split to multiple service backends using the SMI Traffic Split API. Consider the following example where traffic to the bookstore.default.svc.cluster.local FQDN corresponding to the default/bookstore service is split to services default/bookstore-v1 and default/bookstore-v2, with a weight of 90 and 10 respectively.
apiVersion: split.smi-spec.io/v1alpha4
kind: TrafficSplit
metadata:
  name: bookstore-split
  namespace: default
spec:
  service: bookstore.default.svc.cluster.local
  backends:
  - service: bookstore-v1
    weight: 90
  - service: bookstore-v2
    weight: 10
For a TrafficSplit resource to be correctly configured, it is important to ensure the following conditions are met:
metadata.namespaceis a namespace added to the meshmetadata.namespace,spec.service, andspec.backendsall belong to the same namespacespec.servicespecifies an FQDN of a Kubernetes servicespec.serviceandspec.backendscorrespond to Kubernetes service objects- The total weight of all backends must be greater than zero, and each backend must have a positive weight
When a TrafficSplit resource is created, FSM applies the configuration on client sidecars to split traffic directed to the root service (spec.service) to the backends (spec.backends) based the specified weights. For HTTP traffic, the Host/Authority header in the request must match the FQDNs of the root service specified in the TrafficSplit resource. In the above example, it implies that the Host/Authority header in the HTTP request originated by the client must match the Kubernetes service FQDNs of the default/bookstore service for traffic split to work.
Note: FSM does not configure
Host/Authorityheader rewrites for the original HTTP requests, so it is necessary that the backend services referenced in aTrafficSplitresource accept requests with the original HTTPHost/Authorityheader.
It is important to note that a TrafficSplit resource only configures traffic splitting to a service, and does not give applications permission to communicate with each other. Thus, a valid TrafficTarget resource must be configured in conjunction with a TrafficSplit configuration to achieve traffic flow between applications as desired.
Refer to a demo on Canary rollouts using SMI Traffic Split to learn more.
4 - Circuit Breaking
Circuit breaking is a critical component of distributed systems and an important resiliency pattern. Circuit breaking allows applications to fail quickly and apply back pressure downstream as soon as possible, thereby providing the means to limit the impact of failures across the system. This guide describes how circuit breaking can be configured in FSM.
Configuring circuit breaking
FSM leverages its UpstreamTrafficSetting API to configure circuit breaking attributes for traffic directed to an upstream service. We use the term upstream service to refer to a service that receives connections and requests from clients and return responses. The specification enables configuring circuit breaking attributes for an upstream service at the connection and request level.
Each UpstreamTrafficSetting configuration targets an upstream host defined by the spec.host field. For a Kubernetes service my-svc in the namespace my-namespace, the UpstreamTrafficSetting resource must be created in the namespace my-namespace, and spec.host must be an FQDN of the form my-svc.my-namespace.svc.cluster.local. When specified as a match in an Egress policy, spec.host must correspond to the host specified in the Egress policy and the UpstreamTrafficSetting configuration must belong to the same namespace as the Egress resource.
Circuit breaking is applicable at both the TCP and HTTP level, and can be configured using the connectionSettings attribute in the UpstreamTrafficSetting resource. TCP traffic settings apply to both TCP and HTTP traffic, while HTTP settings only apply to HTTP traffic.
The following circuit breaking configurations are supported:
Maximum connections: The maximum number of connections that a client is allowed to establish to all backends belonging to the upstream host specified via thespec.hostfield in theUpstreamTrafficSettingconfiguration. This setting can be configured using thetcp.maxConnectionsfield and is applicable to both TCP and HTTP traffic. If not specified, the default is4294967295(2^32 - 1).Maximum pending requests: The maximum number of pending HTTP requests to the upstream host that are allowed to be queued. Requests are added to the list of pending requests whenever there aren’t enough upstream connections available to immediately dispatch the request. For HTTP/2 connections, ifhttp.maxRequestsPerConnectionis not configured, all requests will be multiplexed over the same connection so this circuit breaker will only be hit when no connection is already established. This setting can be configured using thehttp.maxPendingRequestsfield and is only applicable to HTTP traffic. If not specified, the default is4294967295(2^32 - 1).Maximum requests: The maximum number of parallel request that a client is allowed to make to the upstream host. This setting can be configured using thehttp.maxRequestsfield and is only applicable to HTTP traffic. If not specified, the default is4294967295(2^32 - 1).Maximum requests per connection: The maximum number of requests allowed per connection. This setting can be configured using thehttp.maxRequestsPerConnectionfield and is only applicable to HTTP traffic. If not specified, there is no limit.Maximum active retries: The maximum number of active retries that a client is allowed to make to the upstream host. This setting can be configured using thehttp.maxRetriesfield and is only applicable to HTTP traffic. If not specified, the default is4294967295(2^32 - 1).
To learn more about configuring circuit breaking, refer to the following demo guides:
5 - Retry
Retry is a resiliency pattern that enables an application to shield transient issues from customers. This is done by retrying requests that are failing from temporary faults such as a pod is starting up. This guide describes how to implement retry policy in FSM.
Configuring Retry
FSM uses its Retry policy API to allow retries on traffic from a specified source (ServiceAccount) to one or more destinations (Service). Retry is only applicable to HTTP traffic. FSM can implement retry for applications participating in the mesh.
The following retry configurations are supported:
Per Try Timeout: The time allowed for a retry to take before it is considered a failed attempt. The default uses the global route timeout.Retry Backoff Base Interval: The base interval for exponential retry back-off. The backoff is randomly chosen from the range [0,(2**N-1)B], where N is the retry number and B is the base interval. The default is25msand the maximum interval is 10 times the base interval.Number of Retries: The maximum number of retries to attempt. The default is1.Retry On: Specifies the policy for when a failed request will be retried. Multiple policies can be specified by using a,delimited list.
To learn more about configuring retry, refer to the Retry policy demo and [API documentation][1].
Examples
If requests from the bookbuyer service to bookstore-v1 service or bookstore-v2 service receive responses with a status code 5xx, then bookbuyer will retry the request 3 times. If an attempted retry takes longer than 3s it’s considered a failed attempt. Each retry has a delay period (backoff) before it is attempted calculated above. The backoff for all retries is capped at 10s.
kind: Retry
apiVersion: policy.flomesh.io/v1alpha1
metadata:
  name: retry
spec:
  source:
    kind: ServiceAccount
    name: bookbuyer
    namespace: bookbuyer
  destinations:
  - kind: Service
    name: bookstore
    namespace: bookstore-v1
  - kind: Service
    name: bookstore
    namespace: bookstore-v2
  retryPolicy:
    retryOn: "5xx"
    perTryTimeout: 3s
    numRetries: 3
    retryBackoffBaseInterval: 1s
If requests from the bookbuyer service to bookstore-v2 service receive responses with a status code 5xx or retriable-4xx (409), then bookbuyer will retry the request 5 times. If an attempted retry takes longer than 4s it’s considered a failed attempt. Each retry has a delay period (backoff) before it is attempted calculated above. The backoff for all retries is capped at 20ms.
kind: Retry
apiVersion: policy.flomesh.io/v1alpha1
metadata:
  name: retry
spec:
  source:
    kind: ServiceAccount
    name: bookbuyer
    namespace: bookbuyer
  destinations:
  - kind: Service
    name: bookstore
    namespace: bookstore-v2
  retryPolicy:
    retryOn: "5xx,retriable-4xx"
    perTryTimeout: 4s
    numRetries: 5
    retryBackoffBaseInterval: 2ms
6 - Rate Limiting
Rate limiting is an effective mechanism to control the throughput of traffic destined to a target host. It puts a cap on how often downstream clients can send network traffic within a certain timeframe.
Most commonly, when a large number of clients are sending traffic to a target host, if the target host becomes backed up, the downstream clients will overwhelm the upstream target host. In this scenario it is extremely difficult to configure a tight enough circuit breaking limit on each downstream host such that the system will operate normally during typical request patterns but still prevent cascading failure when the system starts to fail. In such scenarios, rate limiting traffic to the target host is effective.
FSM supports server-side rate limiting per target host, also referred to as local per-instance rate limiting.
Configuring local per-instance rate limiting
FSM leverages its UpstreamTrafficSetting API to configure rate limiting attributes for traffic directed to an upstream service. We use the term upstream service to refer to a service that receives connections and requests from clients and return responses. The specification enables configuring local rate limiting attributes for an upstream service at the connection and request level.
Each UpstreamTrafficSetting configuration targets an upstream host defined by the spec.host field. For a Kubernetes service my-svc in the namespace my-namespace, the UpstreamTrafficSetting resource must be created in the namespace my-namespace, and spec.host must be an FQDN of the form my-svc.my-namespace.svc.cluster.local.
Local rate limiting is applicable at both the TCP (L4) connection and HTTP request level, and can be configured using the rateLimit.local attribute in the UpstreamTrafficSetting resource. TCP settings apply to both TCP and HTTP traffic, while HTTP settings only apply to HTTP traffic. Both TCP and HTTP level rate limiting is enforced using a token bucket rate limiter.
Rate limiting TCP connections
TCP connections can be rate limited per unit of time. An optional burst limit can be specified to allow a burst of connections above the baseline rate to accommodate for connection bursts in a short interval of time. TCP rate limiting is applied as a token bucket rate limiter at the network filter chain of the upstream service’s inbound listener. Each incoming connection processed by the filter consumes a single token. If the token is available, the connection will be allowed. If no tokens are available, the connection will be immediately closed.
The following attributes nested under spec.rateLimit.local.tcp define the rate limiting attributes for TCP connections:
connections: The number of connections allowed per unit of time before rate limiting occurs on all backends belonging to the upstream host specified via thespec.hostfield in theUpstreamTrafficSettingconfiguration. This setting is applicable to both TCP and HTTP traffic.unit: The period of time within which connections over the limit will be rate limited. Valid values aresecond,minuteandhour.burst: The number of connections above the baseline rate that are allowed in a short period of time.
Refer to the TCP local rate limiting API for additional information regarding API usage.
Rate limiting HTTP requests
HTTP requests can be rate limited per unit of time. An optional burst limit can be specified to allow a burst of requests above the baseline rate to accommodate for request bursts in a short interval of time. HTTP rate limiting is applied as a token bucket rate limiter at the virtual host and/or HTTP route level at the upstream backend, depending on the rate limiting configuration. Each incoming request processed by the filter consumes a single token. If the token is available, the request will be allowed. If no tokens are available, the request will receive the configured rate limit status.
HTTP request rate limiting can be configured at the virtual host level by specifying the rate limiting attributes nested under the spec.rateLimit.local.http field. Alternatively, rate limiting can be configured per HTTP route allowed on the upstream backend by specifying the rate limiting attributes as a part of the spec.httpRoutes field. It is important to note that when configuring rate limiting per HTTP route, the route matches an HTTP path that has already been permitted by a service mesh policy, otherwise the rate limiting policy will be ignored.
The following rate limiting attributes can be configured for HTTP traffic:
requests: The number of requests allowed per unit of time before rate limiting occurs on all backends belonging to the upstream host specified via thespec.hostfield in theUpstreamTrafficSettingconfiguration.unit: The period of time within which requests over the limit will be rate limited. Valid values aresecond,minuteandhour.burst: The number of requests above the baseline rate that are allowed in a short period of time.responseStatusCode: The HTTP status code to use for responses to rate limited requests. Code must be in the 400-599 (inclusive) error range. If not specified, a default of 429 (Too Many Requests) is used.responseHeadersToAdd: The list of HTTP headers as key-value pairs that should be added to each response for requests that have been rate limited.
Demos
To learn more about configuring rate limting, refer to the following demo guides:
7 - Ingress
7.1 - Ingress to Mesh
Using Ingress to manage external access to services within the cluster
Ingress refers to managing external access to services within the cluster, typically HTTP/HTTPS services. FSM’s ingress capability allows cluster administrators and application owners to route traffic from clients external to the service mesh to service mesh backends using a set of rules depending on the mechanism used to perform ingress.
IngressBackend API
FSM leverages its IngressBackend API to configure a backend service to accept ingress traffic from trusted sources. The specification enables configuring how specific backends must authorize ingress traffic depending on the protocol used, HTTP or HTTPS. When the backend protocol is http, the specified source kind must either be: 1. Service kind whose endpoints will be authorized to connect to the backend, or 2. IPRange kind that specifies the source IP CIDR range authorized to connect to the backend. When the backend protocol is https, the source specified must be an AuthenticatedPrincipal kind which defines the Subject Alternative Name (SAN) encoded in the client’s certificate that the backend will authenticate. A source with the kind Service or IPRange is optional for https backends, and if specified implies that the client must match the source in addition to its AuthenticatedPrincipal value. For https backends, client certificate validation is performed by default and can be disabled by setting skipClientCertValidation: true in the tls field for the backend. The port.number field for a backend service in the IngressBackend configuration must correspond to the targetPort of a Kubernetes service.
Note that when the Kind for a source in an IngressBackend configuration is set to Service, FSM controller will attempt to discover the endpoints of that service. For FSM to be able to discover the endpoints of a service, the namespace in which the service resides needs to be a monitored namespace. Enable the namespace to be monitored using:
kubectl label ns <namespace> flomesh.io/monitored-by=<mesh name>
Examples
The following IngressBackend configuration will allow access to the foo service on port 80 in the test namespace only if the source originating the traffic is an endpoint of the myapp service in the default namespace:
kind: IngressBackend
apiVersion: policy.flomesh.io/v1alpha1
metadata:
  name: basic
  namespace: test
spec:
  backends:
    - name: foo
      port:
        number: 80 # targetPort of the service
        protocol: http
  sources:
    - kind: Service
      namespace: default
      name: myapp
The following IngressBackend configuration will allow access to the foo service on port 80 in the test namespace only if the source originating the traffic has an IP address that belongs to the CIDR range 10.0.0.0/8:
kind: IngressBackend
apiVersion: policy.flomesh.io/v1alpha1
metadata:
  name: basic
  namespace: test
spec:
  backends:
    - name: foo
      port:
        number: 80 # targetPort of the service
        protocol: http
  sources:
    - kind: IPRange
      name: 10.0.0.0/8
The following IngressBackend configuration will allow access to the foo service on port 80 in the test namespace only if the source originating the traffic encrypts the traffic with TLS and has the Subject Alternative Name (SAN) client.default.svc.cluster.local encoded in its client certificate:
kind: IngressBackend
apiVersion: policy.flomesh.io/v1alpha1
metadata:
  name: basic
  namespace: test
spec:
  backends:
    - name: foo
      port:
        number: 80
        protocol: https # https implies TLS
      tls:
        skipClientCertValidation: false # mTLS (optional, default: false)
  sources:
    - kind: AuthenticatedPrincipal
      name: client.default.svc.cluster.local
Refer to the following sections to understand how the IngressBackend configuration looks like for http and https backends.
Choices to perform Ingress
FSM supports multiple options to expose mesh services externally using ingress which are described in the following sections. FSM has been tested with Contour and OSS Nginx, which work with the ingress controller installed outside the mesh and provisioned with a certificate to participate in the mesh.
Note: FSM integration with Nginx Plus has not been fully tested for picking up a self-signed mTLS certificate from a Kubernetes secret. However, an alternative way to incorporate Nginx Plus or any ingress is to install it in the mesh so that it is injected with an Pipy sidecar, which will allow it to participate in the mesh. Additional inbound ports such as 80 and 443 may need to be allowed to bypass the Pipy sidecar.
1. Using FSM ingress controllers and gateways
Using FSM ingress controllers and edge proxy is the preferred method for executing Ingress in an FSM managed services mesh. Using FSM, users get a high-performance ingress controller with rich policy specifications for a variety of scenarios, while maintaining lightweight profiles.
To use FSM as an ingress, enable it during mesh installation by passing option --set=fsm.fsmIngress.enabled=true:
fsm install \
    --set=fsm.fsmIngress.enabled=true
Or enable ingress feature after mesh installed:
fsm ingress enable --fsm-namespace <FSM NAMESPACE>
In addition to configuring the edge proxy for FSM using the appropriate API, the service mesh backend in FSM will only accept traffic from authorized edge proxy or gateways. FSM’s IngressBackend specification allows cluster administrators and application owners to explicitly specify how the service mesh backend should authorize ingress traffic. The following sections describe how to use the IngressBackend and HTTPProxy APIs in combination to allow HTTP and HTTPS ingress traffic to be routed to the mesh backend.
It is recommended that ingress traffic always be restricted to authorized clients. To do this, enable FSM to monitor the endpoints of the edge proxy located in the namespace where the ingress installation is located:
kubectl label ns <fsm namespace> flomesh.io/monitored-by=<mesh name>
If using FSM Ingress as Ingress controller, there is no need to execute command above.
HTTP Ingress using FSM
A minimal [HTTPProxy][2] configuration and FSM’s IngressBackend1 specification to route ingress traffic to the mesh service foo in the namespace test might look like the following:
apiVersion: networking.k8s.io/v1
kind: Ingress
metadata:
  name: fsm-ingress
  namespace: test
spec:
  ingressClassName: pipy
  rules:
  - host: foo-basic.bar.com
    http:
      paths:
      - path: /
        pathType: Prefix
        backend:
          service:
            name: foo
            port:
              number: 80
---
kind: IngressBackend
apiVersion: policy.flomesh.io/v1alpha1
metadata:
  name: basic
  namespace: test
spec:
  backends:
    - name: foo
      port:
        number: 80 # targetPort of the service
        protocol: http # http implies no TLS
  sources:
    - kind: Service
      namespace: fsm-system
      name: fsm-ingress
The above configuration allows external clients to access the foo service under the test namespace.
- The Ingress configuration will route incoming HTTP traffic from external sources with the
Host:header offoo-basic.bar.comto the service namedfooon port80in thetestnamespace. - IngressBackend is configured to allow only endpoints named
fsm-ingressservice from the same namespace where FSM is installed (default isfsm-system) to access port80of thefooserivce under thetestnamespace.
Examples
Refer to the Ingress with FSM demo for examples on how to expose mesh services externally using FSM in FSM.
2. Bring your own Ingress Controller and Gateway
If using FSM with FSM for ingress is not feasible for your use case, FSM provides the facility to use your own ingress controller and edge gateway for routing external traffic to service mesh backends. Much like how ingress is configured above, in addition to configuring the ingress controller to route traffic to service mesh backends, an IngressBackend configuration is required to authorize clients responsible for proxying traffic originating externally.
7.2 - Service Loadbalancer
7.3 - FSM Ingress Controller
The Kubernetes Ingress API is designed with a separation of concerns, where the Ingress implementation provides an entry feature infrastructure managed by operations staff; it also allows application owners to control the routing of requests to the backend through rules.
Ingress is an API object for managing external access to services in a cluster, with typical access through HTTP. It provides load balancing, SSL termination, and name-based virtual hosting. For the Ingress resource to work, the cluster must have a running Ingress controller.
Ingress controller configures the HTTP load balancer by monitoring Ingress resources in the cluster.
7.3.1 - Installation
Installation
Prerequisites
- Kubernetes cluster version v1.19.0 or higher.
- FSM version >= v1.1.0.
- FSM CLI to install FSM and enable FSM Ingress.
There are two options to install FSM Ingress Controller. One is installing it along with FSM during FSM installation. It won’t be enabled by default so we need to enable it explicitly:
fsm install \
    --set=fsm.fsmIngress.enabled=true
Another is installing it separately if you already have FSM mesh installed.
Using the fsm command line tool to enable FSM Ingress Controller.
fsm ingress enable
Check the resource.
kubectl get pod,svc -n fsm-system -l app=fsm-ingress
NAME                               READY   STATUS    RESTARTS   AGE
pod/fsm-ingress-574465b678-xj8l6   1/1     Running   0          14h

NAME                  TYPE           CLUSTER-IP      EXTERNAL-IP   PORT(S)        AGE
service/fsm-ingress   LoadBalancer   10.43.243.124   10.0.2.4      80:30508/TCP   14h
Once all done, we can start to play with FSM Ingress Controller.
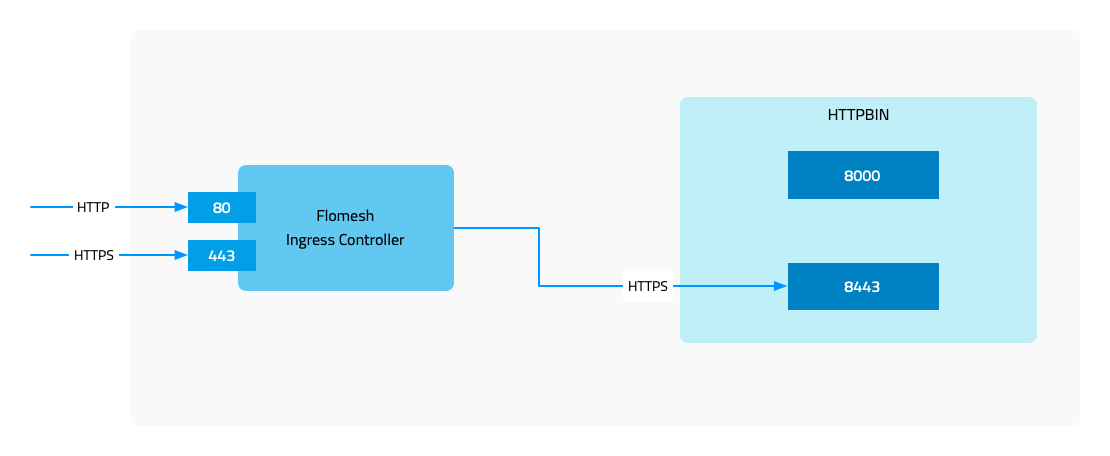
7.3.3 - Advanced TLS
FSM Ingress Controller - Advanced TLS
In the document of FSM Ingress Controller, we introduced FSM Ingress and some of its basic functinoality. In this part of series, we will continue on where we left and look into advanced TLS features and we can configure FSM Ingress to use them.
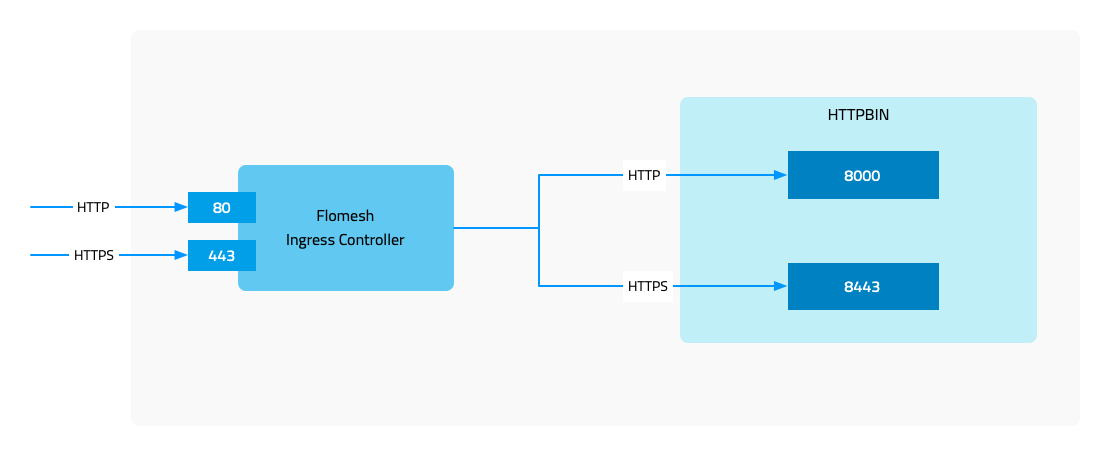
Normally, we see below four combinations of communication with upstream services
- Client -> HTTP Ingress -> HTTP Upstream
- Client -> HTTPS Ingress -> HTTP Upstream
- Client -> HTTP Ingress -> HTTPS Upstream
- Client -> HTTPS Ingress -> HTTPS Upstream
Two of the above combinations has been covered in basics introduction blog post and in this article we will introduce the remaining two combinations i.e. communicating with an upstream HTTPS service.
- HTTPS Upstream: The certificate of the backend service, the upstream, must be checked.
- Client Verification: Mainly when using HTTPS entrance, the certificate used by the client is checked.
Demo
7.3.4 - TLS Passthrough
FSM Ingress Controller - TLS Passthrough
This guide will demonstrate TLS passthrough feature of FSM Ingress.
What is TLS passthrough
TLS (Secure Socket Layer), also known as TLS (Transport Layer Security), protects the security communication between the client and the server through encryption.
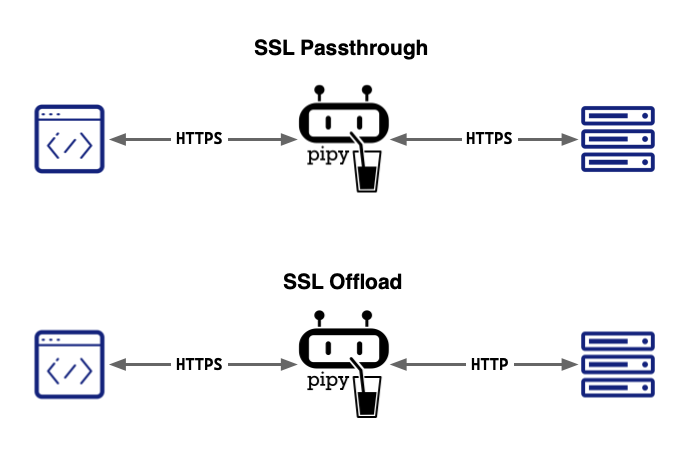
TLS Passthrough is one of the two ways that a proxy server handles TLS requests (the other is TLS offload). In TLS passthrough mode, the proxy does not decrypt the TLS request from the client but instead forwards it to the upstream server for decryption, meaning the data remains encrypted while passing through the proxy, thus ensuring the security of important and sensitive data.
Advantages of TLS passthrough
- Since the data is not decrypted on the proxy but is forwarded to the upstream server in an encrypted manner, the data is protected from network attacks.
- Encrypted data arrives at the upstream server without decryption, ensuring the confidentiality of the data.
- This is also the simplest method of configuring TLS for the proxy.
Disadvantages of TLS passthrough
- Malicious code may be present in the traffic, which will directly reach the backend server.
- In the TLS passthrough process, switching servers is not possible.
- Layer-7 traffic processing cannot be performed.
Installation
The TLS passthrough feature can be enabled during installation of FSM.
fsm install --set=fsm.image.registry=addozhang --set=fsm.image.tag=latest-main --set=fsm.fsmIngress.enabled=true --set=fsm.fsmIngress.tls.enabled=true --set=fsm.fsmIngress.tls.sslPassthrough.enabled=true
Or you can enable it during FSM Ingress enabling when already have FSM installed.
fsm ingress enable --tls-enable --passthrough-enable
Demo
7.4 - FSM Gateway
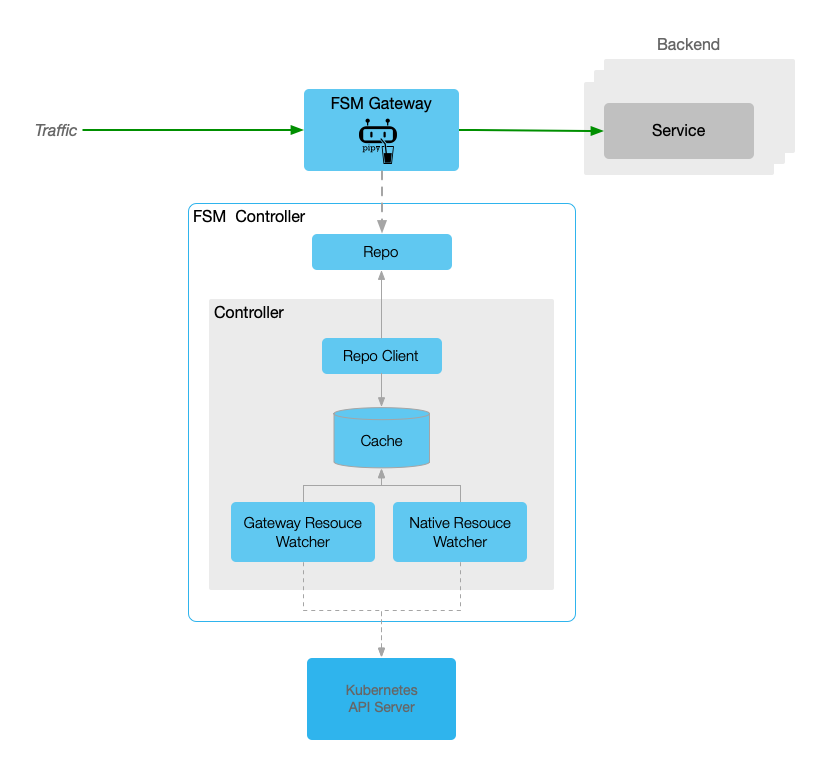
The FSM Gateway serves as an implementation of the Kubernetes Gateway API, representing one of the various components within the FSM world.
Upon activation of the FSM Gateway, the FSM controller, assuming the position of gateway overseer, diligently monitors both Kubernetes native resources and Gateway API assets. Subsequently, it dynamically furnishes the pertinent configurations to Pipy, functioning as a proxy.
Should you have an interest in the FSM Gateway, the ensuing documentation might prove beneficial.
7.4.1 - Installation
To utilize the FSM Gateway, initial activation within the FSM is requisite. Analogous to the FSM Ingress, two distinct methodologies exist for its enablement.
Note: It is imperative to acknowledge that the minimum required version of Kubernetes to facilitate the FSM Gateway activation is v1.21.0.
Let’s start.
Prerequisites
- Kubernetes cluster version v1.21.0 or higher.
- FSM version >= v1.1.0.
- FSM CLI to install FSM and enable FSM Gateway.
Installation
One methodology for enabling FSM Gateway is enable it during FSM installation. Remember that it’s diabled by defaulty.
fsm install \
    --set=fsm.fsmGateway.enabled=true
Another approach is installing it individually if you already have FSM mesh installed.
fsm gateway enable
Once done, we can check the GatewayClass resource in cluster.
kubectl get GatewayClass
NAME              CONTROLLER                      ACCEPTED   AGE
fsm-gateway-cls   flomesh.io/gateway-controller   True       113s
Yes, the fsm-gateway-cls is just the one we are expecting. We can also get the controller name above.
Different from Ingress controller, there is no explicit Deployment or Pod unless create a Gateway manually.
Let’s try with below to create a simple FSM gateway.
Quickstart
To create a FSM gateway, we need to create Gateway resource. This manifest will setup a gateway which will listen on port 8000 and accept the xRoute resources from same namespace.
xRoutestands forHTTPRoute,HTTPRoute,TLSRoute,TCPRoute,UDPRouteandGRPCRoute.
kubectl apply -n fsm-system -f - <<EOF
apiVersion: gateway.networking.k8s.io/v1
kind: Gateway
metadata:
  name: simple-fsm-gateway
spec:
  gatewayClassName: fsm-gateway-cls
  listeners:
    - protocol: HTTP
      port: 8000
      name: http
      allowedRoutes:
        namespaces:
          from: Same
EOF
Then we can check the resoureces:
kubectl get po,svc -n fsm-system -l app=fsm-gateway
NAME                                          READY   STATUS    RESTARTS   AGE
pod/fsm-gateway-fsm-system-745ddc856b-v64ql   1/1     Running   0          12m

NAME                             TYPE           CLUSTER-IP     EXTERNAL-IP   PORT(S)          AGE
service/fsm-gateway-fsm-system   LoadBalancer   10.43.20.139   10.0.2.4      8000:32328/TCP   12m
At this time, you will get result below if trying to access the gateway port:
curl -i 10.0.2.4:8000/
HTTP/1.1 404 Not Found
content-length: 13
connection: keep-alive

Not found
That’s why we have not configure any route. Let’s create a HTTRoute for the Service fsm-controller(The FSM controller has a Pipy repo running).
kubectl apply -n fsm-system -f - <<EOF
apiVersion: gateway.networking.k8s.io/v1
kind: HTTPRoute
metadata:
  name: repo
spec:
  parentRefs:
  - name: simple-fsm-gateway
    port: 8000
  rules:
  - backendRefs:
    - name: fsm-controller
      port: 6060
EOF
Trigger the request again, it responds 200 this time.
curl -i 10.0.2.4:8000/
HTTP/1.1 200 OK
content-type: text/html
content-length: 0
connection: keep-alive
7.4.2 - HTTP Routing
In FSM Gateway, the HTTPRoute resource is used to configure route rules which will match request to backend servers. Currently, the Kubernetes Service is the only one accepted as backend resource.
Prerequisites
- Kubernetes cluster version v1.21.0 or higher.
- kubectl CLI
- FSM Gateway installed via guide doc.
Demonstration
Deploy sample
First, let’s install the example in namespace httpbin with commands below.
kubectl create namespace httpbin
kubectl apply -n httpbin -f https://raw.githubusercontent.com/flomesh-io/fsm-docs/main/manifests/gateway/http-routing.yaml
Verification
Once done, we can get the gateway installed.
kubectl get pod,svc -n httpbin -l app=fsm-gateway default ⎈
NAME READY STATUS RESTARTS AGE
pod/fsm-gateway-httpbin-867768f76c-69s6x 1/1 Running 0 16m
NAME TYPE CLUSTER-IP EXTERNAL-IP PORT(S) AGE
service/fsm-gateway-httpbin LoadBalancer 10.43.41.36 10.0.2.4 8000:31878/TCP 16m
Beyond the gateway resources, we also create the HTTPRoute resources.
kubectl get httproute -n httpbin
NAME             HOSTNAMES             AGE
http-route-foo   ["foo.example.com"]   18m
http-route-bar   ["bar.example.com"]   18m
Testing
To test the rules, we should get the address of gateway first.
export GATEWAY_IP=$(kubectl get svc -n httpbin -l app=fsm-gateway -o jsonpath='{.items[0].status.loadBalancer.ingress[0].ip}')
We can trigger a request to gateway without hostname.
curl -i http://$GATEWAY_IP:8000/headers
HTTP/1.1 404 Not Found
server: pipy-repo
content-length: 0
connection: keep-alive
It responds with 404. Next, we can try with the hostnames configured in HTTPRoute resources.
curl -H 'host:foo.example.com' http://$GATEWAY_IP:8000/headers
{
  "headers": {
    "Accept": "*/*",
    "Connection": "keep-alive",
    "Host": "foo.example.com",
    "User-Agent": "curl/7.68.0"
  }
}

curl -H 'host:bar.example.com' http://$GATEWAY_IP:8000/headers
{
  "headers": {
    "Accept": "*/*",
    "Connection": "keep-alive",
    "Host": "bar.example.com",
    "User-Agent": "curl/7.68.0"
  }
}
This time, the server responds success message. There is hostname we are requesting in each response.
7.4.3 - HTTP URL Rewrite
The URL rewriting feature provides FSM Gateway users with a way to modify the request URL before the traffic enters the target service. This not only provides greater flexibility to adapt to changes in backend services, but also ensures smooth migration of applications and normalization of URLs.
The HTTPRoute resource utilizes HTTPURLRewriteFilter to rewrite the path in request to another one before it gets forwarded to upstream.
Prerequisites
- Kubernetes cluster version v1.21.0 or higher.
- kubectl CLI
- FSM Gateway installed via guide doc.
Demonstration
We will follow the sample in HTTP Routing.
In backend server, there is a path /get which will responds more information than path /headers.
curl -H 'host:foo.example.com' http://$GATEWAY_IP:8000/get
{
  "args": {},
  "headers": {
    "Accept": "*/*",
    "Connection": "keep-alive",
    "Host": "foo.example.com",
    "User-Agent": "curl/7.68.0"
  },
  "origin": "10.42.0.87",
  "url": "http://foo.example.com/get"
}
Replace URL Full Path
Example bellow will replace the /get path to /headers path.
kubectl apply -n httpbin -f - <<EOF
apiVersion: gateway.networking.k8s.io/v1
kind: HTTPRoute
metadata:
  name: http-route-foo
spec:
  parentRefs:
  - name: simple-fsm-gateway
    port: 8000
  hostnames:
  - foo.example.com
  rules:
  - matches:
    - path:
        type: PathPrefix
        value: /get
    filters:
    - type: URLRewrite
      urlRewrite:
        path:
          type: ReplaceFullPath
          replaceFullPath: /headers
    backendRefs:
    - name: httpbin
      port: 8080
  - matches:
    - path:
        type: PathPrefix
        value: /
    backendRefs:
    - name: httpbin
      port: 8080
EOF
After updated the HTTP rule, we will get the same response as /headers when requesting /get.
curl -H 'host:foo.example.com' http://$GATEWAY_IP:8000/get
{
  "headers": {
    "Accept": "*/*",
    "Connection": "keep-alive",
    "Host": "foo.example.com",
    "User-Agent": "curl/7.68.0"
  }
}
Replace URL Prefix Path
In backend server, there is another two paths:
/status/{statusCode}will respond with specified status code./stream/{n}will respond the response of/getntimes in stream.
curl -s -w "%{response_code}\n" -H 'host:foo.example.com' http://$GATEWAY_IP:8000/status/204
204
curl -s -H 'host:foo.example.com' http://$GATEWAY_IP:8000/stream/1
{"url": "http://foo.example.com/stream/1", "args": {}, "headers": {"Host": "foo.example.com", "User-Agent": "curl/7.68.0", "Accept": "*/*", "Connection": "keep-alive"}, "origin": "10.42.0.161", "id": 0}
If we hope to change the behavior of /status to /stream, the rule is required to update again.
kubectl apply -n httpbin -f - <<EOF
apiVersion: gateway.networking.k8s.io/v1
kind: HTTPRoute
metadata:
  name: http-route-foo
spec:
  parentRefs:
  - name: simple-fsm-gateway
    port: 8000
  hostnames:
  - foo.example.com
  rules:
  - matches:
    - path:
        type: PathPrefix
        value: /status
    filters:
    - type: URLRewrite
      urlRewrite:
        path:
          type: ReplacePrefixMatch
          replacePrefixMatch: /stream
    backendRefs:
    - name: httpbin
      port: 8080
  - matches:
    - path:
        type: PathPrefix
        value: /
    backendRefs:
    - name: httpbin
      port: 8080
EOF
If we trigger the request to /status/204 path again, we will stream the request data 204 times.
curl -s -H 'host:foo.example.com' http://$GATEWAY_IP:8000/status/204
{"url": "http://foo.example.com/stream/204", "args": {}, "headers": {"Host": "foo.example.com", "User-Agent": "curl/7.68.0", "Accept": "*/*", "Connection": "keep-alive"}, "origin": "10.42.0.161", "id": 99}
...
Replace Host Name
Let’s follow the example rule below. It will replace host name from foo.example.com to baz.example.com for all traffic requesting /get.
kubectl apply -n httpbin -f - <<EOF
apiVersion: gateway.networking.k8s.io/v1
kind: HTTPRoute
metadata:
  name: http-route-foo
spec:
  parentRefs:
  - name: simple-fsm-gateway
    port: 8000
  hostnames:
  - foo.example.com
  rules:
  - matches:
    - path:
        type: PathPrefix
        value: /get
    filters:
    - type: URLRewrite
      urlRewrite:
        hostname: baz.example.com
    backendRefs:
    - name: httpbin
      port: 8080
  - matches:
    - path:
        type: PathPrefix
        value: /
    backendRefs:
    - name: httpbin
      port: 8080
EOF
Update rule and trigger request. We can see the client is requesting url http://foo.example.com/get, but the Host is replaced.
curl -H 'host:foo.example.com' http://$GATEWAY_IP:8000/get
{
  "args": {},
  "headers": {
    "Accept": "*/*",
    "Connection": "keep-alive",
    "Host": "baz.example.com",
    "User-Agent": "curl/7.68.0"
  },
  "origin": "10.42.0.87",
  "url": "http://baz.example.com/get"
7.4.4 - HTTP Redirect
Request redirection is a common network application function that allows the server to tell the client: “The resource you requested has been moved to another location, please go to the new location to obtain it.”
The HTTPRoute resource utilizes HTTPRequestRedirectFilter to redirect client to the specified new location.
Prerequisites
- Kubernetes cluster version v1.21.0 or higher.
- kubectl CLI
- FSM Gateway installed via guide doc.
Demonstration
We will follow the sample in HTTP Routing.
In our backend server, there are two paths /headers and /get. The previous one responds all request headers as body, and the latter one responds more information of client than /headers.
To facilitate testing, it’s better to add records to local hosts.
echo $GATEWAY_IP foo.example.com bar.example.com >> /etc/hosts
-bash: /etc/hosts: Permission denied
curl foo.example.com/headers
{
  "headers": {
    "Accept": "*/*",
    "Connection": "keep-alive",
    "Host": "foo.example.com",
    "User-Agent": "curl/7.68.0"
  }
}
curl bar.example.com/get
{
  "args": {},
  "headers": {
    "Accept": "*/*",
    "Connection": "keep-alive",
    "Host": "bar.example.com",
    "User-Agent": "curl/7.68.0"
  },
  "origin": "10.42.0.87",
  "url": "http://bar.example.com/get"
}
Host Name Redirect
The HTTP status code 3XX are used to redirect client to another address. We can redirect all requests to foo.example.com to bar.example.com by responding 301 status and new hostname.
apiVersion: gateway.networking.k8s.io/v1
kind: HTTPRoute
metadata:
  name: http-route-foo
spec:
  parentRefs:
  - name: simple-fsm-gateway
    port: 8000
  hostnames:
  - foo.example.com
  rules:
  - matches:
    - path:
        type: PathPrefix
        value: /
    filters:
    - type: RequestRedirect
      requestRedirect:
        hostname: bar.example.com
        port: 8000
        statusCode: 301
    backendRefs:
    - name: httpbin
      port: 8080
Now, it will return the 301 code and bar.example.com:8000 when requesting foo.example.com.
curl -i http://foo.example.com:8000/get
HTTP/1.1 301 Moved Permanently
Location: http://bar.example.com:8000/get
content-length: 0
connection: keep-alive
By default, curl does not follow location redirecting unless enable it by assign opiton -L.
curl -L http://foo.example.com:8000/get
{
  "args": {},
  "headers": {
    "Accept": "*/*",
    "Connection": "keep-alive",
    "Host": "bar.example.com:8000",
    "User-Agent": "curl/7.68.0"
  },
  "origin": "10.42.0.161",
  "url": "http://bar.example.com:8000/get"
}
Prefix Path Redirect
With path redirection, we can implement what we did with URL Rewriting: redirect the request to /status/{n} to /stream/{n}.
apiVersion: gateway.networking.k8s.io/v1
kind: HTTPRoute
metadata:
  name: http-route-foo
spec:
  parentRefs:
  - name: simple-fsm-gateway
    port: 8000
  hostnames:
  - foo.example.com
  rules:
  - matches:
    - path:
        type: PathPrefix
        value: /status
    filters:
    - type: RequestRedirect
      requestRedirect:
        path:
          type: ReplacePrefixMatch
          replacePrefixMatch: /stream
        statusCode: 301
    backendRefs:
    - name: httpbin
      port: 8080
  - matches:
    backendRefs:
    - name: httpbin
      port: 8080
After update rull, we will get.
curl -i http://foo.example.com:8000/status/204
HTTP/1.1 301 Moved Permanently
Location: http://foo.example.com:8000/stream/204
content-length: 0
connection: keep-alive
Full Path Redirect
We can also change full path during redirecting, such as redirect all /status/xxx to /status/200.
apiVersion: gateway.networking.k8s.io/v1
kind: HTTPRoute
metadata:
  name: http-route-foo
spec:
  parentRefs:
  - name: simple-fsm-gateway
    port: 8000
  hostnames:
  - foo.example.com
  rules:
  - matches:
    - path:
        type: PathPrefix
        value: /status
    filters:
    - type: RequestRedirect
      requestRedirect:
        path:
          type: ReplaceFullPath
          replaceFullPath: /status/200
        statusCode: 301
    backendRefs:
    - name: httpbin
      port: 8080
  - matches:
    backendRefs:
    - name: httpbin
      port: 8080
Now, the status of requests to /status/xxx will be redirected to /status/200.
curl -i http://foo.example.com:8000/status/204
HTTP/1.1 301 Moved Permanently
Location: http://foo.example.com:8000/status/200
content-length: 0
connection: keep-alive
7.4.5 - HTTP Request Header Manipulate
The HTTP header manipulation feature allows you to fine-tune incoming and outgoing request and response headers.
In Gateway API, the HTTPRoute resource utilities two HTTPHeaderFilter filter for request and response header manipulation.
The both filters supports add, set and remove operation. The combination of them is also available.
This document will introduce the HTTP request header manipulation function of FSM Gateway. The introduction of HTTP response header manipulation is located in doc HTTP Response Header Manipulate.
Prerequisites
- Kubernetes cluster version v1.21.0 or higher.
- kubectl CLI
- FSM Gateway installed via guide doc.
Demonstration
We will follow the sample in HTTP Routing.
In backend service, there is a path /headers which will respond all request headers.
curl -H 'host:foo.example.com' http://$GATEWAY_IP:8000/headers
{
  "headers": {
    "Accept": "*/*",
    "Connection": "keep-alive",
    "Host": "10.42.0.15:80",
    "User-Agent": "curl/8.1.2"
  }
}
Add HTTP Request header
With header adding feature, let’s try to add a new header to request by add HTTPHeaderFilter filter.
Modifying the HTTPRoute http-route-foo and add RequestHeaderModifier filter.
kubectl apply -n httpbin -f - <<EOF
apiVersion: gateway.networking.k8s.io/v1
kind: HTTPRoute
metadata:
  name: http-route-foo
spec:
  parentRefs:
  - name: simple-fsm-gateway
    port: 8000
  hostnames:
  - foo.example.com
  rules:
  - matches:
    - path:
        type: PathPrefix
        value: /
    backendRefs:
    - name: httpbin
      port: 8080
    filters:
    - type: RequestHeaderModifier
      requestHeaderModifier:
        add:
        - name: "header-2-add"
          value: "foo"
EOF
Now request the path /headers again and you will get the new header injected by gateway.
Thought HTTP header name is case insensitive but it will be converted to capital mode.
curl -H 'host:foo.example.com' http://$GATEWAY_IP:8000/headers
{
  "headers": {
    "Accept": "*/*",
    "Connection": "keep-alive",
    "Header-2-Add": "foo",
    "Host": "10.42.0.15:80",
    "User-Agent": "curl/8.1.2"
  }
}
Set HTTP Request header
set operation is used to update the value of specified header. If the header not exist, it will do as add operation.
Let’s update the HTTPRoute resource again and set two headers with new value. One does not exist and another does.
kubectl apply -n httpbin -f - <<EOF
apiVersion: gateway.networking.k8s.io/v1
kind: HTTPRoute
metadata:
  name: http-route-foo
spec:
  parentRefs:
  - name: simple-fsm-gateway
    port: 8000
  hostnames:
  - foo.example.com
  rules:
  - matches:
    - path:
        type: PathPrefix
        value: /
    backendRefs:
    - name: httpbin
      port: 8080
    filters:
    - type: RequestHeaderModifier
      requestHeaderModifier:
        set:
        - name: "header-2-set"
          value: "foo"
        - name: "user-agent"
          value: "Mozilla/5.0 (Macintosh; Intel Mac OS X 10_15_7) AppleWebKit/605.1.15 (KHTML, like Gecko) Version/17.0 Safari/605.1.15"
EOF
In the response, we can get the two headers updated.
curl -H 'host:foo.example.com' http://$GATEWAY_IP:8000/headers
{
  "headers": {
    "Accept": "*/*",
    "Connection": "keep-alive",
    "Header-2-Set": "foo",
    "Host": "10.42.0.15:80",
    "User-Agent": "Mozilla/5.0 (Macintosh; Intel Mac OS X 10_15_7) AppleWebKit/605.1.15 (KHTML, like Gecko) Version/17.0 Safari/605.1.15"
  }
}
Remove HTTP Request header
The last operation is remove, which can remove the header of client sending.
Let’s update the HTTPRoute resource to remove user-agent header directly to hide client type from backend service.
kubectl apply -n httpbin -f - <<EOF
apiVersion: gateway.networking.k8s.io/v1
kind: HTTPRoute
metadata:
  name: http-route-foo
spec:
  parentRefs:
  - name: simple-fsm-gateway
    port: 8000
  hostnames:
  - foo.example.com
  rules:
  - matches:
    - path:
        type: PathPrefix
        value: /
    backendRefs:
    - name: httpbin
      port: 8080
    filters:
    - type: RequestHeaderModifier
      requestHeaderModifier:
        remove:
        - "user-agent"
EOF
With resource udpated, the user agent is invisible on backend service side.
curl -H 'host:foo.example.com' http://$GATEWAY_IP:8000/headers
{
  "headers": {
    "Accept": "*/*",
    "Connection": "keep-alive",
    "Host": "10.42.0.15:80"
  }
}
7.4.6 - HTTP Response Header Manipulate
The HTTP header manipulation feature allows you to fine-tune incoming and outgoing request and response headers.
In Gateway API, the HTTPRoute resource utilities two HTTPHeaderFilter filter for request and response header manipulation.
The both filters supports add, set and remove operation. The combination of them is also available.
This document will introduce the HTTP response header manipulation function of FSM Gateway. The introduction of HTTP request header manipulation is located in doc HTTP Request Header Manipulate.
Prerequisites
- Kubernetes cluster version v1.21.0 or higher.
- kubectl CLI
- FSM Gateway installed via guide doc.
Demonstration
We will follow the sample in HTTP Routing.
In backend service responds the generated headers as below.=
curl -I -H 'host:foo.example.com' http://$GATEWAY_IP:8000/headers
HTTP/1.1 200 OK
server: gunicorn/19.9.0
date: Tue, 21 Nov 2023 08:54:43 GMT
content-type: application/json
content-length: 106
access-control-allow-origin: *
access-control-allow-credentials: true
connection: keep-alive
Add HTTP Response header
With header adding feature, let’s try to add a new header to response by add HTTPHeaderFilter filter.
Modifying the HTTPRoute http-route-foo and add ResponseHeaderModifier filter.
kubectl apply -n httpbin -f - <<EOF
apiVersion: gateway.networking.k8s.io/v1
kind: HTTPRoute
metadata:
  name: http-route-foo
spec:
  parentRefs:
  - name: simple-fsm-gateway
    port: 8000
  hostnames:
  - foo.example.com
  rules:
  - matches:
    - path:
        type: PathPrefix
        value: /
    backendRefs:
    - name: httpbin
      port: 8080
    filters:
    - type: ResponseHeaderModifier
      responseHeaderModifier:
        add:
        - name: "header-2-add"
          value: "foo"
EOF
Now request the path /headers again and you will get the new header in response injected by gateway.
curl -I -H 'host:foo.example.com' http://$GATEWAY_IP:8000/headers
HTTP/1.1 200 OK
server: gunicorn/19.9.0
date: Tue, 21 Nov 2023 08:56:58 GMT
content-type: application/json
content-length: 139
access-control-allow-origin: *
access-control-allow-credentials: true
header-2-add: foo
connection: keep-alive
Set HTTP Response header
set operation is used to update the value of specified header. If the header not exist, it will do as add operation.
Let’s update the HTTPRoute resource again and set two headers with new value. One does not exist and another does.
kubectl apply -n httpbin -f - <<EOF
apiVersion: gateway.networking.k8s.io/v1
kind: HTTPRoute
metadata:
  name: http-route-foo
spec:
  parentRefs:
  - name: simple-fsm-gateway
    port: 8000
  hostnames:
  - foo.example.com
  rules:
  - matches:
    - path:
        type: PathPrefix
        value: /
    backendRefs:
    - name: httpbin
      port: 8080
    filters:
    - type: ResponseHeaderModifier
      responseHeaderModifier:
        set:
        - name: "header-2-set"
          value: "foo"
        - name: "server"
          value: "fsm/gateway"
EOF
In the response, we can get the two headers updated.
curl -I -H 'host:foo.example.com' http://$GATEWAY_IP:8000/headers
HTTP/1.1 200 OK
server: fsm/gateway
date: Tue, 21 Nov 2023 08:58:56 GMT
content-type: application/json
content-length: 139
access-control-allow-origin: *
access-control-allow-credentials: true
header-2-set: foo
connection: keep-alive
Remove HTTP Response header
The last operation is remove, which can remove the header of client sending.
Let’s update the HTTPRoute resource to remove server header directly to hide backend implementation from client.
kubectl apply -n httpbin -f - <<EOF
apiVersion: gateway.networking.k8s.io/v1
kind: HTTPRoute
metadata:
  name: http-route-foo
spec:
  parentRefs:
  - name: simple-fsm-gateway
    port: 8000
  hostnames:
  - foo.example.com
  rules:
  - matches:
    - path:
        type: PathPrefix
        value: /
    backendRefs:
    - name: httpbin
      port: 8080
    filters:
    - type: ResponseHeaderModifier
      responseHeaderModifier:
        remove:
        - "server"
EOF
With resource udpated, the backend server implementation is invisible on client side.
curl -I -H 'host:foo.example.com' http://$GATEWAY_IP:8000/headers
HTTP/1.1 200 OK
date: Tue, 21 Nov 2023 09:00:32 GMT
content-type: application/json
content-length: 139
access-control-allow-origin: *
access-control-allow-credentials: true
connection: keep-alive
7.4.7 - TCP Routing
This document will describe how to configure FSM Gateway to load balance TCP traffic.
During the L4 load balancing process, FSM Gateway determines which backend server to distribute traffic to based mainly on network layer and transport layer information, such as IP address and port number. This approach allows the FSM Gateway to make decisions quickly and forward traffic to the appropriate server, thereby improving overall network performance.
If you want to load balance HTTP traffic, please refer to the document HTTP Routing.
Prerequisites
- Kubernetes cluster version v1.21.0 or higher.
- kubectl CLI
- FSM Gateway installed via guide doc.
Demonstration
Deploy sample
First, let’s install the example in namespace httpbin with commands below.
kubectl create namespace httpbin
kubectl apply -n httpbin -f https://raw.githubusercontent.com/flomesh-io/fsm-docs/main/manifests/gateway/tcp-routing.yaml
The command above will create Gateway and TCPRoute resources except for sample app ht tpbin.
In Gateway, there are two listener defined listening on ports 8000 and 8001.
listeners:
- protocol: TCP
  port: 8000
  name: foo
  allowedRoutes:
    namespaces:
      from: Same
- protocol: TCP
  port: 8001
  name: bar
  allowedRoutes:
    namespaces:
      from: Same
The TCPRoute mapping to backend service httpbin is bound to the two ports defined above.
parentRefs:
- name: simple-fsm-gateway
  port: 8000
- name: simple-fsm-gateway
  port: 8001
rules:
- backendRefs:
  - name: httpbin
    port: 8080
This means we should reach backend service via either of two ports.
Testing
Let’s record the IP address of Gateway first.
export GATEWAY_IP=$(kubectl get svc -n httpbin -l app=fsm-gateway -o jsonpath='{.items[0].status.loadBalancer.ingress[0].ip}')
Sending a request to port 8000 of gateway and it will forward the traffic to backend service.
curl http://$GATEWAY_IP:8000/headers
{
  "headers": {
    "Accept": "*/*",
    "Host": "20.24.88.85:8000",
    "User-Agent": "curl/8.1.2"
  }
With gatweay port 8081, it works fine too.
curl http://$GATEWAY_IP:8001/headers
{
  "headers": {
    "Accept": "*/*",
    "Host": "20.24.88.85:8001",
    "User-Agent": "curl/8.1.2"
  }
}
The path /headers responds all request header received. From the header Host, we can get the entrance.
7.4.8 - TLS Termination
TLS offloading is the process of terminating TLS connections at a load balancer or gateway, decrypting the traffic and passing it to the backend server, thereby relieving the backend server of the encryption and decryption burden.
This doc will show you how to use TSL termination for service.
Prerequisites
- Kubernetes cluster version v1.21.0 or higher.
- kubectl CLI
- FSM Gateway installed via guide doc.
Demonstration
export GATEWAY_IP=$(kubectl get svc -n httpbin -l app=fsm-gateway -o jsonpath='{.items[0].status.loadBalancer.ingress[0].ip}')
Issue TLS certificate
If configure TLS, a certificate is required. Let’s issue a certificate first.
openssl req -x509 -sha256 -nodes -days 365 -newkey rsa:2048 \
  -keyout example.com.key -out example.com.crt \
  -subj "/CN=example.com"
With command above executed, you will get two files example.com.crt and example.com.key which we can create a secret with.
kubectl create namespace httpbin
kubectl create secret tls simple-gateway-cert --key=example.com.key --cert=example.com.crt -n httpbin
Deploy sample app
kubectl apply -n httpbin -f https://raw.githubusercontent.com/flomesh-io/fsm-docs/main/manifests/gateway/tls-termination.yaml
Test
curl --cacert example.com.crt https://example.com/headers  --connect-to example.com:443:$GATEWAY_IP:8000
{
  "headers": {
    "Accept": "*/*",
    "Connection": "keep-alive",
    "Host": "example.com",
    "User-Agent": "curl/7.68.0"
  }
}
7.4.9 - TLS Passthrough
TLS passthrough means that the gateway does not decrypt TLS traffic, but directly transmits the encrypted data to the back-end server, which decrypts and processes it.
This doc will guide how to use the TLS Passthrought feature.
Prerequisites
- Kubernetes cluster version v1.21.0 or higher.
- kubectl CLI
- FSM Gateway installed via guide doc.
Demonstration
We will utilize https://httpbin.org for TLS passthrough testing, functioning similarly to the sample app deployed in other documentation sections.
Create Gateway
First of all, we need to create a gateway to accept incoming request. Different from TLS Termination, the mode is set to Passthrough for the listener.
Let’s create it in namespace httpbin which accepts route resources in same namespace.
kubectl create ns httpbin
kubectl apply -n httpbin -f - <<EOF
apiVersion: gateway.networking.k8s.io/v1
kind: Gateway
metadata:
  name: simple-fsm-gateway
spec:
  gatewayClassName: fsm-gateway-cls
  listeners:
  - protocol: TLS
    port: 8000
    name: foo
    tls:
      mode: Passthrough
    allowedRoutes:
      namespaces:
        from: Same
EOF
Let’s record the IP address of gateway.
export GATEWAY_IP=$(kubectl get svc -n httpbin -l app=fsm-gateway -o jsonpath='{.items[0].status.loadBalancer.ingress[0].ip}')
Create TCP Route
To route encrypted traffic to a backend service without decryption, the use of TLSRoute is necessary in this context.
In the rules.backendRefs configuration, we specify an external service using its host and port. For example, for https://httpbin.org, these would be set as name: httpbin.org and port: 443.
kubectl apply -n httpbin -f - <<EOF
apiVersion: gateway.networking.k8s.io/v1alpha2
kind: TLSRoute
metadata:
  name: tcp-route
spec:
  parentRefs:
  - name: simple-fsm-gateway
    port: 8000
  rules:
  - backendRefs:
    - name: httpbin.org
      port: 443
EOF
Test
We issue requests to the URL https://httpbin.org, but in reality, these are routed through the gateway.
curl https://httpbin.org/headers --connect-to httpbin.org:443:$GATEWAY_IP:8000
{
  "headers": {
    "Accept": "*/*",
    "Host": "httpbin.org",
    "User-Agent": "curl/8.1.2",
    "X-Amzn-Trace-Id": "Root=1-655dd2be-583e963f5022e1004257d331"
  }
}
7.4.10 - gRPC Routing
The GRPCRoute is used to route gRPC request to backend service. It can match requests by hostname, gRPC service, gRPC method, or HTTP/2 header.
Prerequisites
- Kubernetes cluster version v1.21.0 or higher.
- kubectl CLI
- FSM Gateway installed via guide doc.
Demonstration
Deploy sample
kubectl create namespace grpcbin
kubectl apply -n grpcbin -f https://raw.githubusercontent.com/flomesh-io/fsm-docs/main/manifests/gateway/gprc-routing.yaml
In gRPC case, the listener configuration is similar with HTTP routing.
gRPC Route
We configure the match rule using service: hello.HelloService and method: SayHello to direct traffic to the target service.
rules:
- matches:
  - method:
      service: hello.HelloService
      method: SayHello
  backendRefs:
  - name: grpcbin
    port: 9000
Let’s test our configuration now.
Test
To test gRPC service, we will test with help of the tool grpcurl.
Let’s record the IP address of gateway first.
export GATEWAY_IP=$(kubectl get svc -n grpcbin -l app=fsm-gateway -o jsonpath='{.items[0].status.loadBalancer.ingress[0].ip}')
Issue a request using the grpcurl command, specifying the service name and method. Doing so will yield the correct response.
grpcurl -plaintext -d '{"greeting":"Flomesh"}' $GATEWAY_IP:8000 hello.HelloService/SayHello
{
  "reply": "hello Flomesh"
}
7.4.11 - UDP Routing
The UDPRoute provides a method to route UDP traffic. When combined with a gateway listener, it can be used to forward traffic on a port specified by the listener to a set of backends defined in the UDPRoute.
Prerequisites
- Kubernetes cluster version v1.21.0 or higher.
- kubectl CLI
- FSM Gateway installed via guide doc.
Demonstration
Prerequisites
- Kubernetes cluster
- kubectl tool
Environment Setup
Deploying Sample Application
Use fortio server as a sample application, which provides a UDP service listening on port 8078 and echoes back the content sent by the client.
kubectl create namespace server
kubectl apply -n server -f - <<EOF
apiVersion: v1
kind: Service
metadata:
  name: fortio
  labels:
    app: fortio
    service: fortio
spec:
  ports:
  - port: 8078
    name: udp-8078
  selector:
    app: fortio
---
apiVersion: apps/v1
kind: Deployment
metadata:
  name: fortio
spec:
  replicas: 1
  selector:
    matchLabels:
      app: fortio
  template:
    metadata:
      labels:
        app: fortio
    spec:
      containers:
      - name: fortio
        image: fortio/fortio:latest_release
        imagePullPolicy: Always
        ports:
        - containerPort: 8078
          name: http
EOF
Creating UDP Gateway
Next, create a Gateway for the UDP service, setting the protocol of the listening port to UDP.
kubectl apply -n server -f - <<EOF
apiVersion: gateway.networking.k8s.io/v1
kind: Gateway
metadata:
  namespace: server
  name: simple-fsm-gateway
spec:
  gatewayClassName: fsm-gateway-cls
  listeners:
    - protocol: UDP
      port: 8000
      name: udp
EOF
Creating UDP Route
Similar to the HTTP protocol, to access backend services through the gateway, a UDPRoute needs to be created.
kubectl -n server apply -f - <<EOF
apiVersion: gateway.networking.k8s.io/v1alpha2
kind: UDPRoute
metadata:
  name: udp-route-sample
spec:
  parentRefs:
    - name: simple-fsm-gateway
      namespace: server
      port: 8000
  rules:
  - backendRefs:
    - name: fortio
      port: 8078
EOF
Test accessing the UDP service. After sending the word ‘fsm’, the same word will be received back.
export GATEWAY_IP=$(kubectl get svc -n server -l app=fsm-gateway -o jsonpath='{.items[0].status.loadBalancer.ingress[0].ip}')

echo 'fsm' | nc -4u -w1 $GATEWAY_IP 8000
fsm
7.4.12 - Fault Injection
The fault injection feature is a powerful testing mechanism used to enhance the robustness and reliability of microservice architectures. This capability tests a system’s fault tolerance and recovery mechanisms by simulating network-level failures such as delays and error responses. Fault injection mainly includes two types: delayed injection and error injection.
Delay injection simulates network delays or slow service processing by artificially introducing delays during the gateway’s processing of requests. This helps test whether the timeout handling and retry strategies of downstream services are effective, ensuring that the entire system can maintain stable operation when actual delays occur.
Error injection simulates a backend service failure by having the gateway return an error response (such as HTTP 5xx errors). This method can verify the service consumer’s handling of failures, such as whether error handling logic and fault tolerance mechanisms, such as circuit breaker mode, are correctly executed.
FSM Gateway supports these two types of fault injection and provides two types of granular fault injection: domain and routing. Next, we will show you the fault injection of FSM Gateway through a demonstration.
Prerequisites
- Kubernetes cluster version v1.21.0 or higher.
- kubectl CLI
- FSM Gateway installed via guide doc.
Demonstration
Deploy Sample Application
Next, deploy the sample application, use the commonly used httpbin service, and create Gateway and [HTTP Route (HttpRoute)] (https://gateway-api.sigs.k8s.io/api-types/httproute/).
kubectl create namespace httpbin
kubectl apply -n httpbin -f https://raw.githubusercontent.com/flomesh-io/fsm-docs/main/manifests/gateway/http-routing.yaml
Confirm Gateway and HTTPRoute created. You will get two HTTP routes with different domain.
kubectl get gateway,httproute -n httpbin
NAME                                                   CLASS             ADDRESS   PROGRAMMED   AGE
gateway.gateway.networking.k8s.io/simple-fsm-gateway   fsm-gateway-cls             Unknown      3s

NAME                                                 HOSTNAMES             AGE
httproute.gateway.networking.k8s.io/http-route-foo   ["foo.example.com"]   2s
httproute.gateway.networking.k8s.io/http-route-bar   ["bar.example.com"]   2s
Check if you can reach service via gateway.
export GATEWAY_IP=$(kubectl get svc -n httpbin -l app=fsm-gateway -o jsonpath='{.items[0].status.loadBalancer.ingress[0].ip}')

curl http://$GATEWAY_IP:8000/headers -H 'host:foo.example.com'
{
  "headers": {
    "Accept": "*/*",
    "Connection": "keep-alive",
    "Host": "10.42.0.15:80",
    "User-Agent": "curl/7.81.0"
  }
}
Fault Injection Testing
Route-Level Fault Injection
We add a route under the HTTP route foo.example.com with a path prefix /headers to facilitate setting fault injection.
kubectl apply -n httpbin -f - <<EOF
apiVersion: gateway.networking.k8s.io/v1
kind: HTTPRoute
metadata:
  name: http-route-foo
spec:
  parentRefs:
  - name: simple-fsm-gateway
    port: 8000
  hostnames:
  - foo.example.com
  rules:
  - matches:
    - path:
        type: PathPrefix
        value: /headers
    backendRefs:
    - name: httpbin
      port: 8080
  - matches:
    - path:
        type: PathPrefix
        value: /
    backendRefs:
    - name: httpbin
      port: 8080
EOF
When we request the /headers and /get paths, we can get the correct response.
Next, we inject a 404 fault with a 100% probability on the /headers route. For detailed configuration, please refer to FaultInjectionPolicy API Reference.
kubectl apply -n httpbin -f - <<EOF
apiVersion: gateway.flomesh.io/v1alpha1
kind: FaultInjectionPolicy
metadata:
  name: fault-injection
spec:
  targetRef:
    group: gateway.networking.k8s.io
    kind: HTTPRoute
    name: http-route-foo
    namespace: httpbin
  http:
  - match:
      path:
        type: PathPrefix
        value: /headers
    config:
      abort:
        percent: 100
        statusCode: 404
EOF
Now, requesting /headers results in a 404 response.
curl -I http://$GATEWAY_IP:8000/headers -H 'host:foo.example.com'
HTTP/1.1 404 Not Found
content-length: 0
connection: keep-alive
Requesting /get will not be affected.
curl -I http://$GATEWAY_IP:8000/get -H 'host:foo.example.com'
HTTP/1.1 200 OK
server: gunicorn/19.9.0
date: Thu, 14 Dec 2023 14:11:36 GMT
content-type: application/json
content-length: 220
access-control-allow-origin: *
access-control-allow-credentials: true
connection: keep-alive
Domain-Level Fault Injection
kubectl apply -n httpbin -f - <<EOF
apiVersion: gateway.flomesh.io/v1alpha1
kind: FaultInjectionPolicy
metadata:
  name: fault-injection
spec:
  targetRef:
    group: gateway.networking.k8s.io
    kind: HTTPRoute
    name: http-route-foo
    namespace: httpbin
  hostnames:
    - hostname: foo.example.com
      config:
        abort:
          percent: 100
          statusCode: 404
EOF
Requesting foo.example.com returns a 404 response.
curl -I http://$GATEWAY_IP:8000/headers -H 'host:foo.example.com'
HTTP/1.1 404 Not Found
content-length: 0
connection: keep-alive
However, requesting bar.example.com, which is not listed in the fault injection, responds normally.
curl -I http://$GATEWAY_IP:8000/headers -H 'host:bar.example.com'
HTTP/1.1 200 OK
server: gunicorn/19.9.0
date: Thu, 14 Dec 2023 13:55:07 GMT
content-type: application/json
content-length: 140
access-control-allow-origin: *
access-control-allow-credentials: true
connection: keep-alive
Modify the fault injection policy to change the error fault to a delay fault: introducing a random delay of 500 to 1000 ms.
kubectl apply -n httpbin -f - <<EOF
apiVersion: gateway.flomesh.io/v1alpha1
kind: FaultInjectionPolicy
metadata:
  name: fault-injection
spec:
  targetRef:
    group: gateway.networking.k8s.io
    kind: HTTPRoute
    name: http-route-foo
    namespace: httpbin
  hostnames:
    - hostname: foo.example.com
      config:
        delay:
          percent: 100
          range:
            min: 500
            max: 1000
          unit: ms
EOF
Check the response time of the requests to see the introduced random delay.
time curl -s http://$GATEWAY_IP:8000/headers -H 'host:foo.example.com' > /dev/null

real	0m0.904s
user	0m0.000s
sys	0m0.010s

time curl -s http://$GATEWAY_IP:8000/headers -H 'host:foo.example.com' > /dev/null

real	0m0.572s
user	0m0.005s
sys	0m0.005s
7.4.13 - Access Control
Blacklist and whitelist functionality is an effective network security mechanism used to control and manage network traffic. This feature relies on a predefined list of rules to determine which entities (IP addresses or IP ranges) are allowed or denied passage through the gateway. The gateway uses blacklists and whitelists to filter incoming network traffic. This method provides simple and direct access control, easy to manage, and effectively prevents known security threats.
As the entry point for cluster traffic, the FSM Gateway manages all traffic entering the cluster. By setting blacklist and whitelist access control policies, it can filter traffic entering the cluster.
FSM Gateway provides two granularities of access control, both targeting L7 HTTP protocol:
- Domain-level access control: A network traffic management strategy based on domain names. It involves implementing access rules for traffic that meets specific domain name conditions, such as allowing or blocking communication with certain domain names.
- Route-level access control: A management strategy based on routes (request headers, methods, paths, parameters), where access control policies are applied to specific routes to manage traffic accessing those routes.
Next, we will demonstrate the use of blacklist and whitelist access control.
Prerequisites
- Kubernetes cluster version v1.21.0 or higher.
- kubectl CLI
- FSM Gateway installed via guide doc.
Demonstration
Deploying a Sample Application
Next, deploy a sample application using the commonly used httpbin service, and create Gateway and HTTP Route (HttpRoute).
kubectl create namespace httpbin
kubectl apply -n httpbin -f https://raw.githubusercontent.com/flomesh-io/fsm-docs/main/manifests/gateway/http-routing.yaml
Check the gateway and HTTP routes; you should see two routes with different domain names created.
kubectl get gateway,httproute -n httpbin
NAME                                                   CLASS             ADDRESS   PROGRAMMED   AGE
gateway.gateway.networking.k8s.io/simple-fsm-gateway   fsm-gateway-cls             Unknown      3s

NAME                                                 HOSTNAMES             AGE
httproute.gateway.networking.k8s.io/http-route-foo   ["foo.example.com"]   2s
httproute.gateway.networking.k8s.io/http-route-bar   ["bar.example.com"]   2s
Verify if the HTTP routing is effective by accessing the application.
export GATEWAY_IP=$(kubectl get svc -n httpbin -l app=fsm-gateway -o jsonpath='{.items[0].status.loadBalancer.ingress[0].ip}')

curl http://$GATEWAY_IP:8000/headers -H 'host:foo.example.com'
{
  "headers": {
    "Accept": "*/*",
    "Connection": "keep-alive",
    "Host": "10.42.0.15:80",
    "User-Agent": "curl/7.81.0"
  }
}
Domain-Based Access Control
With domain-based access control, we can set one or more domain names in the policy and add a blacklist or whitelist for these domains.
For example, in the policy below:
targetRefis a reference to the target resource for which the policy is applied, which is theHTTPRouteresource for HTTP requests.- Through the
hostnamefield, we add a blacklist or whitelist policy forfoo.example.comamong the two domains. - With the prevalence of cloud services and distributed network architectures, the direct connection to the gateway is no longer the client but an intermediate proxy. In such cases, we usually use the HTTP header
X-Forwarded-Forto identify the client’s IP address. In FSM Gateway’s policy, theenableXFFfield controls whether to obtain the client’s IP address from theX-Forwarded-Forheader. - For denied communications, customize the response with
statusCodeandmessage.
For detailed configuration, please refer to AccessControlPolicy API Reference.
kubectl apply -n httpbin -f - <<EOF
apiVersion: gateway.flomesh.io/v1alpha1
kind: AccessControlPolicy
metadata:
  name: access-control-sample
spec:
  targetRef:
    group: gateway.networking.k8s.io
    kind: HTTPRoute
    name: http-route-foo
    namespace: httpbin
  hostnames:
    - hostname: foo.example.com
      config:
        blacklist:
          - 192.168.0.0/24
        whitelist:
          - 112.94.5.242
        enableXFF:

 true
        statusCode: 403
        message: "Forbidden"
EOF
After the policy is effective, we send requests for testing, remembering to add X-Forwarded-For to specify the client IP.
curl -I http://$GATEWAY_IP:8000/headers -H 'host:foo.example.com'  -H 'x-forwarded-for:112.94.5.242'
HTTP/1.1 200 OK
server: gunicorn/19.9.0
date: Fri, 29 Dec 2023 02:29:08 GMT
content-type: application/json
content-length: 139
access-control-allow-origin: *
access-control-allow-credentials: true
connection: keep-alive

curl -I http://$GATEWAY_IP:8000/headers -H 'host:foo.example.com'  -H 'x-forwarded-for: 10.42.0.1'
HTTP/1.1 403 Forbidden
content-length: 9
connection: keep-alive
From the results, when both a whitelist and a blacklist are present, the blacklist configuration will be ignored.
Route-Based Access Control
Route-based access control allows us to set access control policies for specific routes (path, request headers, method, parameters) to restrict access to these particular routes.
Before setting up the access control policy, we add a route with the path prefix /headers under the HTTP route foo.example.com to facilitate the configuration of access control for it.
kubectl apply -n httpbin -f - <<EOF
apiVersion: gateway.networking.k8s.io/v1
kind: HTTPRoute
metadata:
  name: http-route-foo
spec:
  parentRefs:
  - name: simple-fsm-gateway
    port: 8000
  hostnames:
  - foo.example.com
  rules:
  - matches:
    - path:
        type: PathPrefix
        value: /headers
    backendRefs:
    - name: httpbin
      port: 8080
  - matches:
    - path:
        type: PathPrefix
        value: /
    backendRefs:
    - name: httpbin
      port: 8080
EOF
In the following policy:
- The
matchis used to configure the routes to be matched, here we use path matching. - Other configurations continue to use the settings from above.
kubectl apply -n httpbin -f - <<EOF
apiVersion: gateway.flomesh.io/v1alpha1
kind: AccessControlPolicy
metadata:
  name: access-control-sample
spec:
  targetRef:
    group: gateway.networking.k8s.io
    kind: HTTPRoute
    name: http-route-foo
    namespace: httpbin
  http:
    - match:
        path:
          type: PathPrefix
          value: /headers
      config:
        blacklist:
          - 192.168.0.0/24
        whitelist:
          - 112.94.5.242
        enableXFF: true
        statusCode: 403
        message: "Forbidden"
EOF
After updating the policy, we send requests to test. For the path /headers, the results are as before.
curl -I http://$GATEWAY_IP:8000/headers -H 'host:foo.example.com'  -H 'x-forwarded-for:112.94.5.242'
HTTP/1.1 200 OK
server: gunicorn/19.9.0
date: Fri, 29 Dec 2023 02:39:02 GMT
content-type: application/json
content-length: 139
access-control-allow-origin: *
access-control-allow-credentials: true
connection: keep-alive

curl -I http://$GATEWAY_IP:8000/headers -H 'host:foo.example.com'  -H 'x-forwarded-for: 10.42.0.1'
HTTP/1.1 403 Forbidden
content-length: 9
connection: keep-alive
However, if the path /get is accessed, there are no restrictions.
curl -I http://$GATEWAY_IP:8000/get -H 'host:foo.example.com'  -H 'x-forwarded-for: 10.42.0.1'
HTTP/1.1 200 OK
server: gunicorn/19.9.0
date: Fri, 29 Dec 2023 02:40:18 GMT
content-type: application/json
content-length: 230
access-control-allow-origin: *
access-control-allow-credentials: true
connection: keep-alive
This demonstrates the effectiveness and specificity of route-based access control in managing access to different routes within a network infrastructure.
7.4.14 - Rate Limit
Rate limiting in gateways is a crucial network traffic management strategy for controlling the data transfer rate through the gateway, essential for ensuring network stability and efficiency.
FSM Gateway’s rate limiting can be implemented based on various criteria, including port, domain, and route.
- Port-based Rate Limiting: Controls the data transfer rate at the port, ensuring traffic does not exceed a set threshold. This is often used to prevent network congestion and server overload.
- Domain-based Rate Limiting: Sets request rate limits for specific domains. This strategy is typically used to control access frequency to certain services or applications to prevent overload and ensure service quality.
- Route-based Rate Limiting: Sets request rate limits for specific routes or URL paths. This approach allows for more granular traffic control within different parts of a single application.
Configuration
For detailed configuration, please refer to RateLimitPolicy API Reference.
targetRefrefers to the target resource for applying the policy, set here for port granularity, hence referencing theGatewayresourcesimple-fsm-gateway.bps: The default rate limit for the port, measured in bytes per second.config: L7 rate limiting configuration.portsportspecifies the port.bpssets the bytes per second.
hostnameshostname: Domain name.config: L7 rate limiting configuration.
httpmatch:headers: HTTP request matching.method: HTTP method matching.
config: L7 rate limiting configuration.
L7 Rate Limiting Configuration:
backlog: The backlog value refers to the number of requests the system allows to queue when the rate limit threshold is reached. This is an important field, especially when the system suddenly faces a large number of requests that may exceed the set rate limit threshold. The backlog value provides a buffer to handle requests exceeding the rate limit threshold but within the backlog limit. Once the backlog limit is reached, any new requests will be immediately rejected without waiting. This field is optional, defaulting to10.requests: The request value specifies the number of allowed visits within the rate limit time window. This is the core parameter of the rate limiting strategy, determining how many requests can be accepted within a specific time window. The purpose of setting this value is to ensure that the backend system does not receive more requests than it can handle within the given time window. This field is mandatory, with a minimum value of1.statTimeWindow: The rate limit time window (in seconds) defines the period for counting the number of requests. Rate limiting strategies are usually based on sliding or fixed windows. StatTimeWindow defines the size of this window. For example, ifstatTimeWindowis set to 60 seconds, andrequestsis 100, it means a maximum of 100 requests every 60 seconds. This field is mandatory.burst: The burst value represents the maximum number of requests allowed in a short time. This optional field is mainly used to handle short-term request spikes. The burst value is typically higher than the request value, allowing the number of accepted requests in a short time to exceed the average rate. This field is optional.responseStatusCode: The HTTP status code returned to the client when rate limiting occurs. This status code informs the client that the request was rejected due to reaching the rate limit threshold. Common status codes include429 (Too Many Requests), but can be customized as needed. This field is mandatory.responseHeadersToAdd: HTTP headers to be added to the response when rate limiting occurs. This can be used to inform the client about more information regarding the rate limiting policy. For example, aRateLimit-Limitheader can be added to inform the client of the rate limiting configuration. Additional useful information about the current rate limiting policy or how to contact the system administrator can also be provided. This field is optional.
Prerequisites
- Kubernetes Cluster
- kubectl Tool
- FSM Gateway installed via guide doc.
Demonstration
Deploying a Sample Application
Next, deploy a sample application using the popular httpbin service, and create a Gateway and HTTP Route (HttpRoute).
kubectl create namespace httpbin
kubectl apply -n httpbin -f https://raw.githubusercontent.com/flomesh-io/fsm-docs/main/manifests/gateway/http-routing.yaml
Check the gateway and HTTP route, noting the creation of routes for two different domains.
kubectl get gateway,httproute -n httpbin
NAME                                                   CLASS             ADDRESS   PROGRAMMED   AGE
gateway.gateway.networking.k8s.io/simple-fsm-gateway   fsm-gateway-cls             Unknown      3s

NAME                                                 HOSTNAMES             AGE
httproute.gateway.networking.k8s.io/http-route-foo   ["foo.example.com"]   2s
httproute.gateway.networking.k8s.io/http-route-bar   ["bar.example.com"]   2s
Access the application to verify the HTTP route is effective.
export GATEWAY_IP=$(kubectl get svc -n httpbin -l app=fsm-gateway -o jsonpath='{.items[0].status.loadBalancer.ingress[0].ip}')

curl http://$GATEWAY_IP:8000/headers -H 'host:foo.example.com'
{
  "headers": {
    "Accept": "*/*",
    "Connection": "keep-alive",
    "Host": "10.42.0.15:80",
    "User-Agent": "curl/7.81.0"
  }
}
Rate Limiting Test
Port-Based Rate Limiting
Create an 8k file.
dd if=/dev/zero of=payload bs=1K count=8
Test sending the file to the service, which only takes 1s.
time curl -s -X POST -T payload http://$GATEWAY_IP:8000/status/200 -H 'host:foo.example.com'

real	0m1.018s
user	0m0.001s
sys	0m0.014s
Then set the rate limiting policy:
targetRefis the reference to the target resource of the policy, set here for port granularity, hence referencing theGatewayresourcesimple-fsm-gateway.portsportspecifies port 8000bpssets the bytes per second to 2k
kubectl apply -n httpbin -f - <<EOF
apiVersion: gateway.flomesh.io/v1alpha1
kind: RateLimitPolicy
metadata:
  name: ratelimit-sample
spec:
  targetRef:
    group: gateway.networking.k8s.io
    kind: Gateway
    name: simple-fsm-gateway
    namespace: httpbin
  ports:
    - port: 8000
      bps: 2048
EOF
After the policy takes effect, send the 8k file again. Now the rate limiting policy is in effect, and it takes 4 seconds.
time curl -s -X POST -T payload http://$GATEWAY_IP:8000/status/200 -H 'host:foo.example.com'

real	0m4.016s
user	0m0.007s
sys	0m0.005s
Domain-Based Rate Limiting
Before testing domain-based rate limiting, delete the policy created above.
kubectl delete ratelimitpolicies -n httpbin ratelimit-sample
Then use fortio to generate load: 1 concurrent sending 1000 requests at 200 qps.
fortio load -quiet -c 1 -n 1000 -qps 200 -H 'host:foo.example.com' http://$GATEWAY_IP:8000/status/200

Code 200 : 1000 (100.0 %)
Next, set the rate limiting policy:
- Limiting domain
foo.example.com - Backlog of pending requests set to
1 - Max requests in a
60swindow set to200 - Return
429for rate-limited requests with response headerRateLimit-Limit: 200
kubectl apply -n httpbin -f - <<EOF
apiVersion: gateway.flomesh.io/v1alpha1
kind: RateLimitPolicy
metadata:
  name: ratelimit-sample
spec:
  targetRef:
    group: gateway.networking.k8s.io
    kind: HTTPRoute
    name: http-route-foo
    namespace: httpbin
  hostnames:
    - hostname: foo.example.com
      config:
        backlog: 1
        requests: 100
        statTimeWindow: 60
        responseStatusCode: 429
        responseHeadersToAdd:
          - name: RateLimit-Limit
            value: "100"
EOF
After the policy is effective, generate the same load for testing. You can see that 200 responses are successful, and 798 are rate-limited.
-1is the error code set by fortio during read timeout. This is because fortio’s default timeout is3s, and the rate limiting policy sets the backlog to 1. FSM Gateway defaults to 2 threads, so there are 2 timed-out requests.
fortio load -quiet -c 1 -n 1000 -qps 200 -H 'host:foo.example.com' http://$GATEWAY_IP:8000/status/200

Code  -1 : 2 (0.2 %)
Code 200 : 200 (19.9 %)
Code 429 : 798 (79.9 %)
However, accessing bar.example.com will not be rate-limited.
fortio load -quiet -c 1 -n 1000 -qps 200 -H 'host:bar.example.com' http://$GATEWAY_IP:8000/status/200

Code 200 : 1000 (100.0 %)
Route-Based Rate Limiting
Similarly, delete the previously created policy before starting the next test.
kubectl delete ratelimitpolicies -n httpbin ratelimit-sample
Before configuring the access policy,
under the HTTP route foo.example.com, we add a route with the path prefix /headers to facilitate setting the access control policy for it.
kubectl apply -n httpbin -f - <<EOF
apiVersion: gateway.networking.k8s.io/v1
kind: HTTPRoute
metadata:
  name: http-route-foo
spec:
  parentRefs:
  - name: simple-fsm-gateway
    port: 8000
  hostnames:
  - foo.example.com
  rules:
  - matches:
    - path:
        type: PathPrefix
        value: /status/200
    backendRefs:
    - name: httpbin
      port: 8080
  - matches:
    - path:
        type: PathPrefix
        value: /
    backendRefs:
    - name: httpbin
      port: 8080
EOF
Update the rate limiting policy by adding route matching rules: prefix /status/200, other configurations remain unrestricted.
kubectl apply -n httpbin -f - <<EOF
apiVersion: gateway.flomesh.io/v1alpha1
kind: RateLimitPolicy
metadata:
  name: ratelimit-sample
spec:
  targetRef:
    group: gateway.networking.k8s.io
    kind: HTTPRoute
    name: http-route-foo
    namespace: httpbin
  http:
    - match:
        path:
          type: PathPrefix
          value: /status/200
      config:
        backlog: 1
        requests: 100
        statTimeWindow: 60
        responseStatusCode: 429
        responseHeadersToAdd:
          - name: RateLimit-Limit
            value: "100"
EOF
After applying the policy, send the same load. From the results, only 200 requests are successful.
fortio load -quiet -c 1 -n 1000 -qps 200 -H 'host:foo.example.com' http://$GATEWAY_IP:8000/status/200

Code  -1 : 2 (0.2 %)
Code 200 : 200 (20.0 %)
Code 429 : 798 (79.8 %)
When the path /status/204 is used, it will not be subject to rate limiting.
fortio load -quiet -c 1 -n 1000 -qps 200 -H 'host:foo.example.com' http://$GATEWAY_IP:8000/status/204

Code 204 : 1000 (100.0 %)
7.4.15 - Retry
The retry functionality of a gateway is a crucial network communication mechanism designed to enhance the reliability and fault tolerance of system service calls. This feature allows the gateway to automatically resend a request if the initial request fails, thereby reducing the impact of temporary issues (such as network fluctuations, momentary service overloads, etc.) on the end-user experience.
The working principle is, when the gateway sends a request to a downstream service and encounters specific types of failures (such as connection errors, timeouts, 5xx series errors, etc.), it attempts to resend the request based on pre-set policies instead of immediately returning the error to the client.
Prerequisites
- Kubernetes cluster
- kubectl tool
- FSM Gateway installed via guide doc.
Demonstration
Deploying Example Application
We use the fortio server as the example application, which allows defining response status codes and their occurrence probabilities through the status request parameter.
kubectl create namespace server
kubectl apply -n server -f - <<EOF
apiVersion: v1
kind: Service
metadata:
  name: fortio
  labels:
    app: fortio
    service: fortio
spec:
  ports:
  - port: 8080
    name: http-8080
  selector:
    app: fortio
---
apiVersion: apps/v1
kind: Deployment
metadata:
  name: fortio
spec:
  replicas: 1
  selector:
    matchLabels:
      app: fortio
  template:
    metadata:
      labels:
        app: fortio
    spec:
      containers:
      - name: fortio
        image: fortio/fortio:latest_release
        imagePullPolicy: Always
        ports:
        - containerPort: 8080
          name: http
EOF
Creating Gateway and Route
kubectl apply -n server -f - <<EOF
apiVersion: gateway.networking.k8s.io/v1
kind: Gateway
metadata:
  name: simple-fsm-gateway
spec:
  gatewayClassName: fsm-gateway-cls
  listeners:
  - protocol: HTTP
    port: 8000
    name: http
    allowedRoutes:
      namespaces:
        from: Same
---
apiVersion: gateway.networking.k8s.io/v1
kind: HTTPRoute
metadata:
  name: fortio-route
spec:
  parentRefs:
  - name: simple-fsm-gateway
    port: 8000
  rules:
  - matches:
    - path:
        type: PathPrefix
        value: /
    backendRefs:
    - name: fortio
      port: 8080
EOF
Check if the application is accessible.
export GATEWAY_IP=$(kubectl get svc -n server -l app=fsm-gateway -o jsonpath='{.items[0].status.loadBalancer.ingress[0].ip}')

curl -i http://$GATEWAY_IP:8000/echo
HTTP/1.1 200 OK
date: Fri, 05 Jan 2024 07:02:17 GMT
content-length: 0
connection: keep-alive
Testing Retry Strategy
Before setting the retry strategy, add the parameter status=503:10 to make the fortio server have a 10% chance of returning 503. Using fortio load to generate load, sending 100 requests will see nearly 10% are 503 responses.
fortio load -quiet -c 1 -n 100 http://$GATEWAY_IP:8000/echo\?status\=503:10

Code 200 : 89 (89.0 %)
Code 503 : 11 (11.0 %)
All done 100 calls (plus 0 warmup) 1

.054 ms avg, 8.0 qps
Then set the retry strategy.
targetRefspecifies the target resource for the policy, which in the retry policy can only be aServicein K8scoreorServiceImportinflomesh.io(the latter for multi-cluster). Here we specify thefortioin namespaceserver.portsis the list of service ports, as the service may expose multiple ports, different ports can have different retry strategies.portis the service port, set to8080for thefortioservice in this example.configis the core configuration of the retry policy.retryOnis the list of response codes that are retryable, e.g., 5xx matches 500-599, or 500 matches only 500.numRetriesis the number of retries.backoffBaseIntervalis the base interval for calculating backoff (in seconds), i.e., the waiting time between consecutive retry requests. It’s mainly to avoid additional pressure on services that are experiencing problems.
For detailed retry policy configuration, refer to the official documentation RetryPolicy.
kubectl apply -n server -f - <<EOF
apiVersion: gateway.flomesh.io/v1alpha1
kind: RetryPolicy
metadata:
  name: retry-policy-sample
spec:
  targetRef:
    kind: Service
    name: fortio
    namespace: server
  ports:
  - port: 8080
    config:
      retryOn:
      - 5xx
      numRetries: 5
      backoffBaseInterval: 2
EOF
After the policy takes effect, send the same 100 requests, and you can see all are 200 responses. Note that the average response time has increased due to the added time for retries.
fortio load -quiet -c 1 -n 100 http://$GATEWAY_IP:8000/echo\?status\=503:10

Code 200 : 100 (100.0 %)
All done 100 calls (plus 0 warmup) 160.820 ms avg, 5.8 qps
7.4.16 - Session Sticky
Session sticky in a gateway is a network technology designed to ensure that a user’s consecutive requests are directed to the same backend server over a period of time. This functionality is particularly crucial in scenarios requiring user state maintenance or continuous interaction, such as maintaining online shopping carts, keeping users logged in, or handling multi-step transactions.
Session sticky plays a key role in enhancing website performance and user satisfaction by providing a consistent user experience and maintaining transaction integrity. It is typically implemented using client identification information like Cookies or server-side IP binding techniques, thereby ensuring request continuity and effective server load balancing.
Prerequisites
- Kubernetes cluster
- kubectl tool
- FSM Gateway installed via guide doc.
Demonstration
Deploying a Sample Application
To verify the session sticky feature, create the Service pipy, and set up two endpoints with different responses. These endpoints are simulated using the programmable proxy Pipy.
kubectl create namespace server
kubectl apply -n server -f - <<EOF
apiVersion: v1
kind: Service
metadata:
  name: pipy
spec:
  selector:
    app: pipy
  ports:
    - protocol: TCP
      port: 8080
      targetPort: 8080

---
apiVersion: v1
kind: Pod
metadata:
  name: pipy-1
  labels:
    app: pipy
spec:
  containers:
  - name: pipy
    image: flomesh/pipy:0.99.0-2
    command: ["pipy", "-e", "pipy().listen(8080).serveHTTP(new Message({status: 200},'Hello, world'))"]

---
apiVersion: v1
kind: Pod
metadata:
  name: pipy-2
  labels:
    app: pipy
spec:
  containers:
  - name: pipy
    image: flomesh/pipy:0.99.0-2
    command: ["pipy", "-e", "pipy().listen(8080).serveHTTP(new Message({status: 503},'Service unavailable'))"]
EOF
Creating Gateway and Routes
Next, create a gateway and set up routes for the Service pipy.
kubectl apply -n server -f - <<EOF
apiVersion: gateway.networking.k8s.io/v1
kind: Gateway
metadata:
  name: simple-fsm-gateway
spec:
  gatewayClassName: fsm-gateway-cls
  listeners:
  - protocol: HTTP
    port: 8000
    name: http
    allowedRoutes:
      namespaces:
        from: Same
---
apiVersion: gateway.networking.k8s.io/v1
kind: HTTPRoute
metadata:
  name: fortio-route
spec:
  parentRefs:
  - name: simple-fsm-gateway
    port: 8000
  rules:
  - matches:
    - path:
        type: PathPrefix
        value: /
    backendRefs:
    - name: pipy
      port: 8080
EOF
Check if the application is accessible. Results show that the gateway has balanced the load across two endpoints.
export GATEWAY_IP=$(kubectl get svc -n server -l app=fsm-gateway -o jsonpath='{.items[0].status.loadBalancer.ingress[0].ip}')

curl http://$GATEWAY_IP:8000/
Service unavailable

curl http://$GATEWAY_IP:8000/
Hello, world
Testing Session Sticky Strategy
Next, configure the session sticky strategy.
targetRefspecifies the target resource for the policy. In this policy, the target resource can only be a K8scoreService. Here, thepipyin theservernamespace is specified.portsis a list of service ports, as a service may expose multiple ports, allowing different ports to set retry strategies.portis the service port, set to8080for thepipyservice in this example.configis the core configuration of the strategy.cookieNameis the name of the cookie used for session sticky via cookie-based load balancing. This field is optional, but when cookie-based session sticky is enabled, it defines the name of the cookie storing backend server information, such as_srv_id. This means that when a user first visits the application, a cookie named_srv_idis set, typically corresponding to a backend server. When the user revisits, this cookie ensures their requests are routed to the same server as before.expiresis the lifespan of the cookie during session sticky. This defines how long the cookie will last, i.e., how long the user’s consecutive requests will be directed to the same backend server.
For detailed configuration, refer to the official documentation SessionStickyPolicy.
kubectl apply -n server -f - <<EOF
apiVersion: gateway.flomesh.io/v1alpha1
kind: SessionStickyPolicy
metadata:
  name: session-sticky-policy-sample
spec:
  targetRef:
    group: ""
    kind: Service
    name: pipy
    namespace: server
  ports:
  - port: 8080
    config:
      cookieName: _srv_id
      expires: 600
EOF
After creating the policy, send requests again. By adding the option -i, you can see the cookie information added in the response header.
curl -i http://$GATEWAY_IP:8000/
HTTP/1.1 200 OK
set-cookie: _srv_id=7252425551334343; path=/; expires=Fri,  5 Jan 2024 19:15:23 GMT; max-age=600
content-length: 12
connection: keep-alive

Hello, world
Send 3 requests next, adding the cookie information from the above response with the -b parameter. All 3 requests receive the same response, indicating that the session sticky feature is effective.
curl -b _srv_id=7252425551334343 http://$GATEWAY_IP:8000/
Hello, world

curl -b _srv_id=7252425551334343 http://$GATEWAY_IP:8000/
Hello, world

curl -b _srv_id=7252425551334343 http://$GATEWAY_IP:8000/
Hello, world
7.4.17 - Health Check
Gateway health check is an automated monitoring mechanism that regularly checks and verifies the health of backend services, ensuring traffic is only forwarded to those services that are healthy and can handle requests properly. This feature is crucial in microservices or distributed systems, as it maintains high availability and resilience by promptly identifying and isolating faulty or underperforming services.
Health checks enable gateways to ensure that request loads are effectively distributed to well-functioning services, thereby improving the overall system stability and response speed.
Prerequisites
- Kubernetes cluster
- kubectl tool
- FSM Gateway installed via guide doc.
Demonstration
Deploying a Sample Application
To test the health check functionality, create two endpoints with different health statuses. This is achieved by creating the Service pipy, with two endpoints simulated using the programmable proxy Pipy.
kubectl create namespace server
kubectl apply -n server -f - <<EOF
apiVersion: v1
kind: Service
metadata:
  name: pipy
spec:
  selector:
    app: pipy
  ports:
    - protocol: TCP
      port: 8080
      targetPort: 8080
---
apiVersion: v1
kind: Pod
metadata:
  name: pipy-1
  labels:
    app: pipy
spec:
  containers:
  - name: pipy
    image: flomesh/pipy:0.99.0-2
    command: ["pipy", "-e", "pipy().listen(8080).serveHTTP(new Message({status: 200},'Hello, world'))"]
---
apiVersion: v1
kind: Pod
metadata:
  name: pipy-2
  labels:
    app: pipy
spec:
  containers:
  - name: pipy
    image: flomesh/pipy:0.99.0-2
    command: ["pipy", "-e", "pipy().listen(8080).serveHTTP(new Message({status: 503},'Service unavailable'))"]
EOF
Creating Gateway and Routes
Next, create a gateway and set up routes for the Service pipy.
kubectl apply -n server -f - <<EOF
apiVersion: gateway.networking.k8s.io/v1
kind: Gateway
metadata:
  name: simple-fsm-gateway
spec:
  gatewayClassName: fsm-gateway-cls
  listeners:
  - protocol: HTTP
    port: 8000
    name: http
    allowedRoutes:
      namespaces:
        from: Same
---
apiVersion: gateway.networking.k8s.io/v1
kind: HTTPRoute
metadata:
  name: fortio-route
spec:
  parentRefs:
  - name: simple-fsm-gateway
    port: 8000
  rules:
  - matches:
    - path:
        type: PathPrefix
        value: /
    backendRefs:
    - name: pipy
      port: 8080
EOF
Check if the application is accessible. The results show that the gateway has balanced the load between a healthy endpoint and an unhealthy one.
export GATEWAY_IP=$(kubectl get svc -n server -l app=fsm-gateway -o jsonpath='{.items[0].status.loadBalancer.ingress[0].ip}')
curl -o /dev/null -s -w '%{http_code}' http://$GATEWAY_IP:8000/
200
curl -o /dev/null -s -w '%{http_code}' http://$GATEWAY_IP:8000/
503
Testing Health Check Functionality
Next, configure the health check policy.
targetRefspecifies the target resource for the policy, which can only be a K8scoreService. Here, thepipyin theservernamespace is specified.portsis a list of service ports, as a service may expose multiple ports, allowing different ports to set retry strategies.portis the service port, set to8080for thepipyservice in this example.configis the core configuration of the policy.interval: Health check interval, indicating the time interval at which the system performs health checks on backend services.maxFails: Maximum failure count, defining the consecutive health check failures allowed before marking an upstream service as unavailable. This is a key parameter as it determines the system’s tolerance before deciding a service is unhealthy.failTimeout: Failure timeout, defining the length of time an upstream service will be temporarily disabled after being marked unhealthy. This means that even if the service becomes available again, it will be considered unavailable by the proxy during this period.path: Health check path, used for the path in HTTP health checks.matches: Matching conditions, used to determine the success or failure of HTTP health checks. This field can contain multiple conditions, such as expected HTTP status codes, response body content, etc.statusCodes: A list of HTTP response status codes to match, such as[200,201,204].body: The body content of the HTTP response to match.headers: The header information of the HTTP response to match. This field is optional.name: It defines the specific field name you want to match in the HTTP response header. For example, to check the value of theContent-Typeheader, you would setnametoContent-Type. This field is only valid whenTypeis set toheadersand should not be set in other cases. This field is optional.value: The expected matching value. Defines the expected match value. For example,
For detailed policy configuration, refer to the official documentation HealthCheckPolicy.
kubectl apply -n server -f - <<EOF
apiVersion: gateway.flomesh.io/v1alpha1
kind: HealthCheckPolicy
metadata:
  name: health-check-policy-sample
spec:
  targetRef:
    group: ""
    kind: Service
    name: pipy
    namespace: server
  ports:
  - port: 8080
    config:
      interval: 10
      maxFails: 3
      failTimeout: 1
      path: /healthz
      matches:
      - statusCodes:
        - 200
        - 201
EOF
After this configuration, multiple requests consistently return a 200 response, indicating the unhealthy endpoint has been isolated by the gateway.
curl -o /dev/null -s -w '%{http_code}' http://$GATEWAY_IP:8000/
200
curl -o /dev/null -s -w '%{http_code}' http://$GATEWAY_IP:8000/
200
curl -o /dev/null -s -w '%{http_code}' http://$GATEWAY_IP:8000/
200
7.4.18 - Loadbalancing Algorithm
In microservices and API gateway architectures, load balancing is critical for evenly distributing requests across each service instance and providing mechanisms for high availability and fault recovery. FSM Gateway offers various load balancing algorithms, allowing the selection of the most suitable method based on business needs and traffic patterns.
Multiple load balancing algorithms support efficient traffic distribution, maximizing resource utilization and improving service response times:
- RoundRobinLoadBalancer: A common load balancing algorithm where requests are sequentially assigned to each service instance. This is FSM Gateway’s default algorithm unless otherwise specified.
- HashingLoadBalancer: Calculates a hash value based on certain request attributes (like source IP or headers), routing requests to specific service instances. This ensures the same requester or type of request is always routed to the same service instance.
- LeastConnectionLoadBalancer: Considers the current workload (number of connections) of each service instance, allocating new requests to the instance with the least load, ensuring more even resource utilization.
Prerequisites
- Kubernetes cluster
- kubectl tool
- FSM Gateway installed via guide doc.
Demonstration
Deploying a Sample Application
To test load balancing, create two endpoints with different response statuses (200, 201) and content. This is done by creating the Service pipy, with two endpoints simulated using the programmable proxy Pipy.
kubectl create namespace server
kubectl apply -n server -f - <<EOF
apiVersion: v1
kind: Service
metadata:
  name: pipy
spec:
  selector:
    app: pipy
  ports:
    - protocol: TCP
      port: 8080
      targetPort: 8080
---
apiVersion: v1
kind: Pod
metadata:
  name: pipy-1
  labels:
    app: pipy
spec:
  containers:
  - name: pipy
    image: flomesh/pipy:0.99.0-2
    command: ["pipy", "-e", "pipy().listen(8080).serveHTTP(new Message({status: 200},'Hello, world'))"]
---
apiVersion: v1
kind: Pod
metadata:
  name: pipy-2
  labels:
    app: pipy
spec:
  containers:
  - name: pipy
    image: flomesh/pipy:0.99.0-2
    command: ["pipy", "-e", "pipy().listen(8080).serveHTTP(new Message({status: 201},'Hi, world'))"]
EOF
Creating Gateway and Routes
Next, create a gateway and set up routes for the Service pipy.
kubectl apply -n server -f - <<EOF
apiVersion: gateway.networking.k8s.io/v1
kind: Gateway
metadata:
  name: simple-fsm-gateway
spec:
  gatewayClassName: fsm-gateway-cls
  listeners:
  - protocol: HTTP
    port: 8000
    name: http
    allowedRoutes:
      namespaces:
        from: Same
---
apiVersion: gateway.networking.k8s.io/v1
kind: HTTPRoute
metadata:
  name: fortio-route
spec:
  parentRefs:
  - name: simple-fsm-gateway
    port: 8000
  rules:
  - matches:
    - path:
        type: PathPrefix
        value: /
    backendRefs:
    - name: pipy
      port: 8080
EOF
Check application accessibility. The results show that the gateway balanced the load across the two endpoints using the default round-robin algorithm.
export GATEWAY_IP=$(kubectl get svc -n server -l app=fsm-gateway -o jsonpath='{.items[0].status.loadBalancer.ingress[0].ip}')
curl http://$GATEWAY_IP:8000/
Hi, world
curl http://$GATEWAY_IP:8000/
Hello, world
curl http://$GATEWAY_IP:8000/
Hi, world
Load Balancing Algorithm Verification
For configuring load balancing strategies, refer to the LoadBalancerPolicy documentation.
Round-Robin Load Balancing
Test with fortio load: Send 200 requests with 50 concurrent users. Responses of status codes 200 and 201 are evenly split, indicative of round-robin load balancing.
fortio load -quiet -c 50 -n 200 http://$GATEWAY_IP:8000/
Code 200 : 100 (50.0 %)
Code 201 : 100 (50.0 %)
Hashing Load Balancer
Set the load balancing policy to HashingLoadBalancer.
kubectl apply -n server -f - <<EOF
apiVersion: gateway.flomesh.io/v1alpha1
kind: LoadBalancerPolicy
metadata:
  name: lb-policy-sample
spec:
  targetRef:
    group: ""
    kind: Service
    name: pipy
    namespace: server
  ports:
    - port: 8080
      type: HashingLoadBalancer
EOF
Sending the same load, all 200 requests are routed to one endpoint, consistent with the hash-based load balancing.
fortio load -quiet -c 50 -n 200 http://$GATEWAY_IP:8000/
Code 201 : 200 (50.0 %)
Least Connections Load Balancer
In Kubernetes, multiple endpoints of the same Service usually have the same specifications, so the effect of the least connections algorithm is similar to round-robin.
kubectl apply -n server -f - <<EOF
apiVersion: gateway.flomesh.io/v1alpha1
kind: LoadBalancerPolicy
metadata:
  name: lb-policy-sample
spec:
  targetRef:
    group: ""
    kind: Service
    name: pipy
    namespace: server
  ports:
    - port: 8080
      type: LeastConnectionLoadBalancer
EOF
Sending the same load, the traffic is evenly distributed across the two endpoints, as expected.
fortio load -quiet -c 50 -n 200 http://$GATEWAY_IP:8000/
Code 200 : 100 (50.0 %)
Code 201 : 100 (50.0 %)
7.4.19 - Upstream TLS
Using HTTP for external client communication and HTTPS for upstream services is a common network architecture pattern. In this setup, the gateway acts as the SSL/TLS termination point, ensuring secure encrypted communication with upstream services. This means that even though the client-to-gateway communication uses standard unencrypted HTTP protocol, the gateway securely converts these requests to HTTPS for communication with upstream services.
Centralized certificate management simplifies security maintenance, enhancing system reliability and manageability. This pattern is particularly practical in scenarios requiring protected internal communication while balancing front-end compatibility and performance.
Prerequisites
- Kubernetes cluster
- kubectl tool
- FSM Gateway installed via guide doc.
Demonstration
Deploying Sample Application
Our upstream application uses HTTPS, so first, generate a self-signed certificate. The following commands generate a CA certificate, server certificate, and key.
openssl genrsa 2048 > ca-key.pem

openssl req -new -x509 -nodes -days 365000 \
   -key ca-key.pem \
   -out ca-cert.pem \
   -subj '/CN=flomesh.io'

openssl genrsa -out server-key.pem 2048
openssl req -new -key server-key.pem -out server.csr -subj '/CN=foo.example.com'
openssl x509 -req -in server.csr -CA ca-cert.pem -CAkey ca-key.pem -CAcreateserial -out server-cert.pem -days 365
Create a Secret server-cert using the server certificate and key.
kubectl create namespace httpbin
#TLS cert secret
kubectl create secret generic -n httpbin server-cert \
  --from-file=./server-cert.pem \
  --from-file=./server-key.pem
The sample application still uses the httpbin image, but now with TLS enabled using the created certificate and key.
kubectl apply -n httpbin -f - <<EOF
apiVersion: apps/v1
kind: Deployment
metadata:
  name: httpbin
spec:
  replicas: 1
  selector:
    matchLabels:
      app: httpbin
  template:
    metadata:
      labels:
        app: httpbin
    spec:
      containers:
      - name: httpbin
        image: kennethreitz/httpbin
        ports:
        - containerPort: 443
        volumeMounts:
        - name: cert-volume
          mountPath: /etc/httpbin/certs  # Mounting path in the container
        command: ["gunicorn"]
        args: ["-b", "0.0.0.0:443", "httpbin:app", "-k", "gevent", "--certfile", "/etc/httpbin/certs/server-cert.pem", "--keyfile", "/etc/httpbin/certs/server-key.pem"]
      volumes:
      - name: cert-volume
        secret:
          secretName: server-cert
---
apiVersion: v1
kind: Service
metadata:
  name: httpbin
spec:
  selector:
    app: httpbin
  ports:
    - protocol: TCP
      port: 8443
      targetPort: 443
EOF
Verify if HTTPS has been enabled.
export HTTPBIN_POD=$(kubectl get po -n httpbin -l app=httpbin -o jsonpath='{.items[0].metadata.name}')

kubectl port-forward -n httpbin $HTTPBIN_POD 8443:443 &
# access with CA cert
curl --cacert ca-cert.pem https://foo.example.com/headers --connect-to foo.example.com:443:127.0.0.1:8443
{
  "headers": {
    "Accept": "*/*",
    "Host": "foo.example.com",
    "User-Agent": "curl/8.1.2"
  }
}
Creating Gateway and Routes
Next, create a gateway and route for the Service httpbin.
kubectl apply -n httpbin -f - <<EOF
apiVersion: gateway.networking.k8s.io/v1
kind: Gateway
metadata:
  name: simple-fsm-gateway
spec:
  gatewayClassName: fsm-gateway-cls
  listeners:
  - protocol: HTTP
    port: 8000
    name: http
    allowedRoutes:
      namespaces:
        from: Same
---
apiVersion: gateway.networking.k8s.io/v1
kind: HTTPRoute
metadata:
  name: http-route-foo
spec:
  parentRefs:
  - name: simple-fsm-gateway
    port: 8000
  hostnames:
  - foo.example.com
  rules:
  - matches:
    - path:
        type: PathPrefix
        value: /
    backendRefs:
    - name: httpbin
      port: 8443
EOF
At this point, accessing httpbin through the gateway is not possible, as httpbin has TLS enabled and the gateway cannot verify its server certificate.
curl http://foo.example.com/headers --connect-to foo.example.com:80:$GATEWAY_IP:8000
curl: (52) Empty reply from server
Upstream TLS Policy Verification
Create a Secret https-cert using the previously created CA certificate.
#CA cert secret
kubectl create secret generic -n httpbin https-cert --from-file=ca.crt=ca-cert.pem
Next, create an Upstream TLS Policy UpstreamTLSPolicy. Refer to the document UpstreamTLSPolicy and specify the Secret https-cert, containing the CA certificate, for the upstream service httpbin. The gateway will use this certificate to verify httpbin’s server certificate.
kubectl apply -n httpbin -f - <<EOF
apiVersion: gateway.flomesh.io/v1alpha1
kind: UpstreamTLSPolicy
metadata:
  name: upstream-tls-policy-sample
spec:
  targetRef:
    group: ""
    kind: Service
    name: httpbin
    namespace: httpbin
  ports:
  - port: 8443
    config:
      certificateRef:
        namespace: httpbin
        name: https-cert
      mTLS: false
EOF
After applying this policy and once it takes effect, try accessing the httpbin service through the gateway again.
curl http://foo.example.com/headers --connect-to foo.example.com:80:$GATEWAY_IP:8000
{
  "headers": {
    "Accept": "*/*",
    "Connection": "keep-alive",
    "Host": "10.42.0.25:443",
    "User-Agent": "curl/8.1.2"
  }
}
7.4.20 - Gateway mTLS
Enabling mTLS (Mutual TLS Verification) at the gateway is an advanced security measure that requires both the server to prove its identity to the client and vice versa. This mutual authentication significantly enhances communication security, ensuring only clients with valid certificates can establish a connection with the server. mTLS is particularly suitable for highly secure scenarios, such as financial transactions, corporate networks, or applications involving sensitive data. It provides a robust authentication mechanism, effectively reducing unauthorized access and helping organizations comply with strict data protection regulations.
By implementing mTLS, the gateway not only secures data transmission but also provides a more reliable and secure interaction environment between clients and servers.
Prerequisites
- Kubernetes cluster
- kubectl tool
- FSM Gateway installed via guide doc.
Demonstration
Creating Gateway TLS Certificate
openssl genrsa 2048 > ca-key.pem

openssl req -new -x509 -nodes -days 365000 \
   -key ca-key.pem \
   -out ca-cert.pem \
   -subj '/CN=flomesh.io'

openssl genrsa -out server-key.pem 2048
openssl req -new -key server-key.pem -out server.csr -subj '/CN=foo.example.com'
openssl x509 -req -in server.csr -CA ca-cert.pem -CAkey ca-key.pem -CAcreateserial -out server-cert.pem -days 365
Create a Secret server-cert using the CA certificate, server certificate, and key. When the gateway only enables TLS, only the server certificate and key are used.
kubectl create namespace httpbin
#TLS cert secret
kubectl create secret generic -n httpbin simple-gateway-cert \
  --from-file=tls.crt=./server-cert.pem \
  --from-file=tls.key=./server-key.pem \
  --from-file=ca.crt=ca-cert.pem
Deploying Sample Application
Deploy the httpbin service and create a TLS gateway and route for it.
kubectl apply -n httpbin -f https://raw.githubusercontent.com/flomesh-io/fsm-docs/main/manifests/gateway/tls-termination.yaml
Access the httpbin service through the gateway using the CA certificate created earlier, successfully accessing it.
curl --cacert ca-cert.pem https://foo.example.com/headers --connect-to foo.example.com:443:$GATEWAY_IP:8000
{
  "headers": {
    "Accept": "*/*",
    "Host": "foo.example.com",
    "User-Agent": "curl/8.1.2"
  }
}
Gateway mTLS Verification
Enabling mTLS
Now, following the GatewayTLSPolicy document, enable mTLS for the gateway.
kubectl apply -n httpbin -f - <<EOF
apiVersion: gateway.flomesh.io/v1alpha1
kind: GatewayTLSPolicy
metadata:
  name: gateway-tls-policy-sample
spec:
  targetRef:
    group: gateway.networking.k8s.io
    kind: Gateway
    name: simple-fsm-gateway
    namespace: httpbin
  ports:
  - port: 8000
    config:
      mTLS: true
EOF
At this point, if we still use the original method of access, the access will be denied. The gateway has now started mutual mTLS authentication and will verify the client’s certificate.
curl --cacert ca-cert.pem https://foo.example.com/headers --connect-to foo.example.com:443:$GATEWAY_IP:8000

curl: (52) Empty reply from server
Issuing Client Certificate
Using the CA certificate created earlier, issue a certificate for the client.
openssl genrsa -out client-key.pem 2048

openssl req -new -key client-key.pem -out client.csr -subj '/CN=example.com'
openssl x509 -req -in client.csr -CA ca-cert.pem -CAkey ca-key.pem -CAcreateserial -out client-cert.pem -days 365
Now, when making a request, in addition to specifying the CA certificate, also specify the client’s certificate and key to successfully pass the gateway’s verification and access.
curl --cacert ca-cert.pem --cert client-cert.pem --key client-key.pem https://foo.example.com/headers --connect-to foo.example.com:443:$GATEWAY_IP:8000
{
  "headers": {
    "Accept": "*/*",
    "Host": "foo.example.com",
    "User-Agent": "curl/8.1.2"
  }
}
7.4.21 - Traffic Mirroring
Traffic mirroring, sometimes also known as traffic cloning, is primarily used to send a copy of network traffic to another service without affecting production traffic. This feature is commonly utilized for fault diagnosis, performance monitoring, data analysis, and security auditing. Traffic mirroring enables real-time data capture and analysis without disrupting existing business processes.
The Kubernetes Gateway API’s HTTPRequestMirrorFilter provides a definition for traffic mirroring capabilities.
Prerequisites
- Kubernetes cluster
- kubectl tool
- FSM Gateway installed via guide doc.
Demonstration
Deploy Example Applications
To verify the traffic mirroring functionality, at least two backend services are needed. In these services, we will print the request headers to standard output to verify the mirroring functionality via log examination.
We use the programmable proxy Pipy to simulate an echo service and print the request headers.
kubectl create namespace server
kubectl apply -n server -f - <<EOF
apiVersion: v1
kind: Service
metadata:
  name: pipy
spec:
  selector:
    app: pipy
  ports:
    - protocol: TCP
      port: 8080
      targetPort: 8080

---
apiVersion: v1
kind: Pod
metadata:
  name: pipy
  labels:
    app: pipy
spec:
  containers:
  - name: pipy
    image: flomesh/pipy:1.0.0-1
    command: ["pipy", "-e", "pipy().listen(8080).serveHTTP(msg=>(console.log(msg.head),msg))"]
EOF
Create Gateway and Route
Next, create a gateway and a route for the Service pipy.
kubectl apply -n server -f - <<EOF
apiVersion: gateway.networking.k8s.io/v1
kind: Gateway
metadata:
  name: simple-fsm-gateway
spec:
  gatewayClassName: fsm-gateway-cls
  listeners:
  - protocol: HTTP
    port: 8000
    name: http
    allowedRoutes:
      namespaces:
        from: Same
---
apiVersion: gateway.networking.k8s.io/v1
kind: HTTPRoute
metadata:
  name: http-route-sample
spec:
  parentRefs:
  - name: simple-fsm-gateway
    port: 8000
  rules:
  - matches:
    - path:
        type: PathPrefix
        value: /
    backendRefs:
    - name: pipy
      port: 8080
EOF
Attempt accessing the route:
curl http://$GATEWAY_IP:8000/ -d 'Hello world'
Hello world
You can view the logs of the pod pipy. Here, we use the stern tool to view logs from multiple pods simultaneously, and later we will deploy the mirror service.
stern . -c pipy -n server --tail 0
+ pipy › pipy
pipy › pipy 2024-04-28 03:57:03.918 [INF] { protocol: "HTTP/1.1", headers: { "host": "198.19.249.153:8000", "user-agent": "curl/8.4.0", "accept": "*/*", "content-type": "application/x-www-form-urlencoded", "x-forwarded-for": "10.42.0.1", "content-length": "11" }, headerNames: { "host": "Host", "user-agent": "User-Agent", "accept": "Accept", "content-type": "Content-Type" }, method: "POST", scheme:

 undefined, authority: undefined, path: "/" }
Deploying Mirror Service
Next, let’s deploy a mirror service pipy-mirror, which can similarly print the request headers.
kubectl apply -n server -f - <<EOF
apiVersion: v1
kind: Service
metadata:
  name: pipy-mirror
spec:
  selector:
    app: pipy-mirror
  ports:
    - protocol: TCP
      port: 8080
      targetPort: 8080
---
apiVersion: v1
kind: Pod
metadata:
  name: pipy-mirror
  labels:
    app: pipy-mirror
spec:
  containers:
  - name: pipy
    image: flomesh/pipy:1.0.0-1
    command: ["pipy", "-e", "pipy().listen(8080).serveHTTP(msg=>(console.log(msg.head),msg))"]
EOF
Configure Traffic Mirroring Policy
Modify the HTTP route to add a RequestMirror type filter and set the backendRef to the mirror service pipy-mirror created above.
kubectl apply -n server -f - <<EOF
apiVersion: gateway.networking.k8s.io/v1
kind: HTTPRoute
metadata:
  name: http-route-sample
spec:
  parentRefs:
  - name: simple-fsm-gateway
    port: 8000
  rules:
  - matches:
    - path:
        type: PathPrefix
        value: /
    filters:
    - type: RequestMirror
      requestMirror:
        backendRef:
          kind: Service
          name: pipy-mirror
          port: 8080
    backendRefs:
    - name: pipy
      port: 8080
EOF
After applying the policy, send another request and both pods should display the printed request headers.
stern . -c pipy -n server --tail 0
+ pipy › pipy
+ pipy-mirror › pipy
pipy-mirror pipy 2024-04-28 04:11:04.537 [INF] { protocol: "HTTP/1.1", headers: { "host": "198.19.249.153:8000", "user-agent": "curl/8.4.0", "accept": "*/*", "content-type": "application/x-www-form-urlencoded", "x-forwarded-for": "10.42.0.1", "content-length": "11" }, headerNames: { "host": "Host", "user-agent": "User-Agent", "accept": "Accept", "content-type": "Content-Type" }, method: "POST", scheme: undefined, authority: undefined, path: "/" }
pipy pipy 2024-04-28 04:11:04.537 [INF] { protocol: "HTTP/1.1", headers: { "host": "198.19.249.153:8000", "user-agent": "curl/8.4.0", "accept": "*/*", "content-type": "application/x-www-form-urlencoded", "x-forwarded-for": "10.42.0.1", "content-length": "11" }, headerNames: { "host": "Host", "user-agent": "User-Agent", "accept": "Accept", "content-type": "Content-Type" }, method: "POST", scheme: undefined, authority: undefined, path: "/" }
8 - Egress
8.1 - Egress
Allowing access to the Internet and out-of-mesh services (Egress)
This document describes the steps required to enable access to the Internet and services external to the service mesh, referred to as Egress traffic.
FSM redirects all outbound traffic from a pod within the mesh to the pod’s sidecar proxy. Outbound traffic can be classified into two categories:
- Traffic to services within the mesh cluster, referred to as in-mesh traffic
- Traffic to services external to the mesh cluster, referred to as egress traffic
While in-mesh traffic is routed based on L7 traffic policies, egress traffic is routed differently and is not subject to in-mesh traffic policies. FSM supports access to external services as a passthrough without subjecting such traffic to filtering policies.
Configuring Egress
There are two mechanisms to configure Egress:
- Using the Egress policy API: to provide fine grained access control over external traffic
- Using the mesh-wide global egress passthrough setting: the setting is toggled on or off and affects all pods in the mesh, enabling which allows traffic destined to destinations outside the mesh to egress the pod.
1. Configuring Egress policies
FSM supports configuring fine grained policies for traffic destined to external endpoints using its Egress policy API. To use this feature, enable it if not enabled:
# Replace fsm-system with the namespace where FSM is installed
kubectl patch meshconfig fsm-mesh-config -n fsm-system -p '{"spec":{"featureFlags":{"enableEgressPolicy":true},"traffic":{"enableEgress":false}}}' --type=merge
Remember to disable egress passthrough with set
traffic.enableEgress: false.
Refer to the Egress policy demo and API documentation on how to configure policies for routing egress traffic for various protocols.
2. Configuring mesh-wide Egress passthrough
Enabling mesh-wide Egress passthrough to external destinations
Egress can be enabled mesh-wide during FSM install or post install. When egress is enabled mesh-wide, outbound traffic from pods are allowed to egress the pod as long as the traffic does not match in-mesh traffic policies that otherwise deny the traffic.
During FSM installation, the egress feature is enabled by default. You can disabled via options as below.
fsm install --set fsm.enableEgress=falseAfter FSM has been installed:
fsm-controllerretrieves the egress configuration from thefsm-mesh-configMeshConfigcustom resource in the fsm mesh control plane namespace (fsm-systemby default). Usekubectl patchto setenableEgresstotruein thefsm-mesh-configresource.# Replace fsm-system with the namespace where FSM is installed kubectl patch meshconfig fsm-mesh-config -n fsm-system -p '{"spec":{"traffic":{"enableEgress":true}}}' --type=mergeWith kubectl patching, it could be disabled too.
Disabling mesh-wide Egress passthrough to external destinations
Similar to enabling egress, mesh-wide egress can be disabled during FSM install or post install.
During FSM install:
fsm install --set fsm.enableEgress=falseAfter FSM has been installed: Use
kubectl patchto setenableEgresstofalsein thefsm-mesh-configresource.# Replace fsm-system with the namespace where FSM is installed kubectl patch meshconfig fsm-mesh-config -n fsm-system -p '{"spec":{"traffic":{"enableEgress":false}}}' --type=merge
With egress disabled, traffic from pods within the mesh will not be able to access external services outside the cluster.
How it works
When egress is enabled mesh-wide, FSM controller programs every Pipy proxy sidecar in the mesh with a wildcard rule that matches outbound destinations that do not correspond to in-mesh services. The wildcard rule that matches such external traffic simply proxies the traffic as is to its original destination without subjecting them to L4 or L7 traffic policies.
FSM supports egress for traffic that uses TCP as the underlying transport. This includes raw TCP traffic, HTTP, HTTPS, gRPC etc.
Since mesh-wide egress is a global setting and operates as a passthrough to unknown destinations, fine grained access control (such as applying TCP or HTTP routing policies) over egress traffic is not possible.
Refer to the Egress passthrough demo to learn more.
Pipy configurations
When egress is enabled globally in the mesh, the FSM controller issues the following configuration for each Pipy proxy sidecar.
{
  "Spec": {
    "SidecarLogLevel": "error",
    "Traffic": {
      "EnableEgress": true
    }
  }
}
The Pipy script for EnableEgress=true will use the original destination logic to route the request to proxy it to the original destination.
8.2 - Egress Gateway
Egress Gateway
Egress gateway is another approach to manage access to services external to the service mesh.
In this mode, the sidecar forwards egress traffic to the Egress gateway, and Egress gateway completes the forwarding to external services.
Using an Egress Gateway provides unified egress management, although it is an extra hop from the network perspective. The security team can set network rules on a fixed device to allow access to external services. The node selector is then used when the egress gateway is dispatched to these devices. Both approaches have their advantages and disadvantages and need to be chosen based on specific scenarios.
Configuration Egress Gateway
Egress gateway also supports the enable and disable mesh-wide passthrough, you can refer to configuration section of Egress.
First of all, it’s required to deploy the egress gateway. Refer to Egress Gateway Demo for egress gateway installation.
Once we have the gateway, we need to add a global egress policy. The spec of EgressGateway declares that egress traffic can be forwarded to the Service global-egress-gateway under the namespace egress-gateway.
kind: EgressGateway
apiVersion: policy.flomesh.io/v1alpha1
metadata:
  name: global-egress-gateway
  namespace: fsm
spec:
  global:
    - service: fsm-egress-gateway
      namespace: fsm
global-egress-gateway created above is a global egress gateway. By default, all egress traffic will be redirected to this global egress gateway by sidecar.
More configuration for Egress gateway
As we know, the sidecar will forward egress traffic to egress gateway and the latter one will complete the forwarding to services external to mesh.
The transmission between sidecar and egress gateway has two modes: http2tunnel and socks5. This can be set during the deployment of egress gateway and it will use http2tunnel if omitted.
Demo
To learn more about configuration for egress gateway, refer to following demo guides:
9 - Multi-cluster services
Multi-cluster communication with Flomesh Service Mesh
Kubernetes has been quite successful in popularizing the idea of container clusters. Deployments have reached a point where many users are running multiple clusters and struggling to keep them running smoothly. Organizations need to run multiple Kubernetes clusters might fall into one of the below reasons (not an exhaustive list):
- Location
- Latency (run the application as close to customers as possible)
- Jurisdiction (e.g. required to keep user data in-country)
- Data gravity (e.g. data exists in one provider)
- Isolation
- Environment (e.g. development, testing, staging, prod, etc)
- Performance isolation (teams don’t want to feel each other)
- Security isolation (sensitive data or untrusted code)
- Organizational isolation (teams have different management domains)
- Cost isolation (teams want to get different bills)
- Reliability
- Blast radius (an infra or app problem in one cluster doesn’t kill the whole system)
- Infrastructure diversity (an underlying zone, region, or provider outages does not bring down the whole system)
- Scale (the app is too big to fit in a single cluster)
- Upgrade scope (upgrade infra for some parts of your app but not all of it; avoid the need for in-place cluster upgrades)
There is currently no standard way to connect or even think about Kubernetes services beyond the single cluster boundary, and Kubernetes Multicluster SIG has put together a proposal KEP-1645 to extend Kubernetes Service concepts across multiple clusters.
Flomesh team has been spending time tackling the challenge of multicluster communication, integrating north-south traffic management capabilities into FSM SMI compatible service mesh, and contributing back to the Open Source community.
In this part of the series, we will be looking into motivation, goals, architecture of FSM multi-cluster support, its components.
Motivation
During our consultancy and support to the community, commercial clients, and enterprises we have seen multiple requests and desires (a few of which are cited above) on why they want to split their deployments across multiple clusters while maintaining mutual dependencies between workloads operating in those clusters. Currently, the cluster is a hard boundary, and service is opaque to a distant K8s consumer who may otherwise use metadata (e.g. endpoint topology) to better direct traffic. Users may want to use services distributed across clusters to support failover or temporarily during migration, however, this needs non-trivial customized solutions today.
Flomesh team aims to help the community by providing solutions to these problems.
Goals
- Define a minimal API to support service discovery and consumption across clusters.
- Consume a service in another cluster.
- Consume a service deployed in multiple clusters as a single service.
- When a service is consumed from another cluster its behavior should be predictable and consistent with how it would be consumed within its cluster.
- Allow gradual rollout of changes in a multi-cluster environment.
- Provide a stand-alone implementation that can be used without any coupling to any product and/or solution.
- Transparent integration with FSM service mesh, for users who want to have multi-cluster support with service mesh functionality.
- Fully open source and welcomes the community to participate and contribute.
Architecture
- Control plane
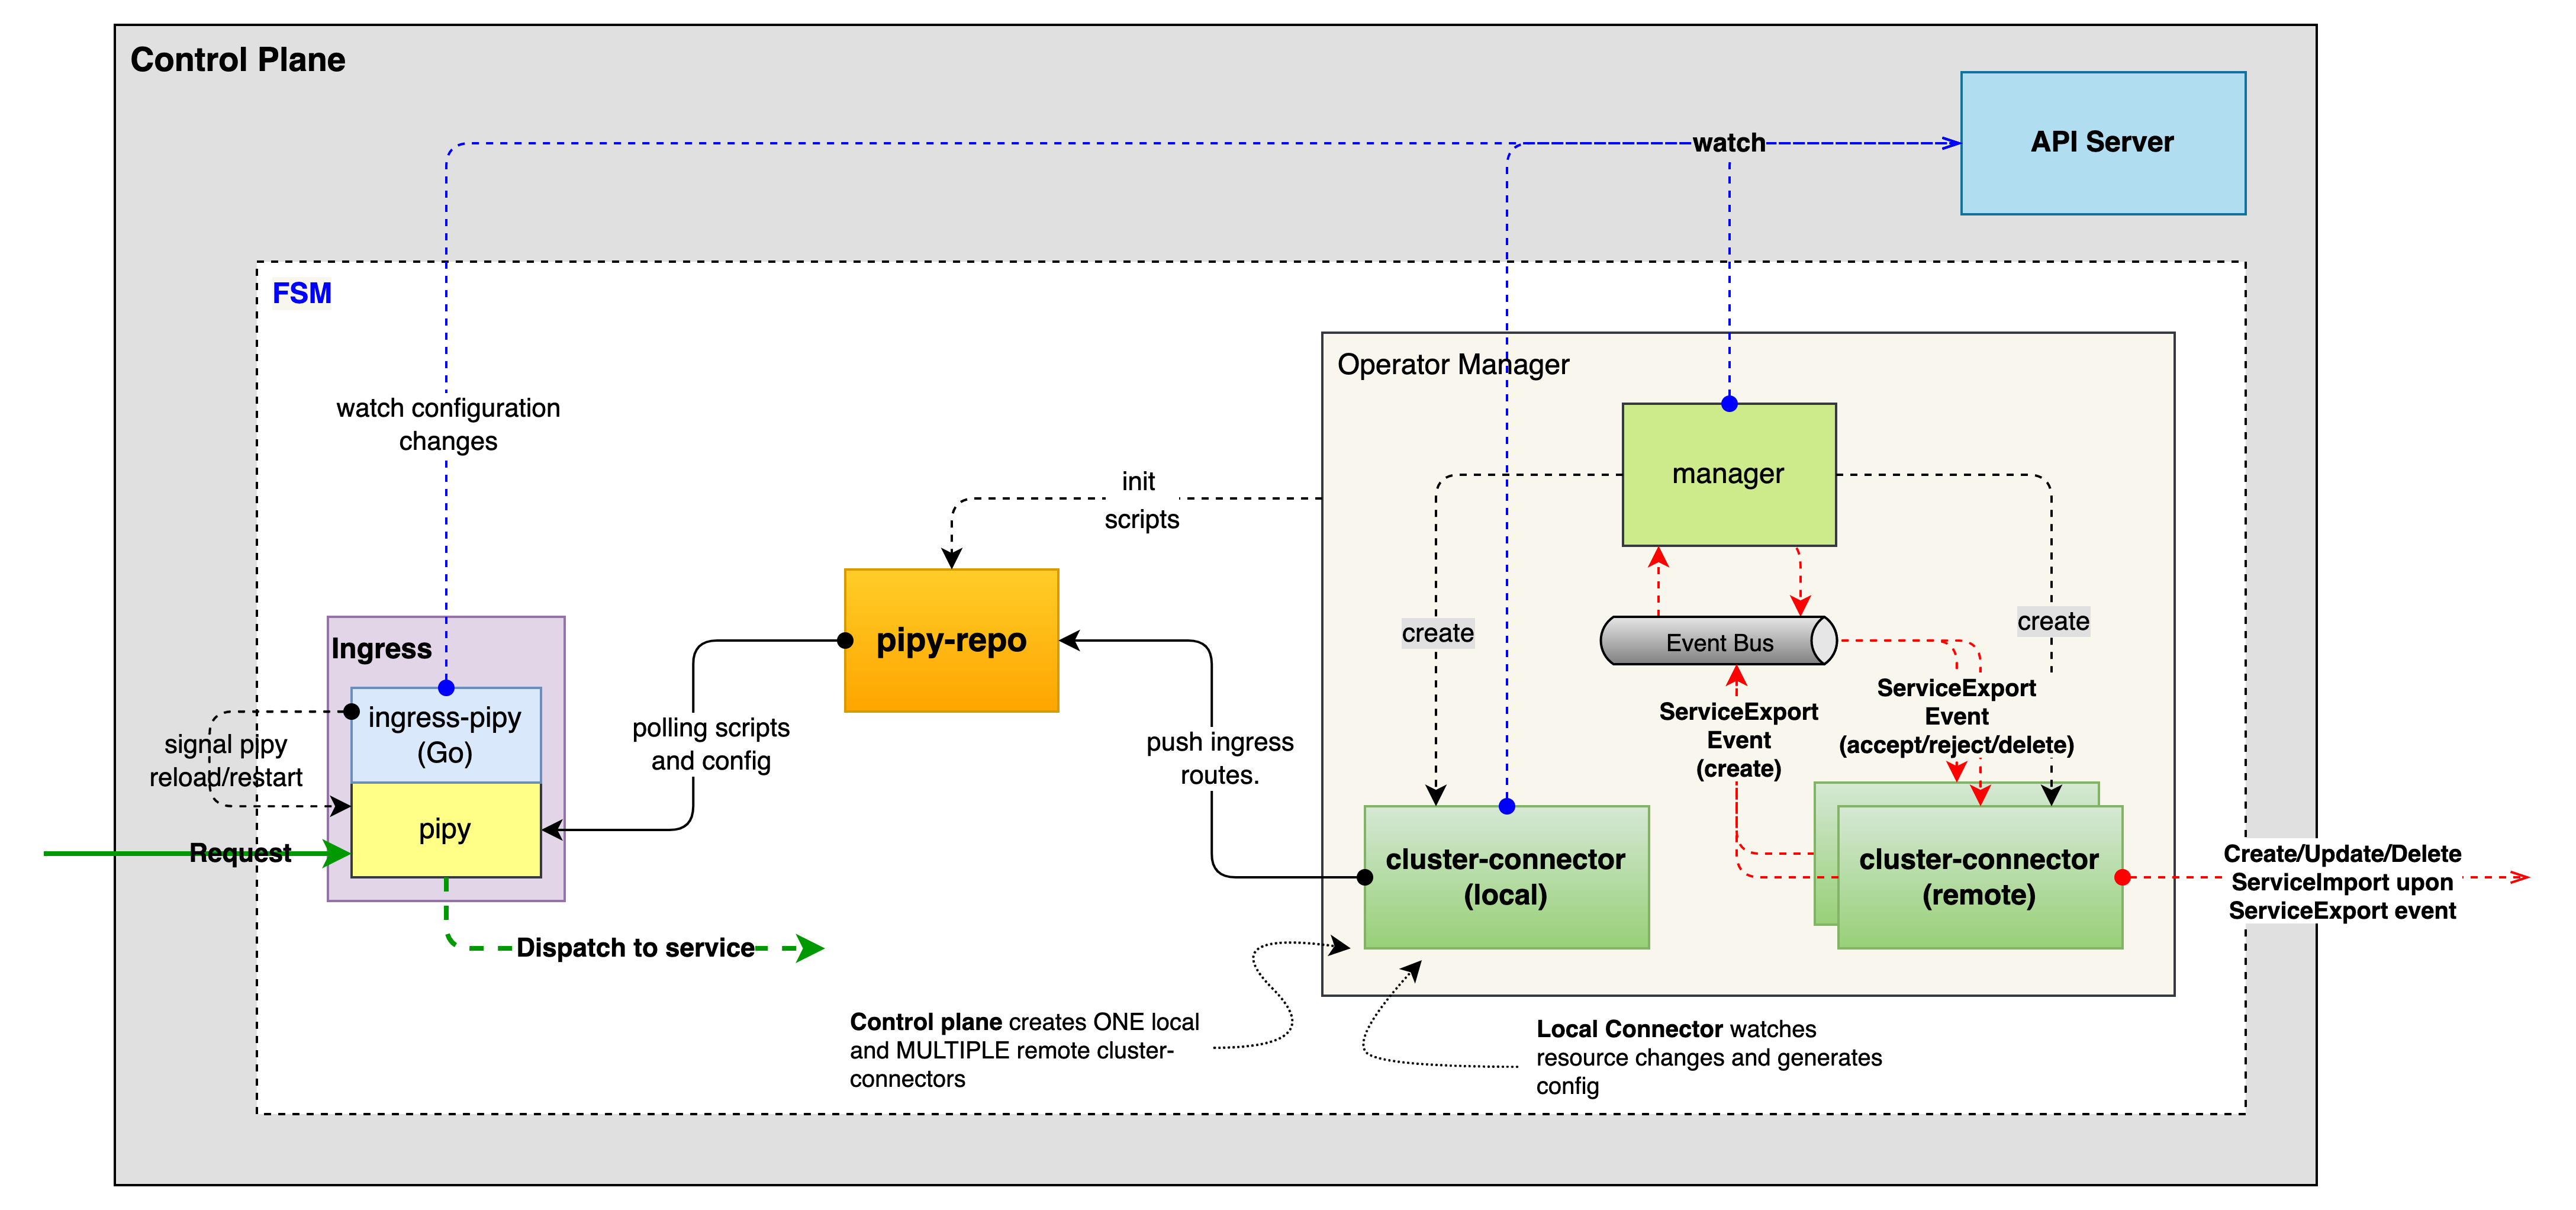
- fsm integration (managed cluster)
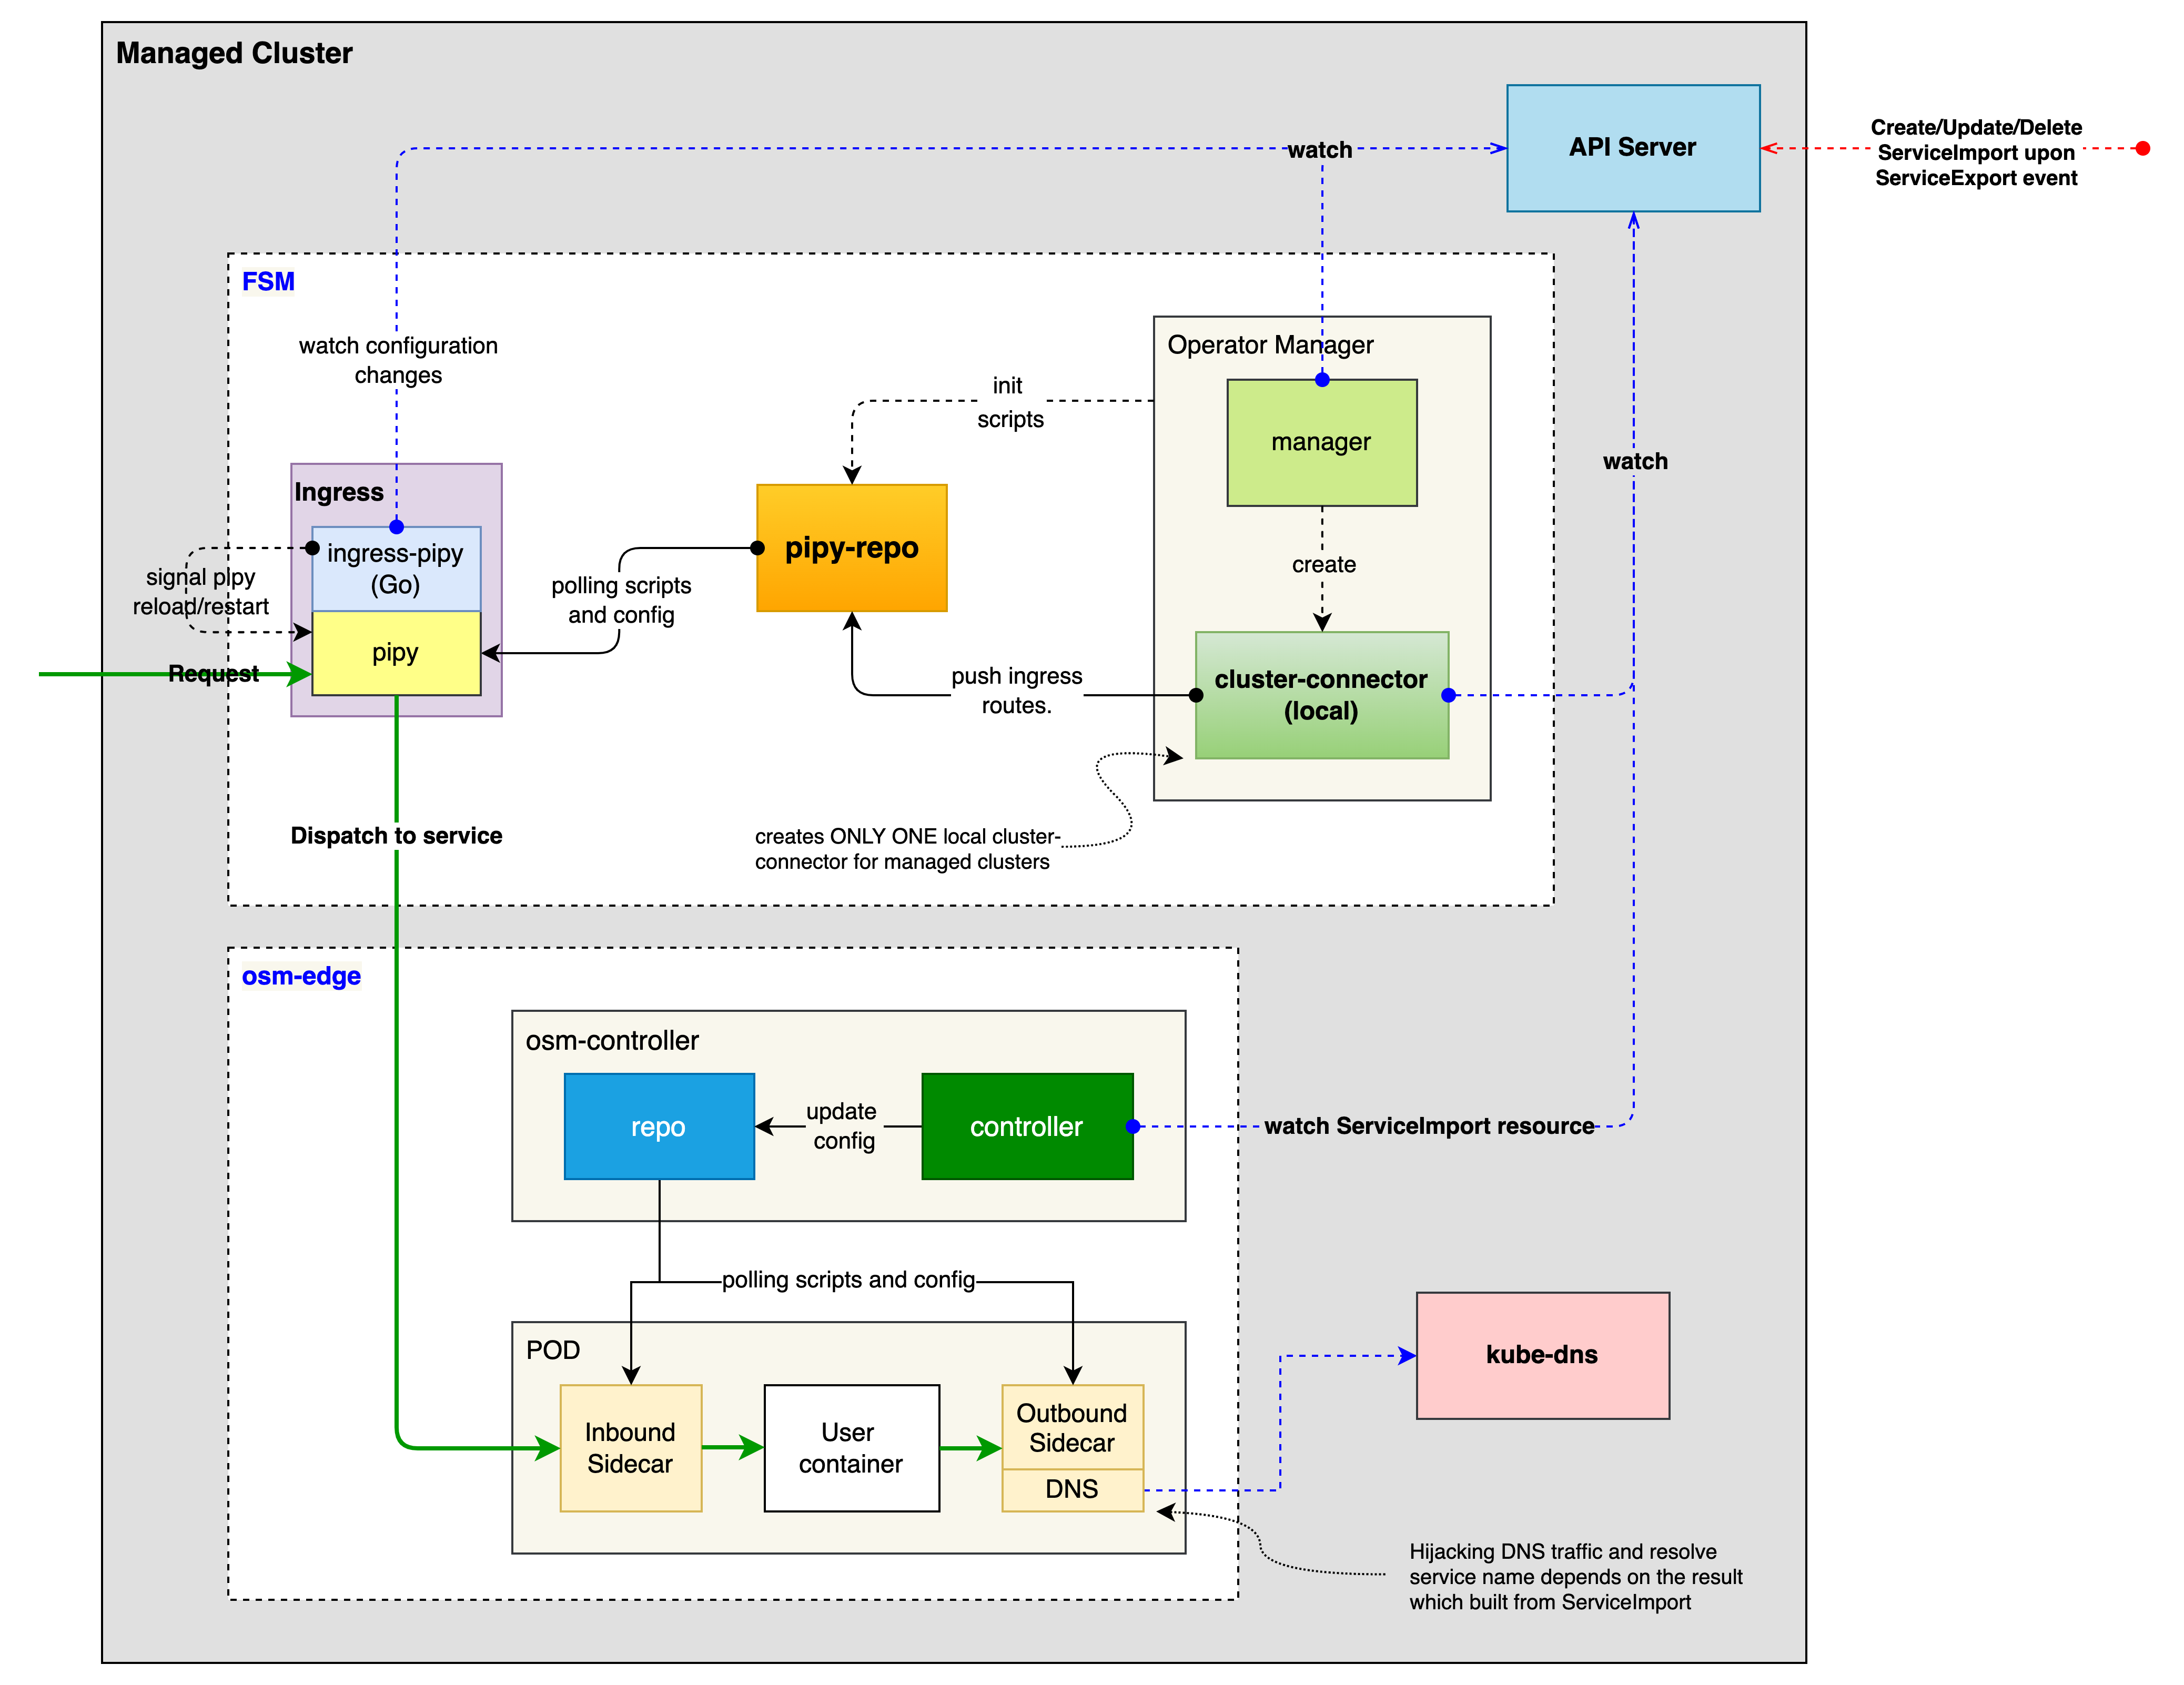
FSM provides a set of Kubernetes custom resources (CRD) for cluster connector, and make use of KEP-1645 ServiceExport and ServiceImport API for exporting and importing services. So let’s take a quick look at them
Cluster CRD
When registering a cluster, we provide the following information.
- The address (e.g.
gatewayHost: cluster-A.host) and port (e.g.gatewayPort: 80) of the cluster kubeconfigto access the cluster, containing the api-server address and information such as the certificate and secret key
apiVersion: flomesh.io/v1alpha1
kind: Cluster
metadata:
  name: cluster-A
spec:
  gatewayHost: cluster-A.host
  gatewayPort: 80
  kubeconfig: |+
    ---
    apiVersion: v1
    clusters:
    - cluster:
        certificate-authority-data:
        server: https://cluster-A.host:6443
      name: cluster-A
    contexts:
    - context:
        cluster: cluster-A
        user: admin@cluster-A
      name: cluster-A
    current-context: cluster-A
    kind: Config
    preferences: {}
    users:
    - name: admin@cluster-A
      user:
        client-certificate-data:
        client-key-data:
ServiceExport and ServiceImport CRD
For cross-cluster service registration, FSM provides the ServiceExport and ServiceImport CRDs from KEP-1645: Multi-Cluster Services API for ServiceExports.flomesh.io and ServiceImports.flomesh.io. The former is used to register services with the control plane and declare that the application can provide services across clusters, while the latter is used to reference services from other clusters.
For clusters cluster-A and cluster-B that join the cluster federation, a Service named foo exists under the namespace bar of cluster cluster-A and a ServiceExport foo of the same name is created under the same namespace. A ServiceImport resource with the same name is automatically created under the namespace bar of cluster cluster-B (if it does not exist, it is automatically created).
// in cluster-A
apiVersion: v1
kind: Service
metadata:
  name: foo
  namespace: bar
spec:
  ports:
  - port: 80
  selector:
    app: foo
---
apiVersion: flomesh.io/v1alpha1
kind: ServiceExport
metadata:
  name: foo
  namespace: bar
---
// in cluster-B
apiVersion: flomesh.io/v1alpha1
kind: ServiceImport
metadata:
  name: foo
  namespace: bar
The YAML snippet above shows how to register the foo service to the control plane of a multi-cluster. In the following, we will walk through a slightly more complex scenario of cross-cluster service registration and traffic scheduling.
Okay that was a quick introduction to the CRDs, so let’s continue with our demo.
For detailed CRD reference, refer to Multicluster API Reference