This is the multi-page printable view of this section. Click here to print.
Security
1 - Bi-directional mTLS
This guide will demonstrate how to configure different TLS certificates for inbound and outbound traffic.
Bi-directional mTLS
There are some use cases, where it is desired to use different TLS certificates for inbound and outbound communication.

Demos
2 - Access Control Management
Access Control Management
Deploying a service mesh in a complex brownfield environment is a lengthy and gradual process requiring upfront planning, or there may exist use cases where you have a specific set of services that either aren’t yet ready for migration or for some reason can not be migrated to service mesh.
This guide will talk about the approaches which can be used to enable services outside of the service mesh to communicate with services within the FSM service mesh.
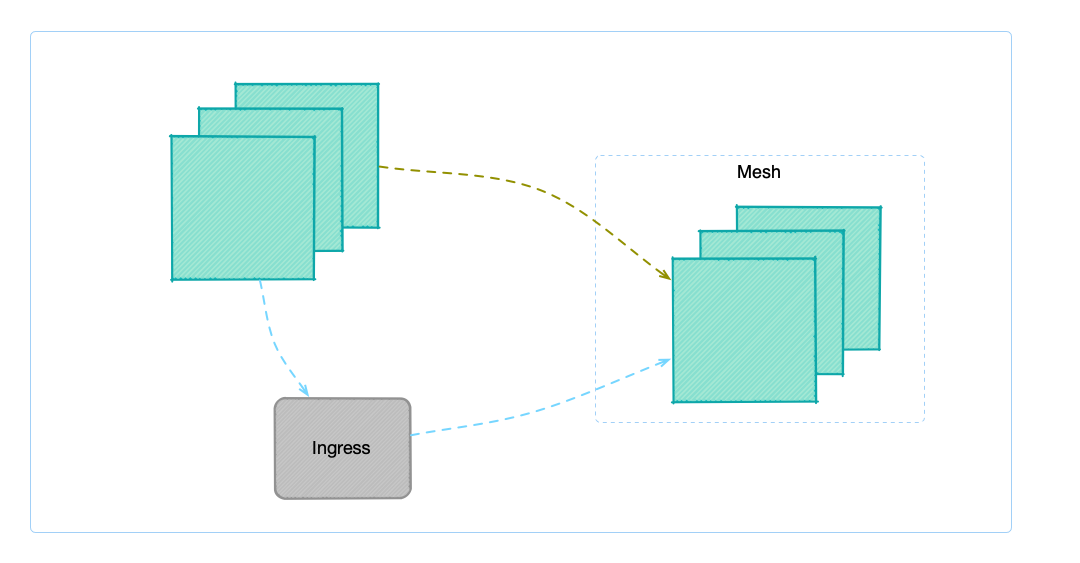
FSM offers two ways to allow accessing services within the service mesh:
- via Ingress
- FSM Ingress controller
- Nginx Ingress controller
- Access Control
- Service
- IPRange
The first method to access the services in the service mesh is via Ingress controller, and treat the services outside the mesh as the services inside the cluster. The advantage of this approach is that the setup is simple and straightforward and the disadvantages are also apparent, as you cannot achieve fine-grained access control, and all services outside the mesh can access services within the mesh.
This guide will focus on the second approach, which allows support for fine-grained access control on who can access services within the service mesh. This feature was added and to release FSM v1.1.0.
Access Control can be configured via two resource types: Service and IP range. In terms of data transmission, it supports plaintext transmission and mTLS-encrypted traffic.
Demo
To learn more about access control, refer to following demo guides:
3 - Certificate Management
mTLS and Certificate Issuance
FSM uses mTLS for encryption of data between pods as well as Pipy and service identity. Certificates are created and distributed to each Pipy proxy by the FSM control plane.
Types of Certificates
There are a few kinds of certificates used in FSM:
| Certificate Type | How it is used | Validity duration | Sample CommonName |
|---|---|---|---|
| service | used for east-west communication between Pipy; identifies Service Accounts | default 24h; defined by fsm.certificateProvider.serviceCertValidityDuration install option | bookstore-v2.bookstore.cluster.local |
| webhook server | used by the mutating, validating and CRD conversion webhook servers | a decade | fsm-injector.fsm-system.svc |
Root Certificate
The root certificate for the service mesh is stored in an Opaque Kubernetes Secret named fsm-ca-bundle in the namespace where fsm is installed (by default fsm-system).
The secret YAML has the following shape:
apiVersion: v1
kind: Secret
type: Opaque
metadata:
      name: fsm-ca-bundle
      namespace: fsm-system
data:
  ca.crt: <base64 encoded root cert>
  private.key: <base64 encoded private key>
To read the root certificate (with the exception of Hashicorp Vault), you can retrieve the corresponding secret and decode it:
kubectl get secret -n $fsm_namespace $fsm_ca_bundle -o jsonpath='{.data.ca\.crt}' |
    base64 -d |
    openssl x509 -text -noout
Note: By default, the CA bundle is named fsm-ca-bundle.
This will provide valuable certificate information, such as the expiration date and the issuer.
Root Certificate Rotation
Tresor
WARNING: Rotating root certificates will incur downtime between any services as they transition their mTLS certs from one issuer to the next.
We are currently working on a zero-downtime root cert rotation mechanism that we expect to announce in one of our upcoming releases.
The self-signed root certificate, which is created via the Tresor package within FSM, will expire in a decade. To rotate the root cert, the following steps should be followed:
Delete the
fsm-ca-bundlecertificate in the fsm namespaceexport fsm_namespace=fsm-system # Replace fsm-system with the namespace where FSM is installed kubectl delete secret fsm-ca-bundle -n $fsm_namespaceRestart the control plane components
kubectl rollout restart deploy fsm-controller -n $fsm_namespace
kubectl rollout restart deploy fsm-injector -n $fsm_namespace
kubectl rollout restart deploy fsm-bootstrap -n $fsm_namespace
When the components gets re-deployed, you should be able to eventually see the new fsm-ca-bundle secret in $fsm_namespace:
kubectl get secrets -n $fsm_namespace
NAME                           TYPE                                  DATA   AGE
fsm-ca-bundle                  Opaque                                3      74m
The new expiration date can be found with the following command:
kubectl get secret -n $fsm_namespace $fsm_ca_bundle -o jsonpath='{.data.ca\.crt}' |
    base64 -d |
    openssl x509 -noout -dates
For the Sidecar service and validation certificates to be rotated the data plane components must restarted.
Hashicorp Vault and Certmanager
For certificate providers other than Tresor, the process of rotating the root certificate will be different. For Hashicorp Vault and cert-manager.io, users will need to rotate the root certificate themselves outside of FSM.
Issuing Certificates
Open Service Mesh supports 3 methods of issuing certificates:
- using an internal FSM package, called Tresor. This is the default for a first time installation.
- using Hashicorp Vault
- using cert-manager
Using FSM’s Tresor certificate issuer
FSM includes a package, tresor. This is a minimal implementation of the certificate.Manager interface. It issues certificates leveraging the crypto Go library, and stores these certificates as Kubernetes secrets.
To use the
tresorpackage during development setexport CERT_MANAGER=tresorin the.envfile of this repo.To use this package in your Kubernetes cluster set the
CERT_MANAGER=tresorvariable in the Helm chart prior to deployment.
Additionally:
fsm.caBundleSecretName- this string is the name of the Kubernetes secret, where the CA root certificate and private key will be saved.
Using Hashicorp Vault
Service Mesh operators, who consider storing their service mesh’s CA root key in Kubernetes insecure have the option to integrate with a Hashicorp Vault installation. In such scenarios a pre-configured Hashi Vault is required. Open Service Mesh’s control plane connects to the URL of the Vault, authenticates, and begins requesting certificates. This setup shifts the responsibility of correctly and securely configuring Vault to the operator.
The following configuration parameters will be required for FSM to integrate with an existing Vault installation:
- Vault address
- Vault token
- Validity period for certificates
fsm install set flag control how FSM integrates with Vault. The following fsm install set options must be configured to issue certificates with Vault:
--set fsm.certificateProvider.kind=vault- set this tovault--set fsm.vault.host- host name of the Vault server (example:vault.contoso.com)--set fsm.vault.protocol- protocol for Vault connection (httporhttps)--set fsm.vault.role- role created on Vault server and dedicated to Flomesh Service Mesh (example:fsm)--set fsm.certificateProvider.serviceCertValidityDuration- period for which each new certificate issued for service-to-service communication will be valid. It is represented as a sequence of decimal numbers each with optional fraction and a unit suffix, ex: 1h to represent 1 hour, 30m to represent 30 minutes, 1.5h or 1h30m to represent 1 hour and 30 minutes.
The Vault token must be provided to FSM so it can connect to Vault. The token can be configured as a set option or stored in a Kubernetes secret in the namespace of the FSM installation. If the fsm.vault.token option is not set, the fsm.vault.secret.name and fsm.vault.secret.key options must be configured.
--set fsm.vault.token- token to be used by FSM to connect to Vault (this is issued on the Vault server for the particular role)--set fsm.vault.secret.name- the string name of the Kubernetes secret storing the Vault token--set fsm.vault.secret.key- the key of the Vault token in the Kubernetes secret
Additionally:
fsm.caBundleSecretName- this string is the name of the Kubernetes secret where the service mesh root certificate will be stored. When using Vault (unlike Tresor) the root key will not be exported to this secret.
Installing Hashi Vault
Installation of Hashi Vault is out of scope for the Open Service Mesh project. Typically this is the responsibility of dedicated security teams. Documentation on how to deploy Vault securely and make it highly available is available on Vault’s website.
This repository does contain a script (deploy-vault.sh), which is used to automate the deployment of Hashi Vault for continuous integration. This is strictly for development purposes only. Running the script will deploy Vault in a Kubernetes namespace defined by the $K8S_NAMESPACE environment variable in your .env file. This script can be used for demonstration purposes. It requires the following environment variables:
export K8S_NAMESPACE=fsm-system-ns
export VAULT_TOKEN=xyz
Running the ./demo/deploy-vault.sh script will result in a dev Vault installation:
NAMESPACE         NAME                                    READY   STATUS    RESTARTS   AGE
fsm-system-ns     vault-5f678c4cc5-9wchj                  1/1     Running   0          28s
Fetching the logs of the pod will show details on the Vault installation:
==> Vault server configuration:

             Api Address: http://0.0.0.0:8200
                     Cgo: disabled
         Cluster Address: https://0.0.0.0:8201
              Listener 1: tcp (addr: "0.0.0.0:8200", cluster address: "0.0.0.0:8201", max_request_duration: "1m30s", max_request_size: "33554432", tls: "disabled")
               Log Level: info
                   Mlock: supported: true, enabled: false
           Recovery Mode: false
                 Storage: inmem
                 Version: Vault v1.4.0

WARNING! dev mode is enabled! In this mode, Vault runs entirely in-memory
and starts unsealed with a single unseal key. The root token is already
authenticated to the CLI, so you can immediately begin using Vault.

You may need to set the following environment variable:

    $ export VAULT_ADDR='http://0.0.0.0:8200'

The unseal key and root token are displayed below in case you want to
seal/unseal the Vault or re-authenticate.

Unseal Key: cZzYxUaJaN10sa2UrPu7akLoyU6rKSXMcRt5dbIKlZ0=
Root Token: xyz

Development mode should NOT be used in production installations!

==> Vault server started! Log data will stream in below:
...
The outcome of deploying Vault in your system is a URL and a token. For instance the URL of Vault could be http://vault.<fsm-namespace>.svc.cluster.local and the token xxx.
Note:
<fsm-namespace>refers to the namespace where the fsm control plane is installed.
Configure FSM with Vault
After Vault installation and before we use Helm to deploy FSM, the following parameters must be provided provided in the Helm chart:
CERT_MANAGER=vault
VAULT_HOST="vault.${K8S_NAMESPACE}.svc.cluster.local"
VAULT_PROTOCOL=http
VAULT_TOKEN=xyz
VAULT_ROLE=fsm
When running FSM on your local workstation, use the following fsm install set options:
--set fsm.certificateProvider.kind="vault"
--set fsm.vault.host="localhost"  # or the host where Vault is installed
--set fsm.vault.protocol="http"
--set fsm.vault.token="xyz"
--set fsm.vault.role="fsm'
--set fsm.serviceCertValidityDuration=24h
How FSM Integrates with Vault
When the FSM control plane starts, a new certificate issuer is instantiated.
The kind of cert issuer is determined by the fsm.certificateProvider.kind set option.
When this is set to vault FSM uses a Vault cert issuer.
This is a Hashicorp Vault client, which satisfies the certificate.Manager
interface. It provides the following methods:
  - IssueCertificate - issues new certificates
  - GetCertificate - retrieves a certificate given its Common Name (CN)
  - RotateCertificate - rotates expiring certificates
  - GetAnnouncementsChannel - returns a channel, which is used to announce when certificates have been issued or rotated
FSM assumes that a CA has already been created on the Vault server.
FSM also requires a dedicated Vault role (for instance pki/roles/fsm).
The Vault role created by the ./demo/deploy-vault.sh script applies the following configuration, which is only appropriate for development purposes:
allow_any_name:trueallow_subdomains:trueallow_baredomains:trueallow_localhost:truemax_ttl:24h
Hashi Vault’s site has excellent documentation
on how to create a new CA. The ./demo/deploy-vault.sh script uses the
following commands to setup the dev environment:
export VAULT_TOKEN="xyz"
export VAULT_ADDR="http://localhost:8200"
export VAULT_ROLE="fsm"

# Launch the Vault server in dev mode
vault server -dev -dev-listen-address=0.0.0.0:8200 -dev-root-token-id=${VAULT_TOKEN}

# Also save the token locally so this is available
echo $VAULT_TOKEN>~/.vault-token;

# Enable the PKI secrets engine (See: https://www.vaultproject.io/docs/secrets/pki#pki-secrets-engine)
vault secrets enable pki;

# Set the max lease TTL to a decade
vault secrets tune -max-lease-ttl=87600h pki;

# Set URL configuration (See: https://www.vaultproject.io/docs/secrets/pki#set-url-configuration)
vault write pki/config/urls issuing_certificates='http://127.0.0.1:8200/v1/pki/ca' crl_distribution_points='http://127.0.0.1:8200/v1/pki/crl';

# Configure a role named "fsm" (See: https://www.vaultproject.io/docs/secrets/pki#configure-a-role)
vault write pki/roles/${VAULT_ROLE} allow_any_name=true allow_subdomains=true;

# Create a root certificate named "fsm.root" (See: https://www.vaultproject.io/docs/secrets/pki#setup)
vault write pki/root/generate/internal common_name='fsm.root' ttl='87600h'
The FSM control plane provides verbose logs on operations done with the Vault installations.
Using cert-manager
cert-manager is another provider for issuing signed certificates to the FSM service mesh, without the need for storing private keys in Kubernetes. cert-manager has support for multiple issuer backends core to cert-manager, as well as pluggable external issuers.
Note that ACME certificates are not supported as an issuer for service mesh certificates.
When FSM requests certificates, it will create cert-manager
CertificateRequest
resources that are signed by the configured issuer.
Configure cert-manger for FSM signing
cert-manager must first be installed, with an issuer ready, before FSM can be installed using cert-manager as the certificate provider. You can find the installation documentation for cert-manager here.
Once cert-manager is installed, configure an issuer
resource to serve certificate
requests. It is recommended to use an Issuer resource kind (rather than a
ClusterIssuer) which should live in the FSM namespace (fsm-system by
default).
Once ready, it is required to store the root CA certificate of your issuer
as a Kubernetes secret in the FSM namespace (fsm-system by default) at the
ca.crt key. The target CA secret name can be configured on FSM using
fsm install --set fsm.caBundleSecretName=my-secret-name (typically fsm-ca-bundle).
kubectl create secret -n fsm-system generic fsm-ca-bundle --from-file ca.crt
Refer to the cert-manager demo to learn more.
Configure FSM with cert-manager
In order for FSM to use cert-manager with the configured issuer, set the
following CLI arguments on the fsm install command:
--set fsm.certificateProvider.kind="cert-manager"- Required to use cert-manager as the provider.--set fsm.certmanager.issuerName- The name of the [Cluster]Issuer resource (defaulted tofsm-ca).--set fsm.certmanager.issuerKind- The kind of issuer (eitherIssuerorClusterIssuer, defaulted toIssuer).--set fsm.certmanager.issuerGroup- The group that the issuer belongs to (defaulted tocert-manager.iowhich is all core issuer types).
4 - Traffic Access Control
Traffic Access Control
The SMI Traffic Access Control API can be used to configure access to specific pods and routes based on the identity of a client for locking down applications to only allowed users and services. This allow users to define access control policy for their application based on service identity using Kubernetes service accounts.
Traffic Access Control API handles the authorization side only.
What is supported
FSM implements the SMI Traffic Access Control v1alpha3 version.
It supports the following:
- SMI access control policies to authorize traffic access between service identities
- SMI traffic specs policies to define routing rules to associate with access control policies
How it works
A TrafficTarget associates a set of traffic definitions (rules) with a service identity which is allocated to a group of pods. Access is controlled
via referenced TrafficSpecs and by a list of source service identities. If a pod which holds the reference service identity makes a call to the destination on one of the defined routes then access will be allowed. Any pod which attempts to connect and is not in
the defined list of sources will be denied. Any pod which is in the defined list but attempts to connect on a route which is not in the list of TrafficSpecs will be denied.
kind: TCPRoute
metadata:
  name: the-routes
spec:
  matches:
    ports:
    - 8080
---
kind: HTTPRouteGroup
metadata:
  name: the-routes
spec:
  matches:
  - name: metrics
    pathRegex: "/metrics"
    methods:
    - GET
  - name: everything
    pathRegex: ".*"
    methods: ["*"]
For this definition, there are two routes: metrics and everything. It is a common use case to restrict access to /metrics to only be scraped by Prometheus. To define the target for this traffic, it takes a TrafficTarget.
---
kind: TrafficTarget
metadata:
  name: path-specific
  namespace: default
spec:
  destination:
    kind: ServiceAccount
    name: service-a
    namespace: default
  rules:
  - kind: TCPRoute
    name: the-routes
  - kind: HTTPRouteGroup
    name: the-routes
    matches:
    - metrics
  sources:
  - kind: ServiceAccount
    name: prometheus
    namespace: default
This example selects all the pods which have the service-a ServiceAccount. Traffic destined on a path /metrics is allowed. The matches field is
optional and if omitted, a rule is valid for all the matches in a traffic spec (a OR relationship). It is possible for a service to expose multiple ports,
the TCPRoute/UDPRoute matches.ports field allows the user to specify specifically which port traffic should be allowed on. The matches.ports is an optional element, if not specified, traffic will be allowed to all ports on the destination service.
Allowing destination traffic should only be possible with permission of the service owner. Therefore, RBAC rules should be configured to control the pods
which are allowed to assign the ServiceAccount defined in the TrafficTarget destination.
Note: access control is always enforced on the server side of a connection (or the target). It is up to implementations to decide whether they would also like to enforce access control on the client (or source) side of the connection as well.
Source identities which are allowed to connect to the destination is defined in the sources list. Only pods which have a ServiceAccount which is named in the sources list are allowed to connect to the destination.
Example implementation for L7
The following implementation shows four services api, website, payment and prometheus. It shows how it is possible to write fine grained TrafficTargets which allow access to be controlled by route and source.
kind: TCPRoute
metadata:
  name: api-service-port
spec:
  matches:
    ports:
    - 8080
---
kind: HTTPRouteGroup
metadata:
  name: api-service-routes
spec:
  matches:
  - name: api
    pathRegex: /api
    methods: ["*"]
  - name: metrics
    pathRegex: /metrics
    methods: ["GET"]
---
kind: TrafficTarget
metadata:
  name: api-service-metrics
  namespace: default
spec:
  destination:
    kind: ServiceAccount
    name: api-service
    namespace: default
  rules:
  - kind: TCPRoute
    name: api-service-port
  - kind: HTTPRouteGroup
    name: api-service-routes
    matches:
    - metrics
  sources:
  - kind: ServiceAccount
    name: prometheus
    namespace: default
---
kind: TrafficTarget
metadata:
  name: api-service-api
  namespace: default
spec:
  destination:
    kind: ServiceAccount
    name: api-service
    namespace: default
  rules:
  - kind: TCPRoute
    name: api-service-port
  - kind: HTTPRouteGroup
    name: api-service-routes
    matches:
    - api
  sources:
  - kind: ServiceAccount
    name: website-service
    namespace: default
  - kind: ServiceAccount
    name: payments-service
    namespace: default
The previous example would allow the following HTTP traffic:
| source | destination | path | method |
|---|---|---|---|
| website-service | api-service | /api | * |
| payments-service | api-service | /api | * |
| prometheus | api-service | /metrics | GET |
Example implementation for L4
The following implementation shows how to define TrafficTargets for allowing TCP and UDP traffic to specific ports.
kind: TCPRoute
metadata:
  name: tcp-ports
spec:
  matches:
    ports:
    - 8301
    - 8302
    - 8300
---
kind: UDPRoute
metadata:
  name: udp-ports
spec:
  matches:
    ports:
    - 8301
    - 8302
---
kind: TrafficTarget
metadata:
  name: protocal-specific
spec:
  destination:
    kind: ServiceAccount
    name: server
    namespace: default
  rules:
  - kind: TCPRoute
    name: tcp-ports
  - kind: UDPRoute
    name: udp-ports
  sources:
  - kind: ServiceAccount
    name: client
    namespace: default
Above configuration will allow TCP and UDP traffic to both
8301and8302ports, but will block UDP traffic to8300.
Refer to a guide on configure traffic policies to learn more.