This is the multi-page printable view of this section. Click here to print.
Integrations
1 - Integrate Dapr with FSM
Dapr FSM Walkthrough
This document walks you through the steps of getting Dapr working with FSM on a Kubernetes cluster.
Install Dapr on your cluster with mTLS disabled:
Dapr has a quickstart repository to help users get familiar with dapr and its features. For this integration demo we will be leveraging the hello-kubernetes quickstart. As we would like to integrate this Dapr example with FSM, there are a few modifications required and they are as follows:
The hello-kubernetes demo installs Dapr with mtls enabled (by default), we would not want mtls from Dapr and would like to leverage FSM for this. Hence while installing Dapr on your cluster, make sure to disable mtls by passing the flag :
--enable-mtls=falseduring the installationFurther hello-kubernetes sets up everything in the default namespace, it is strongly recommended to set up the entire hello-kubernetes demo in a specific namespace (we will later join this namespace to FSM’s mesh). For the purpose of this integration, we have the namespace as
dapr-testkubectl create namespace dapr-test namespace/dapr-test createdThe redis state store, redis.yaml, node.yaml and python.yaml need to be deployed in the
dapr-testnamespaceSince the resources for this demo are set up in a custom namespace. We will need to add an rbac rule on the cluster for Dapr to have access to the secrets. Create the following role and role binding:
kubectl apply -f - <<EOF
---
apiVersion: rbac.authorization.k8s.io/v1
kind: Role
metadata:
  name: secret-reader
  namespace: dapr-test
rules:
- apiGroups: [""]
  resources: ["secrets"]
  verbs: ["get", "list"]
---

kind: RoleBinding
apiVersion: rbac.authorization.k8s.io/v1
metadata:
  name: dapr-secret-reader
  namespace: dapr-test
subjects:
- kind: ServiceAccount
  name: default
roleRef:
  kind: Role
  name: secret-reader
  apiGroup: rbac.authorization.k8s.io
EOF
Ensure the sample applications are running with Dapr as desired.
Install FSM:
fsm install
FSM installed successfully in namespace [fsm-system] with mesh name [fsm]
Enable permissive mode in FSM:
kubectl patch meshconfig fsm-mesh-config -n fsm-system -p '{"spec":{"traffic":{"enablePermissiveTrafficPolicyMode":true}}}'  --type=merge
meshconfig.config.flomesh.io/fsm-mesh-config patched
This is necessary, so that the hello-kubernetes example works as is and no SMI policies are needed from the get go.
Exclude kubernetes API server IP from being intercepted by FSM’s sidecar:
- Get the kubernetes API server cluster IP:
kubectl get svc -n default NAME TYPE CLUSTER-IP EXTERNAL-IP PORT(S) AGE kubernetes ClusterIP 10.0.0.1 <none> 443/TCP 1d - Add this IP to the MeshConfig so that outbound traffic to it is excluded from interception by FSM’s sidecar
kubectl patch meshconfig fsm-mesh-config -n fsm-system -p '{"spec":{"traffic":{"outboundIPRangeExclusionList":["10.0.0.1/32"]}}}'  --type=merge
meshconfig.config.flomesh.io/fsm-mesh-config patched
It is necessary to exclude the Kubernetes API server IP in FSM because Dapr leverages Kubernetes secrets to access the redis state store in this demo.
Note: If you have hardcoded the password in the Dapr component file, you may skip this step.
- Get the kubernetes API server cluster IP:
Globally exclude ports from being intercepted by FSM’s sidecar:
Get the ports of Dapr’s placement server (
dapr-placement-server):kubectl get svc -n dapr-system NAME TYPE CLUSTER-IP EXTERNAL-IP PORT(S) AGE dapr-api ClusterIP 10.0.172.245 <none> 80/TCP 2h dapr-dashboard ClusterIP 10.0.80.141 <none> 8080/TCP 2h dapr-placement-server ClusterIP None <none> 50005/TCP,8201/TCP 2h dapr-sentry ClusterIP 10.0.87.36 <none> 80/TCP 2h dapr-sidecar-injector ClusterIP 10.0.77.47 <none> 443/TCP 2hGet the ports of your redis state store from the redis.yaml,
6379incase of this demoAdd these ports to the MeshConfig so that outbound traffic to it is excluded from interception by FSM’s sidecar
kubectl patch meshconfig fsm-mesh-config -n fsm-system -p '{"spec":{"traffic":{"outboundPortExclusionList":[50005,8201,6379]}}}'  --type=merge
meshconfig.config.flomesh.io/fsm-mesh-config patched
It is necessary to globally exclude Dapr’s placement server (
dapr-placement-server) port from being intercepted by FSM’s sidecar, as pods having Dapr on them would need to talk to Dapr’s control plane. The redis state store also needs to be excluded so that Dapr’s sidecar can route the traffic to redis, without being intercepted by FSM’s sidecar.Note: Globally excluding ports would result in all pods in FSM’s mesh from not interceting any outbound traffic to the specified ports. If you wish to exclude the ports selectively only on pods that are running Dapr, you may omit this step and follow the step mentioned below.
Exclude ports from being intercepted by FSM’s sidecar at pod level:
Get the ports of Dapr’s api and sentry (
dapr-sentryanddapr-api):kubectl get svc -n dapr-system NAME TYPE CLUSTER-IP EXTERNAL-IP PORT(S) AGE dapr-api ClusterIP 10.0.172.245 <none> 80/TCP 2h dapr-dashboard ClusterIP 10.0.80.141 <none> 8080/TCP 2h dapr-placement-server ClusterIP None <none> 50005/TCP,8201/TCP 2h dapr-sentry ClusterIP 10.0.87.36 <none> 80/TCP 2h dapr-sidecar-injector ClusterIP 10.0.77.47 <none> 443/TCP 2hUpdate the pod spec in both nodeapp (node.yaml) and pythonapp (python.yaml) to contain the following annotation:
flomesh.io/outbound-port-exclusion-list: "80"
Adding the annotation to the pod excludes Dapr’s api (
dapr-api) and sentry (dapr-sentry) port’s from being intercepted by FSM’s sidecar, as these pods would need to talk to Dapr’s control plane.Make FSM monitor the namespace that was used for the Dapr hello-kubernetes demo setup:
fsm namespace add dapr-test
Namespace [dapr-test] successfully added to mesh [fsm]
Delete and re-deploy the Dapr hello-kubernetes pods:
kubectl delete -f ./deploy/node.yaml
service "nodeapp" deleted
deployment.apps "nodeapp" deleted
kubectl delete -f ./deploy/python.yaml deployment.apps "pythonapp" deletedkubectl apply -f ./deploy/node.yaml service "nodeapp" created deployment.apps "nodeapp" createdkubectl apply -f ./deploy/python.yaml deployment.apps "pythonapp" createdThe pythonapp and nodeapp pods on restart will now have 3 containers each, indicating FSM’s proxy sidecar has been successfully injected
kubectl get pods -n dapr-test
NAME                         READY   STATUS    RESTARTS   AGE
my-release-redis-master-0    1/1     Running   0          2h
my-release-redis-slave-0     1/1     Running   0          2h
my-release-redis-slave-1     1/1     Running   0          2h
nodeapp-7ff6cfb879-9dl2l     3/3     Running   0          68s
pythonapp-6bd9897fb7-wdmb5   3/3     Running   0          53s
Verify the Dapr hello-kubernetes demo works as expected:
Applying SMI Traffic Policies:
The demo so far illustrated permissive traffic policy mode in FSM whereby application connectivity within the mesh is automatically configured by
fsm-controller, therefore no SMI policy was required for the pythonapp to talk to the nodeapp.In order to see the same demo work with an SMI Traffic Policy, follow the steps outlined below:
Disable permissive mode:
kubectl patch meshconfig fsm-mesh-config -n fsm-system -p '{"spec":{"traffic":{"enablePermissiveTrafficPolicyMode":false}}}'  --type=merge
meshconfig.config.flomesh.io/fsm-mesh-config patched
Verify the pythonapp documented here no longer causes the order ID to increment.
Create a service account for nodeapp and pythonapp:
kubectl create sa nodeapp -n dapr-test
serviceaccount/nodeapp created
kubectl create sa pythonapp -n dapr-test serviceaccount/pythonapp createdUpdate the role binding on the cluster to contain the newly created service accounts:
kubectl apply -f - <<EOF
---
kind: RoleBinding
apiVersion: rbac.authorization.k8s.io/v1
metadata:
  name: dapr-secret-reader
  namespace: dapr-test
subjects:
- kind: ServiceAccount
  name: default
- kind: ServiceAccount
  name: nopdeapp
- kind: ServiceAccount
  name: pythonapp
roleRef:
  kind: Role
  name: secret-reader
  apiGroup: rbac.authorization.k8s.io
EOF
Apply the following SMI access control policies:
Deploy SMI TrafficTarget
kubectl apply -f - <<EOF
---
kind: TrafficTarget
apiVersion: access.smi-spec.io/v1alpha3
metadata:
  name: pythodapp-traffic-target
  namespace: dapr-test
spec:
  destination:
    kind: ServiceAccount
    name: nodeapp
    namespace: dapr-test
  rules:
  - kind: HTTPRouteGroup
    name: nodeapp-service-routes
    matches:
    - new-order
  sources:
  - kind: ServiceAccount
    name: pythonapp
    namespace: dapr-test
EOF
Deploy HTTPRouteGroup policy
kubectl apply -f - <<EOF
---
apiVersion: specs.smi-spec.io/v1alpha4
kind: HTTPRouteGroup
metadata:
  name: nodeapp-service-routes
  namespace: dapr-test
spec:
  matches:
  - name: new-order
EOF
Update the pod spec in both nodeapp (node.yaml) and pythonapp (python.yaml) to contain their respective service accounts. Delete and re-deploy the Dapr hello-kubernetes pods
Verify the Dapr hello-kubernetes demo works as expected, shown here
Cleanup:
To clean up the Dapr hello-kubernetes demo, clean the
dapr-testnamespacekubectl delete ns dapr-testTo uninstall Dapr, run
dapr uninstall --kubernetesTo uninstall FSM, run
fsm uninstall meshTo remove FSM’s cluster wide resources after uninstallation, run the following command. See the uninstall guide for more context and information.
fsm uninstall mesh --delete-cluster-wide-resources
2 - Integrate Prometheus with FSM
Prometheus and FSM Integration
To familiarize yourself on how FSM works with Prometheus, try installing a new mesh with sample applications to see which metrics are collected.
Install FSM with its own Prometheus instance:
fsm install --set fsm.deployPrometheus=true,fsm.enablePermissiveTrafficPolicy=trueWait all pods up.
kubectl wait --for=condition=Ready pod --all -n fsm-systemCreate a namespace for sample workloads:
kubectl create namespace metrics-demoMake the new FSM monitor the new namespace:
fsm namespace add metrics-demoConfigure FSM’s Prometheus to scrape metrics from the new namespace:
fsm metrics enable --namespace metrics-demoInstall sample applications:
kubectl apply -f https://raw.githubusercontent.com/flomesh-io/fsm-docs/main/manifests/samples/curl/curl.yaml -n metrics-demo
kubectl apply -f https://raw.githubusercontent.com/flomesh-io/fsm-docs/main/manifests/samples/httpbin/httpbin.yaml -n metrics-demo
Ensure the new Pods are Running and all containers are ready:
kubectl get pods -n metrics-demo
NAME                       READY   STATUS    RESTARTS   AGE
curl-54ccc6954c-q8s89      2/2     Running   0          95s
httpbin-8484bfdd46-vq98x   2/2     Running   0          72s
Generate traffic:
The following command makes the curl Pod make about 1 request per second to the httpbin Pod forever:
kubectl exec -n metrics-demo -ti "$(kubectl get pod -n metrics-demo -l app=curl -o jsonpath='{.items[0].metadata.name}')" -c curl -- sh -c 'while :; do curl -i httpbin.metrics-demo:14001/status/200; sleep 1; done'

HTTP/1.1 200 OK
server: gunicorn/19.9.0
date: Wed, 06 Jul 2022 02:53:16 GMT
content-type: text/html; charset=utf-8
access-control-allow-origin: *
access-control-allow-credentials: true
content-length: 0
connection: keep-alive

HTTP/1.1 200 OK
server: gunicorn/19.9.0
date: Wed, 06 Jul 2022 02:53:17 GMT
content-type: text/html; charset=utf-8
access-control-allow-origin: *
access-control-allow-credentials: true
content-length: 0
connection: keep-alive
...
View metrics in Prometheus:
Forward the Prometheus port:
kubectl port-forward -n fsm-system $(kubectl get pods -n fsm-system -l app=fsm-prometheus -o jsonpath='{.items[0].metadata.name}') 7070

Forwarding from 127.0.0.1:7070 -> 7070
Forwarding from [::1]:7070 -> 7070
Navigate to http://localhost:7070 in a web browser to view the Prometheus UI. The following query shows how many requests per second are being made from the curl pod to the httpbin pod, which should be about 1:
irate(sidecar_cluster_upstream_rq_xx{exported_source_workload_name="curl", sidecar_cluster_name="metrics-demo/httpbin|14001"}[30s])Feel free to explore the other metrics available from within the Prometheus UI.
Cleanup
Once you are done with the demo resources, clean them up by first deleting the application namespace:
kubectl delete ns metrics-demoThen, uninstall FSM:
fsm uninstall mesh
Uninstall FSM [mesh name: fsm] ? [y/n]: y
FSM [mesh name: fsm] uninstalled
To remove FSM’s cluster wide resources after uninstallation, run the following command. See the uninstall guide for more context and information.
fsm uninstall mesh --delete-namespace -a -f
3 - Microservice Discovery Integration
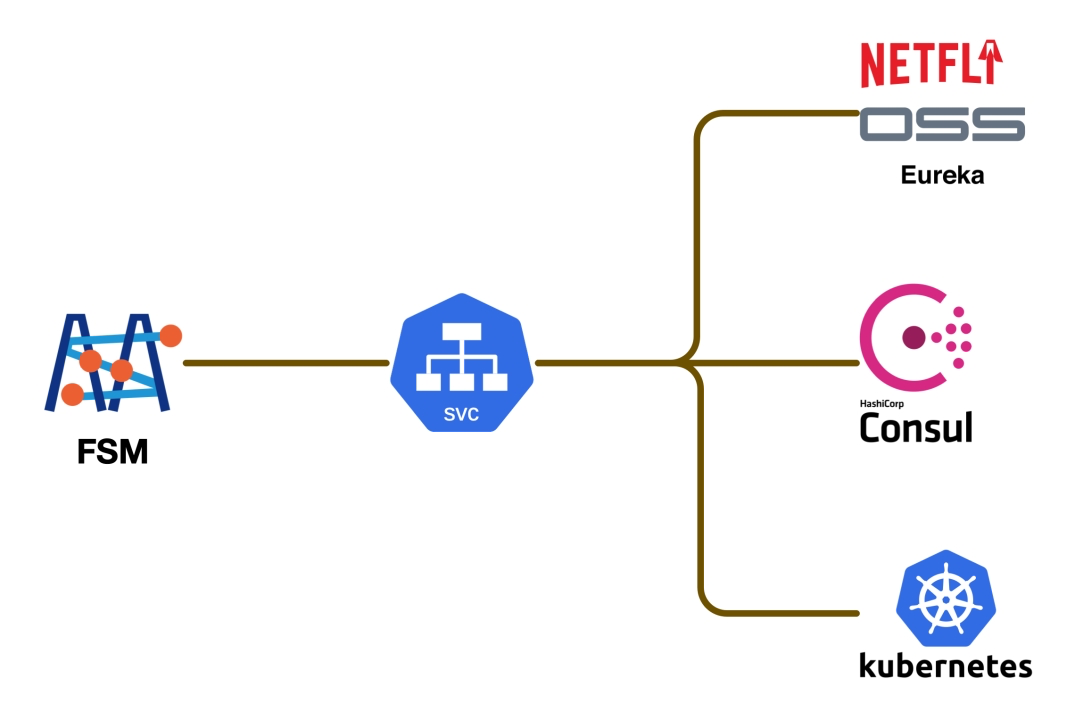
FSM, as a service mesh product, operates on the concept of a “unified service directory” to manage and accommodate various microservice architectures. It automatically identifies and integrates deployed services into a centralized service directory. This enables real-time and automated interactions among microservices, whether they are deployed on Kubernetes (K8s) or other environments.
For non-K8s environments, FSM supports multiple popular service registries. This means it can integrate with different service discovery systems, including:
- Consul: A service mesh solution by HashiCorp for service discovery and configuration.
- Eureka: A service discovery tool developed by Netflix, part of the Spring Cloud Netflix microservice suite.
- Nacos: An open-source service discovery and configuration management system by Alibaba, aimed at providing dynamic service discovery and configuration management for cloud-native applications.
Adapting these registries, FSM enhances its application in hybrid architectures, allowing users to enjoy the benefits of a service mesh without being limited to a specific microservice framework. This compatibility positions FSM as a strong service mesh option in diverse microservice environments.
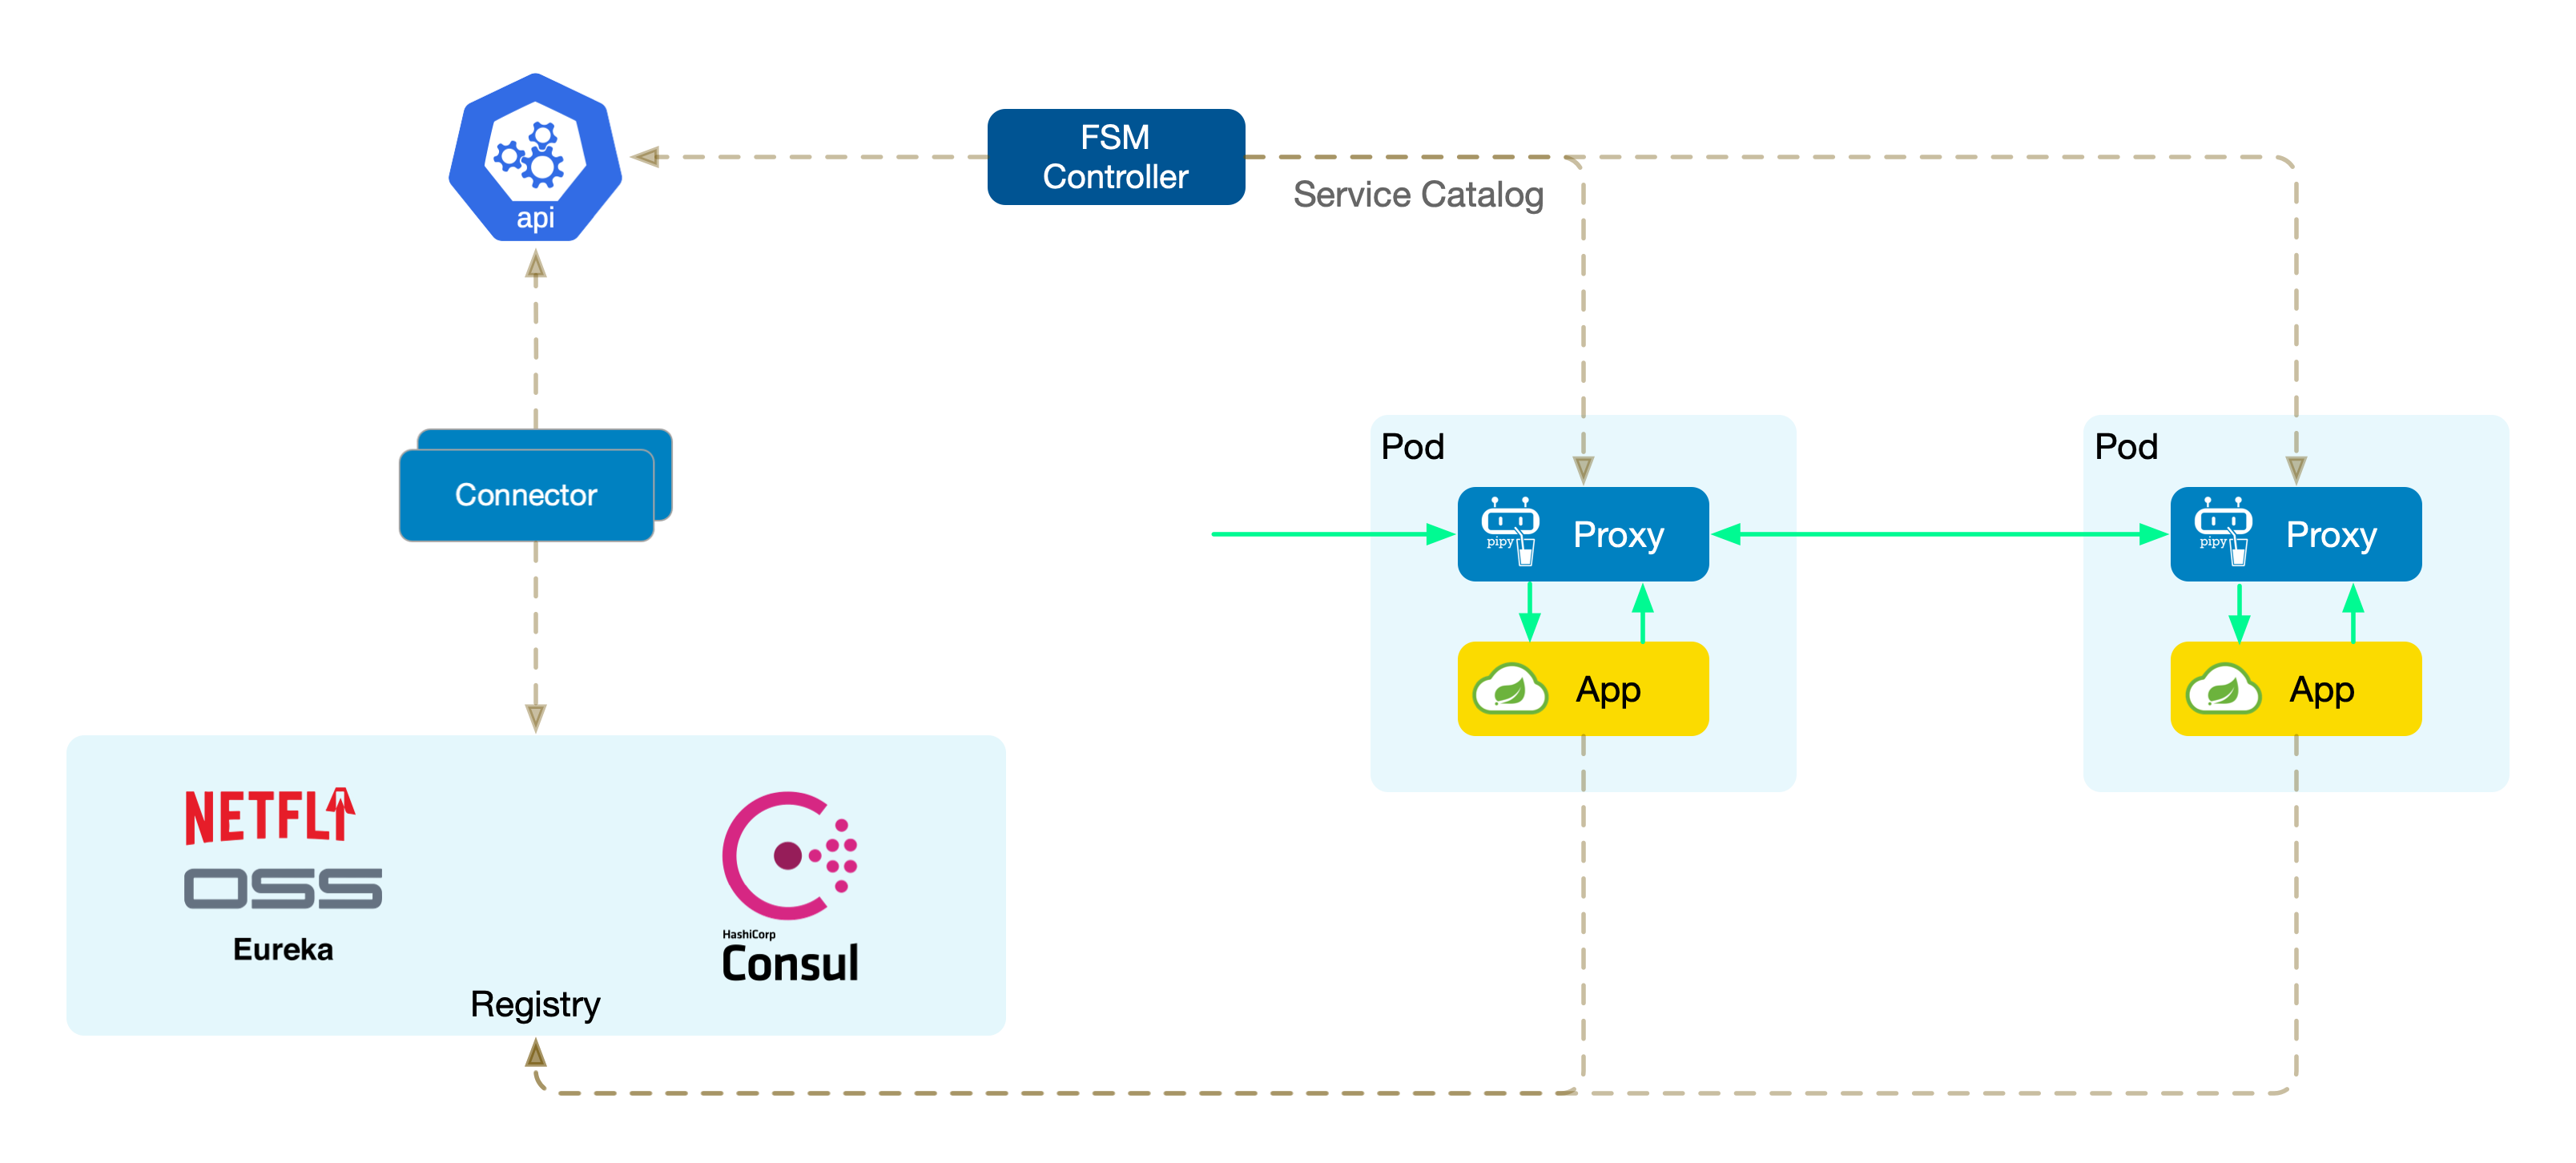
Unified Service Directory
The unified service directory provides a smooth integration experience. By abstracting services from different microservice registries into Kubernetes services (K8s Services), FSM standardizes service information. This approach has several key advantages:
- Simplified service discovery: Services from different sources need not write and maintain multiple sets of code for different discovery mechanisms; everything is uniformly handled through K8s Services.
- Reduced complexity: Encapsulating different service registries as K8s Services means users only need to interact with the K8s API, simplifying operations.
- Seamless cloud-native integration: For services already running on Kubernetes, this unified service model integrates seamlessly, enhancing inter-service operability.
Connectors
FSM uses framework-specific connectors to interface with different microservice registries. Each connector is tasked with communicating with a specific registry (such as Consul, Eureka, or Nacos), performing key tasks like service registration, monitoring service changes, encapsulating as K8s Services, and writing to the cluster.
Connectors are independent components developed in Go (theoretically supporting other languages as well) that can quickly interface with packages provided by the corresponding registry.
Next, we demonstrate integrating Spring Cloud Consul microservices into the service mesh and testing the commonly used canary release scenario.