This is the multi-page printable view of this section. Click here to print.
Demos
- 1: Traffic Management
- 1.1: Outbound Traffic IP Range Exclusions
- 1.2: Retry Policy
- 1.3: TCP Traffic Routing
- 1.4: Canary Rollouts using SMI Traffic Split
- 1.5: Circuit breaking for destinations within the mesh
- 1.6: Local rate limiting of L4 connections
- 1.7: Local rate limiting of HTTP requests
- 2: Integration
- 3: Ingress
- 3.1: Ingress with Service Mesh
- 3.2: Ingress Controller - Basics
- 3.3: Ingress Controller - Advanced TLS
- 3.4: Ingress with Kubernetes Nginx Ingress Controller
- 3.5: Ingress with Traefik
- 3.6: FSM Ingress Controller - SSL Passthrough
- 4: Egress
- 4.1: Egress Passthrough to Unknown Destinations
- 4.2: Egress Gateway Passthrough to Unknown Destinations
- 4.3: Egress Policy
- 4.4: Egress Gateway Policy
- 5: Multi Cluster
- 6: Security
- 6.1: Permissive Traffic Policy Mode
- 6.2: Bi-direction TLS with FSM Ingress
- 6.3: Service-based access control
- 6.4: IP range-based access control
- 6.5: Cert-manager Certificate Provider
- 7: Observability
- 7.1: Distributed Tracing Collaboration between FSM and OpenTelemetry
- 7.2: Integrate FSM with Prometheus and Grafana
- 8: Extending FSM with Plugins
1 - Traffic Management
1.1 - Outbound Traffic IP Range Exclusions
This guide demonstrates how outbound IP address ranges can be excluded from being intercepted by FSM’s proxy sidecar, so as to not subject them to service mesh filtering and routing policies.
Prerequisites
- Kubernetes cluster running Kubernetes v1.19.0 or greater.
- Have FSM installed.
- Have
kubectlavailable to interact with the API server. - Have
fsmCLI available for managing the service mesh.
Demo
The following demo shows an HTTP curl client making HTTP requests to the httpbin.org website directly using its IP address. We will explicitly disable the egress functionality to ensure traffic to a non-mesh destination (httpbin.org in this demo) is not able to egress the pod.
Disable mesh-wide egress passthrough.
export fsm_namespace=fsm-system # Replace fsm-system with the namespace where FSM is installed
kubectl patch meshconfig fsm-mesh-config -n "$fsm_namespace" -p '{"spec":{"traffic":{"enableEgress":false}}}'  --type=merge
Deploy the
curlclient into thecurlnamespace after enrolling its namespace to the mesh.# Create the curl namespace kubectl create namespace curl # Add the namespace to the mesh fsm namespace add curl # Deploy curl client in the curl namespace kubectl apply -f https://raw.githubusercontent.com/flomesh-io/fsm-docs/main/manifests/samples/curl/curl.yaml -n curlConfirm the
curlclient pod is up and running.$ kubectl get pods -n curl NAME READY STATUS RESTARTS AGE curl-54ccc6954c-9rlvp 2/2 Running 0 20sRetrieve the public IP address for the
httpbin.orgwebsite. For the purpose of this demo, we will test with a single IP range to be excluded from traffic interception. In this example, we will use the IP address54.91.118.50represented by the IP range54.91.118.50/32, to make HTTP requests with and without outbound IP range exclusions configured.$ nslookup httpbin.org Server: 172.23.48.1 Address: 172.23.48.1#53 Non-authoritative answer: Name: httpbin.org Address: 54.91.118.50 Name: httpbin.org Address: 54.166.163.67 Name: httpbin.org Address: 34.231.30.52 Name: httpbin.org Address: 34.199.75.4Note: Replace
54.91.118.50with a valid IP address returned by the above command in subsequent steps.Confirm the
curlclient is unable to make successful HTTP requests to thehttpbin.orgwebsite running onhttp://54.91.118.50:80.$ kubectl exec -n curl -ti "$(kubectl get pod -n curl -l app=curl -o jsonpath='{.items[0].metadata.name}')" -c curl -- curl -I http://54.91.118.50:80 curl: (7) Failed to connect to 54.91.118.50 port 80: Connection refused command terminated with exit code 7The failure above is expected because by default outbound traffic is redirected via the Pipy proxy sidecar running on the
curlclient’s pod, and the proxy subjects this traffic to service mesh policies which does not allow this traffic.Program FSM to exclude the IP range
54.91.118.50/32IP rangekubectl patch meshconfig fsm-mesh-config -n "$fsm_namespace" -p '{"spec":{"traffic":{"outboundIPRangeExclusionList":["54.91.118.50/32"]}}}' --type=mergeConfirm the MeshConfig has been updated as expected
# 54.91.118.50 is one of the IP addresses of httpbin.org
$ kubectl get meshconfig fsm-mesh-config -n "$fsm_namespace" -o jsonpath='{.spec.traffic.outboundIPRangeExclusionList}{"\n"}'
["54.91.118.50/32"]
Restart the
curlclient pod so the updated outbound IP range exclusions can be configured. It is important to note that existing pods must be restarted to pick up the updated configuration because the traffic interception rules are programmed by the init container only at the time of pod creation.kubectl rollout restart deployment curl -n curlWait for the restarted pod to be up and running.
Confirm the
curlclient is able to make successful HTTP requests to thehttpbin.orgwebsite running onhttp://54.91.118.50:80# 54.91.118.50 is one of the IP addresses for httpbin.org $ kubectl exec -n curl -ti "$(kubectl get pod -n curl -l app=curl -o jsonpath='{.items[0].metadata.name}')" -c curl -- curl -I http://54.91.118.50:80 HTTP/1.1 200 OK Date: Thu, 18 Mar 2021 23:17:44 GMT Content-Type: text/html; charset=utf-8 Content-Length: 9593 Connection: keep-alive Server: gunicorn/19.9.0 Access-Control-Allow-Origin: * Access-Control-Allow-Credentials: trueConfirm that HTTP requests to other IP addresses of the
httpbin.orgwebsite that are not excluded fail# 34.199.75.4 is one of the IP addresses for httpbin.org $ kubectl exec -n curl -ti "$(kubectl get pod -n curl -l app=curl -o jsonpath='{.items[0].metadata.name}')" -c curl -- curl -I http://34.199.75.4:80 curl: (7) Failed to connect to 34.199.75.4 port 80: Connection refused command terminated with exit code 7
1.2 - Retry Policy
This guide demonstrates how to configure retry policy for a client and server application within the service mesh.
Prerequisites
- Kubernetes cluster running Kubernetes v1.19.0 or greater.
- Have
kubectlavailable to interact with the API server. - Have
fsmCLI available for managing the service mesh.
Demo
Install FSM with permissive mode and retry policy enabled.
fsm install --set=fsm.enablePermissiveTrafficPolicy=true --set=fsm.featureFlags.enableRetryPolicy=trueDeploy the
httpbinservice into thehttpbinnamespace after enrolling its namespace to the mesh. Thehttpbinservice runs on port14001.kubectl create namespace httpbin fsm namespace add httpbin kubectl apply -f https://raw.githubusercontent.com/flomesh-io/fsm-docs/main/manifests/samples/httpbin/httpbin.yaml -n httpbinConfirm the
httpbinservice and pods are up and running.kubectl get svc,pod -n httpbinShould look similar to below
NAME      TYPE        CLUSTER-IP     EXTERNAL-IP   PORT(S)     AGE
httpbin   ClusterIP   10.96.198.23   <none>        14001/TCP   20s

NAME                     READY   STATUS    RESTARTS   AGE
httpbin-5b8b94b9-lt2vs   2/2     Running   0          20s
Deploy the
curlinto thecurlnamespace after enrolling its namespace to the mesh.kubectl create namespace curl fsm namespace add curl kubectl apply -f https://raw.githubusercontent.com/flomesh-io/fsm-docs/main/manifests/samples/curl/curl.yaml -n curlConfirm the
curlpod is up and running.kubectl get pods -n curlShould look similar to below.
NAME                    READY   STATUS    RESTARTS   AGE
curl-54ccc6954c-9rlvp   2/2     Running   0          20s
Apply the Retry policy to retry when the
curlServiceAccount receives a5xxcode when sending a request tohttpbinService.kubectl apply -f - <<EOF kind: Retry apiVersion: policy.flomesh.io/v1alpha1 metadata: name: retry namespace: curl spec: source: kind: ServiceAccount name: curl namespace: curl destinations: - kind: Service name: httpbin namespace: httpbin retryPolicy: retryOn: "5xx" perTryTimeout: 1s numRetries: 5 retryBackoffBaseInterval: 1s EOFSend a HTTP request that returns status code
503from thecurlpod to thehttpbinservice.curl_client="$(kubectl get pod -n curl -l app=curl -o jsonpath='{.items[0].metadata.name}')" kubectl exec "$curl_client" -n curl -c curl -- curl -sI httpbin.httpbin.svc.cluster.local:14001/status/503Returned result might look like
HTTP/1.1 503 SERVICE UNAVAILABLE
server: gunicorn
date: Tue, 14 Feb 2023 11:11:51 GMT
content-type: text/html; charset=utf-8
access-control-allow-origin: *
access-control-allow-credentials: true
content-length: 0
connection: keep-alive
Query for the stats between
curltohttpbin.curl_client="$(kubectl get pod -n curl -l app=curl -o jsonpath='{.items[0].metadata.name}')" fsm proxy get stats -n curl "$curl_client" | grep upstream_rq_retryThe number of times the request from the
curlpod to thehttpbinpod was retried using the exponential backoff retry should be equal to thenumRetriesfield in the retry policy.The
upstream_rq_retry_limit_exceededstat shows the number of requests not retried because it’s more than the maximum retries allowed -numRetries.cluster.httpbin/httpbin|14001.upstream_rq_retry: 4 cluster.httpbin/httpbin|14001.upstream_rq_retry_backoff_exponential: 4 cluster.httpbin/httpbin|14001.upstream_rq_retry_backoff_ratelimited: 0 cluster.httpbin/httpbin|14001.upstream_rq_retry_limit_exceeded: 1 cluster.httpbin/httpbin|14001.upstream_rq_retry_overflow: 0 cluster.httpbin/httpbin|14001.upstream_rq_retry_success: 0Send a HTTP request that returns a non-5xx status code from the
curlpod to thehttpbinservice.curl_client="$(kubectl get pod -n curl -l app=curl -o jsonpath='{.items[0].metadata.name}')" kubectl exec "$curl_client" -n curl -c curl -- curl -sI httpbin.httpbin.svc.cluster.local:14001/status/404Returned result might look something like
HTTP/1.1 404 NOT FOUND
server: gunicorn
date: Tue, 14 Feb 2023 11:18:56 GMT
content-type: text/html; charset=utf-8
access-control-allow-origin: *
access-control-allow-credentials: true
content-length: 0
connection: keep-alive
1.3 - TCP Traffic Routing
This guide demonstrates a TCP client and server application within the service mesh communicating using FSM’s TCP routing capability.
Prerequisites
- Kubernetes cluster running Kubernetes v1.19.0 or greater.
- Have FSM installed.
- Have
kubectlavailable to interact with the API server. - Have
fsmCLI available for managing the service mesh.
Demo
The following demo shows a TCP client sending data to a tcp-echo server, which then echoes back the data to the client over a TCP connection.
Set the namespace where FSM is installed.
fsm_namespace=fsm-system # Replace fsm-system with the namespace where FSM is installed if differentDeploy the
tcp-echoservice in thetcp-demonamespace. Thetcp-echoservice runs on port9000with theappProtocolfield set totcp, which indicates to FSM that TCP routing must be used for traffic directed to thetcp-echoservice on port9000.# Create the tcp-demo namespace kubectl create namespace tcp-demo # Add the namespace to the mesh fsm namespace add tcp-demo # Deploy the service kubectl apply -f https://raw.githubusercontent.com/flomesh-io/fsm-docs/main/manifests/apps/tcp-echo.yaml -n tcp-demoConfirm the
tcp-echoservice and pod is up and running.$ kubectl get svc,po -n tcp-demo NAME TYPE CLUSTER-IP EXTERNAL-IP PORT(S) AGE service/tcp-echo ClusterIP 10.0.216.68 <none> 9000/TCP 97s NAME READY STATUS RESTARTS AGE pod/tcp-echo-6656b7c4f8-zt92q 2/2 Running 0 97sDeploy the
curlclient into thecurlnamespace.# Create the curl namespace kubectl create namespace curl # Add the namespace to the mesh fsm namespace add curl # Deploy curl client in the curl namespace kubectl apply -f https://raw.githubusercontent.com/flomesh-io/fsm-docs/main/manifests/samples/curl/curl.yaml -n curlConfirm the
curlclient pod is up and running.$ kubectl get pods -n curl NAME READY STATUS RESTARTS AGE curl-54ccc6954c-9rlvp 2/2 Running 0 20s
Using Permissive Traffic Policy Mode
We will enable service discovery using permissive traffic policy mode, which allows application connectivity to be established without the need for explicit SMI policies.
Enable permissive traffic policy mode
kubectl patch meshconfig fsm-mesh-config -n "$fsm_namespace" -p '{"spec":{"traffic":{"enablePermissiveTrafficPolicyMode":true}}}' --type=mergeConfirm the
curlclient is able to send and receive a response from thetcp-echoservice using TCP routing.$ kubectl exec -n curl -ti "$(kubectl get pod -n curl -l app=curl -o jsonpath='{.items[0].metadata.name}')" -c curl -- sh -c 'echo hello | nc tcp-echo.tcp-demo 9000' echo response: helloThe
tcp-echoservice should echo back the data sent by the client. In the above example, the client sendshello, and thetcp-echoservice responds withecho response: hello.
Using SMI Traffic Policy Mode
When using SMI traffic policy mode, explicit traffic policies must be configured to allow application connectivity. We will set up SMI policies to allow the curl client to communicate with the tcp-echo service on port 9000.
Enable SMI traffic policy mode by disabling permissive traffic policy mode
kubectl patch meshconfig fsm-mesh-config -n "$fsm_namespace" -p '{"spec":{"traffic":{"enablePermissiveTrafficPolicyMode":false}}}' --type=mergeConfirm the
curlclient is unable to send and receive a response from thetcp-echoservice in the absence of SMI policies.$ kubectl exec -n curl -ti "$(kubectl get pod -n curl -l app=curl -o jsonpath='{.items[0].metadata.name}')" -c curl -- sh -c 'echo hello | nc tcp-echo.tcp-demo 9000' command terminated with exit code 1Configure SMI traffic access and routing policies.
kubectl apply -f - <<EOF
# TCP route to allows access to tcp-echo:9000
apiVersion: specs.smi-spec.io/v1alpha4
kind: TCPRoute
metadata:
name: tcp-echo-route
namespace: tcp-demo
spec:
matches:
    ports:
    - 9000
---
# Traffic target to allow curl app to access tcp-echo service using a TCPRoute
kind: TrafficTarget
apiVersion: access.smi-spec.io/v1alpha3
metadata:
name: tcp-access
namespace: tcp-demo
spec:
destination:
    kind: ServiceAccount
    name: tcp-echo
    namespace: tcp-demo
sources:
- kind: ServiceAccount
    name: curl
    namespace: curl
rules:
- kind: TCPRoute
    name: tcp-echo-route
EOF
Confirm the
curlclient is able to send and receive a response from thetcp-echoservice using SMI TCP route.$ kubectl exec -n curl -ti "$(kubectl get pod -n curl -l app=curl -o jsonpath='{.items[0].metadata.name}')" -c curl -- sh -c 'echo hello | nc tcp-echo.tcp-demo 9000' echo response: hello
1.4 - Canary Rollouts using SMI Traffic Split
This guide demonstrates how to perform Canary rollouts using the SMI Traffic Split configuration.
Prerequisites
- Kubernetes cluster running Kubernetes v1.19.0 or greater.
- Have FSM installed.
- Have
kubectlavailable to interact with the API server. - Have
fsmCLI available for managing the service mesh.
Demonstration
Explanation
In this demo, we use two applications, curl and httpbin implemented with Pipy, to act as client and server respectively. The service has two versions, v1 and v2, which are simulated by deploying httpbin-v1 and httpbin-v2.
Observant viewers may notice the frequent use of Pipy to implement httpbin functionalities in demonstrations. This is because web services implemented with Pipy can easily customize response content, facilitating the observation of test results.
Prerequisites
- Kubernetes cluster
- kubectl CLI
Installing the Service Mesh
Download the FSM CLI.
system=$(uname -s | tr '[:upper:]' '[:lower:]')
arch=$(uname -m | sed -E 's/x86_/amd/' | sed -E 's/aarch/arm/')
release=v1.3.3
curl -L https://github.com/flomesh-io/fsm/releases/download/${release}/fsm-${release}-${system}-${arch}.tar.gz | tar -vxzf -
cp ./${system}-amd64/fsm /usr/local/bin/fsm
Install the service mesh and wait for all components to run successfully.
fsm install --timeout 120s
Deploying the Sample Application
The curl and httpbin applications run in their respective namespaces, which are managed by the service mesh through the fsm namespace add xxx command.
kubectl create ns httpbin
kubectl create ns curl
fsm namespace add httpbin curl
Deploy the v1 version of httpbin which returns Hi, I am v1! for all HTTP requests. Other applications access httpbin through the Service httpbin.
kubectl apply -n httpbin -f - <<EOF
apiVersion: v1
kind: Service
metadata:
  name: httpbin
spec:
  ports:
    - name: pipy
      port: 8080
      targetPort: 8080
      protocol: TCP
  selector:
    app: pipy
---
apiVersion: apps/v1
kind: Deployment
metadata:
  name: httpbin-v1
  labels:
    app: pipy
    version: v1
spec:
  replicas: 1
  selector:
    matchLabels:
      app: pipy
      version: v1
  template:
    metadata:
      labels:
        app: pipy
        version: v1
    spec:
      containers:
        - name: pipy
          image: flomesh/pipy:latest
          ports:
            - name: pipy
              containerPort: 8080
          command:
            - pipy
            - -e
            - |
              pipy()
              .listen(8080)
              .serveHTTP(new Message('Hi, I am v1!\n'))
EOF
Deploy the curl application.
kubectl apply -n curl -f - <<EOF
apiVersion: v1
kind: Service
metadata:
  name: curl
  labels:
    app: curl
    service: curl
spec:
  ports:
    - name: http
      port: 80
  selector:
    app: curl
---
apiVersion: apps/v1
kind: Deployment
metadata:
  name: curl
spec:
  replicas: 1
  selector:
    matchLabels:
      app: curl
  template:
    metadata:
      labels:
        app: curl
    spec:
      containers:
      - image: curlimages/curl
        imagePullPolicy: IfNotPresent
        name: curl
        command: ["sleep", "365d"]
EOF
Wait for all applications to run successfully.
kubectl wait --for=condition=ready pod --all -A
Test application access.
curl_client="$(kubectl get pod -n curl -l app=curl -o jsonpath='{.items[0].metadata.name}')"
# send four request
kubectl exec "$curl_client" -n curl -c curl -- curl -s httpbin.httpbin:8080 httpbin.httpbin:8080 httpbin.httpbin:8080 httpbin.httpbin:8080
Expected results are displayed.
Hi, I am v1!
Hi, I am v1!
Hi, I am v1!
Hi, I am v1!
Next, deploy the v2 version of httpbin.
Deploying Version v2
The v2 version of httpbin returns Hi, I am v2! for all HTTP requests. Before deployment, we need to set the default traffic split strategy, otherwise, the new version instances would be accessible through the Service httpbin.
Create Service httpbin-v1 with an additional version tag in its selector compared to Service httpbin. Currently, both have the same endpoints.
kubectl apply -n httpbin -f - <<EOF
apiVersion: v1
kind: Service
metadata:
  name: httpbin-v1
spec:
  ports:
    - name: pipy
      port: 8080
      targetPort: 8080
      protocol: TCP
  selector:
    app: pipy
    version: v1
EOF
Apply the TrafficSplit strategy to route all traffic to httpbin-v1.
kubectl apply -n httpbin -f - <<EOF
apiVersion: split.smi-spec.io/v1alpha4
kind: TrafficSplit
metadata:
  name: httpbin-split
spec:
  service: httpbin
  backends:
  - service: httpbin-v1
    weight: 100
EOF
Then deploy the new version.
kubectl apply -n httpbin -f - <<EOF
apiVersion: v1
kind: Service
metadata:
  name: httpbin-v2
spec:
  ports:
    - name: pipy
      port: 8080
      targetPort: 8080
      protocol: TCP
  selector:
    app: pipy
    version: v2
---
apiVersion: apps/v1
kind: Deployment
metadata:
  name: httpbin-v2
  labels:
    app: pipy
    version: v2
spec:
  replicas: 1
  selector:
    matchLabels:
      app: pipy
      version: v2
  template:
    metadata:
      labels:
        app: pipy
        version: v2
    spec:
      containers:
        - name: pipy
          image: flomesh/pipy:latest
          ports:
            - name: pipy
              containerPort: 8080
          command:
            - pipy
            - -e
            - |
              pipy()
              .listen(8080)
              .serveHTTP(new Message('Hi, I am v2!\n'))
EOF
Wait for the new version to run successfully.
kubectl wait --for=condition=ready pod -n httpbin -l version=v2
If you send requests again, v1 httpbin still handles them.
kubectl exec "$curl_client" -n curl -c curl -- curl -s httpbin.httpbin:8080 httpbin.httpbin:8080 httpbin.httpbin:8080 httpbin.httpbin:8080
Hi, I am v1!
Hi, I am v1!
Hi, I am v1!
Hi, I am v1!
Canary Release
Modify the traffic split strategy to direct 25% of the traffic to version v2.
kubectl apply -n httpbin -f - <<EOF
apiVersion: split.smi-spec.io/v1alpha4
kind: TrafficSplit
metadata:
  name: httpbin-split
spec:
  service: httpbin
  backends:
  - service: httpbin-v1
    weight: 75
  - service: httpbin-v2
    weight: 25
EOF
Sending requests again shows that 1/4 of the traffic is handled by version v2.
kubectl exec "$curl_client" -n curl -c curl -- curl -s httpbin.httpbin:8080 httpbin.httpbin:8080 httpbin.httpbin:8080 httpbin.httpbin:8080
Hi, I am v1!
Hi, I am v2!
Hi, I am v1!
Hi, I am v1!
Advanced Canary Release
Suppose in version v2, /test endpoint functionality has been updated. For risk control, we want only a portion of the traffic to access the /test endpoint of the v2 version, while other endpoints like /demo should only access the v1 version.
We need to introduce another resource to define the traffic visiting the /test endpoint: a route definition. Here we define two routes:
httpbin-test: Traffic using theGETmethod to access/test.httpbin-all: Traffic using theGETmethod to access/, note this is a prefix match.
kubectl apply -n httpbin -f - <<EOF
apiVersion: specs.smi-spec.io/v1alpha4
kind: HTTPRouteGroup
metadata:
  name: httpbin-test
spec:
  matches:
  - name: test
    pathRegex: "/test"
    methods:
    - GET
---
apiVersion: specs.smi-spec.io/v1alpha4
kind: HTTPRouteGroup
metadata:
  name: httpbin-all
spec:
  matches:
  - name: test
    pathRegex: ".*"
    methods:
    - GET
EOF
Then
update the traffic split strategy, associating the routes to the split. Also, create a new policy.
kubectl apply -n httpbin -f - <<EOF
apiVersion: split.smi-spec.io/v1alpha4
kind: TrafficSplit
metadata:
  name: httpbin-split
spec:
  service: httpbin
  matches:
  - name: httpbin-test
    kind: HTTPRouteGroup
  backends:
  - service: httpbin-v1
    weight: 75
  - service: httpbin-v2
    weight: 25
---
apiVersion: split.smi-spec.io/v1alpha4
kind: TrafficSplit
metadata:
  name: httpbin-all
spec:
  service: httpbin
  matches:
  - name: httpbin-all
    kind: HTTPRouteGroup
  backends:
  - service: httpbin-v1
    weight: 100
EOF
Now, when accessing the /test endpoint, only 25% of the traffic goes to the new version.
kubectl exec "$curl_client" -n curl -c curl -- curl -s httpbin.httpbin:8080/test httpbin.httpbin:8080/test httpbin.httpbin:8080/test httpbin.httpbin:8080/test
Hi, I am v1!
Hi, I am v2!
Hi, I am v1!
Hi, I am v1!
And requests to the /demo endpoint all go to the old v1 version.
kubectl exec "$curl_client" -n curl -c curl -- curl -s httpbin.httpbin:8080/demo httpbin.httpbin:8080/demo httpbin.httpbin:8080/demo httpbin.httpbin:8080/demo
Hi, I am v1!
Hi, I am v1!
Hi, I am v1!
Hi, I am v1!
This meets the expectations.
1.5 - Circuit breaking for destinations within the mesh
This guide demonstrates how to configure circuit breaking for destinations that are a part of an FSM managed service mesh.
Prerequisites
- Kubernetes cluster running Kubernetes v1.19.0 or greater.
- Have FSM installed.
- Have
kubectlavailable to interact with the API server. - Have
fsmCLI available for managing the service mesh. - FSM version >= v1.0.0.
Demo
The following demo shows a load-testing client fortio sending traffic to the httpbin service. We will see how applying circuit breakers for traffic to the httpbin service impacts the fortio client when the configured circuit breaking limits trip.
For simplicity, enable permissive traffic policy mode so that explicit SMI traffic access policies are not required for application connectivity within the mesh.
export FSM_NAMESPACE=fsm-system # Replace fsm-system with the namespace where FSM is installed
kubectl patch meshconfig fsm-mesh-config -n "$FSM_NAMESPACE" -p '{"spec":{"traffic":{"enablePermissiveTrafficPolicyMode":true}}}'  --type=merge
Deploy services
Deploy server service.
kubectl create namespace server
fsm namespace add server
kubectl apply -n server -f - <<EOF
apiVersion: v1
kind: Service
metadata:
  name: fortio
  labels:
    app: fortio
    service: fortio
spec:
  ports:
  - port: 8080
    name: http-8080
  - port: 8078
    name: tcp-8078
  - port: 8079
    name: grpc-8079
  selector:
    app: fortio
---
apiVersion: apps/v1
kind: Deployment
metadata:
  name: fortio
spec:
  replicas: 1
  selector:
    matchLabels:
      app: fortio
  template:
    metadata:
      labels:
        app: fortio
    spec:
      containers:
      - name: fortio
        image: fortio/fortio:latest_release
        imagePullPolicy: Always
        ports:
        - containerPort: 8080
          name: http
        - containerPort: 8078
          name: tcp
        - containerPort: 8079
          name: grpc
EOF
Deploy client service.
kubectl create namespace client
fsm namespace add client

kubectl apply -n client -f - <<EOF
apiVersion: v1
kind: ServiceAccount
metadata:
  name: fortio-client
---
apiVersion: apps/v1
kind: Deployment
metadata:
  name: fortio-client
spec:
  replicas: 1
  selector:
    matchLabels:
      app: fortio-client
  template:
    metadata:
      labels:
        app: fortio-client
    spec:
      serviceAccountName: fortio-client
      containers:
      - name: fortio-client
        image: fortio/fortio:latest_release
        imagePullPolicy: Always
EOF
Test
Confirm the fortio-client is able to successfully make HTTP requests to the fortio-server service on port 8080. We call the service with 10 concurrent connections (-c 10) and send 1000 requests (-n 1000). Service is configured to return HTTP status code of 511 for 20% requests.
fortio_client=`kubectl get pod -n client -l app=fortio-client -o jsonpath='{.items[0].metadata.name}'`
kubectl exec "$fortio_client" -n client -c fortio-client -- fortio load -quiet -c 10 -n 1000 -qps 200 -p 99.99 http://fortio.server.svc.cluster.local:8080/echo?status=511:20
Returned result might look something like below:
Sockets used: 205 (for perfect keepalive, would be 10)
Uniform: false, Jitter: false, Catchup allowed: true
IP addresses distribution:
10.43.43.151:8080: 205
Code 200 : 804 (80.4 %)
Code 511 : 196 (19.6 %)
All done 1000 calls (plus 0 warmup) 2.845 ms avg, 199.8 qps
Next, apply a circuit breaker configuration using the UpstreamTrafficSetting resource for traffic directed to the fortio-server service.
Policy: Error Request Count Triggers Circuit Breaker
The error request count trigger threshold is set to errorAmountThreshold=100, the circuit breaker is triggered when the error request count reaches 100, returning 503 Service Unavailable!, the circuit breaker lasts for 10s
kubectl apply -f - <<EOF
apiVersion: policy.flomesh.io/v1alpha1
kind: UpstreamTrafficSetting
metadata:
  name: http-circuit-breaking
  namespace: server
spec:
  host: fortio.server.svc.cluster.local
  connectionSettings:
    http:
      circuitBreaking:
        statTimeWindow: 1m
        minRequestAmount: 200
        errorAmountThreshold: 100
        degradedTimeWindow: 10s
        degradedStatusCode: 503
        degradedResponseContent: 'Service Unavailable!'
EOF
Set 20% of the server’s responses to return error code 511. When the error request count reaches 100, the number of successful requests should be around 400.
kubectl exec "$fortio_client" -n client -c fortio-client -- fortio load -quiet -c 10 -n 1000 -qps 200 -p 99.99 http://fortio.server.svc.cluster.local:8080/echo\?status\=511:20
From the results, it meets the expectations. After circuit breaker, the requests return the 503 error code.
Sockets used: 570 (for perfect keepalive, would be 10)
Uniform: false, Jitter: false, Catchup allowed: true
IP addresses distribution:
10.43.43.151:8080: 570
Code 200 : 430 (43.0 %)
Code 503 : 470 (47.0 %)
Code 511 : 100 (10.0 %)
All done 1000 calls (plus 0 warmup) 3.376 ms avg, 199.8 qps
Checking the sidecar logs, the error count reached 100 at the 530th request, triggering the circuit breaker.
2023-02-08 01:08:01.456 [INF] [circuit_breaker] total/slowAmount/errorAmount (open) server/fortio|8080 530 0 100
Policy: Error Rate Triggers Circuit Breaker
Here we change the trigger from error count to error rate: errorRatioThreshold=0.10, the circuit breaker is triggered when the error rate reaches 10%, it lasts for 10s and returns 503 Service Unavailable!. Note that the minimum number of requests is still 200.
kubectl apply -f - <<EOF
apiVersion: policy.flomesh.io/v1alpha1
kind: UpstreamTrafficSetting
metadata:
  name: http-circuit-breaking
  namespace: server
spec:
  host: fortio.server.svc.cluster.local
  connectionSettings:
    http:
      circuitBreaking:
        statTimeWindow: 1m
        minRequestAmount: 200
        errorRatioThreshold: 0.10
        degradedTimeWindow: 10s
        degradedStatusCode: 503
        degradedResponseContent: 'Service Unavailable!'
EOF
Set 20% of the server’s responses to return error code 511.
kubectl exec "$fortio_client" -n client -c fortio-client -- fortio load -quiet -c 10 -n 1000 -qps 200 -p 99.99 http://fortio.server.svc.cluster.local:8080/echo\?status\=511:20
From the output results, it can be seen that after 200 requests, the circuit breaker was triggered, and the number of circuit breaker requests was 800.
Sockets used: 836 (for perfect keepalive, would be 10)
Uniform: false, Jitter: false, Catchup allowed: true
IP addresses distribution:
10.43.43.151:8080: 836
Code 200 : 164 (16.4 %)
Code 503 : 800 (80.0 %)
Code 511 : 36 (3.6 %)
All done 1000 calls (plus 0 warmup) 3.605 ms avg, 199.8 qps
Checking the sidecar logs, after satisfying the minimum number of requests to trigger the circuit breaker (200), the error rate also reached the threshold, triggering the circuit breaker.
2023-02-08 01:19:25.874 [INF] [circuit_breaker] total/slowAmount/errorAmount (close) server/fortio|8080 200 0 36
Policy: Slow Call Request Count Triggers Circuit Breaker
Testing slow calls, add a 200ms delay to 20% of the requests.
kubectl exec "$fortio_client" -n client -c fortio-client -- fortio load -quiet -c 10 -n 1000 -qps 200 -p 50,78,79,80,81,82,90,95 http://fortio.server.svc.cluster.local:8080/echo\?delay\=200ms:20
A similar effect is achieved, with nearly 80% of requests taking less than 200ms.
# target 50% 0.000999031
# target 78% 0.0095
# target 79% 0.200175
# target 80% 0.200467
# target 81% 0.200759
# target 82% 0.20105
# target 90% 0.203385
# target 95% 0.204844

285103 max 0.000285103 sum 0.000285103
Sockets used: 10 (for perfect keepalive, would be 10)
Uniform: false, Jitter: false, Catchup allowed: true
IP addresses distribution:
10.43.43.151:8080: 10
Code 200 : 1000 (100.0 %)
All done 1000 calls (plus 0 warmup) 44.405 ms avg, 149.6 qps
Setting strategy:
- Set the slow call request time threshold to
200ms - Set the number of slow call requests to
100
kubectl apply -f - <<EOF
apiVersion: policy.flomesh.io/v1alpha1
kind: UpstreamTrafficSetting
metadata:
  name: http-circuit-breaking
  namespace: server
spec:
  host: fortio.server.svc.cluster.local
  connectionSettings:
    http:
      circuitBreaking:
        statTimeWindow: 1m
        minRequestAmount: 200
        slowTimeThreshold: 200ms
        slowAmountThreshold: 100
        degradedTimeWindow: 10s
        degradedStatusCode: 503
        degradedResponseContent: 'Service Unavailable!'
EOF
Inject a 200ms delay for 20% of requests.
kubectl exec "$fortio_client" -n client -c fortio-client -- fortio load -quiet -c 10 -n 1000 -qps 200 -p 50,78,79,80,81,82,90,95 http://fortio.server.svc.cluster.local:8080/echo\?delay\=200ms:20
The number of successful requests is 504, with 20% taking 200ms, and the number of slow requests has reached the threshold to trigger a circuit breaker.
# target 50% 0.00246111
# target 78% 0.00393846
# target 79% 0.00398974
# target 80% 0.00409756
# target 81% 0.00421951
# target 82% 0.00434146
# target 90% 0.202764
# target 95% 0.220036

Sockets used: 496 (for perfect keepalive, would be 10)
Uniform: false, Jitter: false, Catchup allowed: true
IP addresses distribution:
10.43.43.151:8080: 496
Code 200 : 504 (50.4 %)
Code 503 : 496 (49.6 %)
All done 1000 calls (plus 0 warmup) 24.086 ms avg, 199.8 qps
Checking the logs of the sidecar, the number of slow calls reached 100 on the 504th request, triggering the circuit breaker.
2023-02-08 07:27:01.106 [INF] [circuit_breaker] total/slowAmount/errorAmount (open) server/fortio|8080 504 100 0
Policy: Slow Call Rate Triggers Circuit Breaking
The slow call rate is set to 0.10, meaning that the circuit breaker will be triggered when it is expected that 10% of the requests within the statistical window will take more than 200ms.
kubectl apply -f - <<EOF
apiVersion: policy.flomesh.io/v1alpha1
kind: UpstreamTrafficSetting
metadata:
  name: http-circuit-breaking
  namespace: server
spec:
  host: fortio.server.svc.cluster.local
  connectionSettings:
    http:
      circuitBreaking:
        statTimeWindow: 1m
        minRequestAmount: 200
        slowTimeThreshold: 200ms
        slowRatioThreshold: 0.1
        degradedTimeWindow: 10s
        degradedStatusCode: 503
        degradedResponseContent: 'Service Unavailable!'
EOF
Add 200ms delay to 20% of requests.
kubectl exec "$fortio_client" -n client -c fortio-client -- fortio load -quiet -c 10 -n 1000 -qps 200 -p 50,78,79,80,81,82,90,95 http://fortio.server.svc.cluster.local:8080/echo\?delay\=200ms:20
From the output results, there are 202 successful requests which meets the minimum number of requests required for the configuration to take effect. Among them, 20% are slow calls, reaching the threshold for triggering circuit breaker.
# target 50% 0.00305539
# target 78% 0.00387172
# target 79% 0.00390087
# target 80% 0.00393003
# target 81% 0.00395918
# target 82% 0.00398834
# target 90% 0.00458915
# target 95% 0.00497674

Sockets used: 798 (for perfect keepalive, would be 10)
Uniform: false, Jitter: false, Catchup allowed: true
IP addresses distribution:
10.43.43.151:8080: 798
Code 200 : 202 (20.2 %)
Code 503 : 798 (79.8 %)
All done 1000 calls (plus 0 warmup) 10.133 ms avg, 199.8 qps
Check the logs of the sidecar, at the 202nd request, the number of slow requests was 28, which triggered the circuit breaker.
2023-02-08 07:38:25.284 [INF] [circuit_breaker] total/slowAmount/errorAmount (open) server/fortio|8080 202 28 0
1.6 - Local rate limiting of L4 connections
This guide demonstrates how to configure rate limiting for L4 TCP connections destined to a target host that is a part of a FSM managed service mesh.
Prerequisites
- Kubernetes cluster running Kubernetes v1.19.0 or greater.
- Have FSM installed.
- Have
kubectlavailable to interact with the API server. - Have
fsmCLI available for managing the service mesh. - FSM version >= v1.2.0.
Demo
The following demo shows a client fortio-client sending TCP traffic to the fortio TCP echo service. The fortio service echoes TCP messages back to the client. We will see the impact of applying local TCP rate limiting policies targeting the fortio service to control the throughput of traffic destined to the service backend.
For simplicity, enable permissive traffic policy mode so that explicit SMI traffic access policies are not required for application connectivity within the mesh.
export FSM_NAMESPACE=fsm-system # Replace fsm-system with the namespace where FSM is installed
kubectl patch meshconfig fsm-mesh-config -n "$FSM_NAMESPACE" -p '{"spec":{"traffic":{"enablePermissiveTrafficPolicyMode":true}}}'  --type=merge
Deploy the
fortioTCP echoservice in thedemonamespace after enrolling its namespace to the mesh. ThefortioTCP echoservice runs on port8078.# Create the demo namespace kubectl create namespace demo # Add the namespace to the mesh fsm namespace add demo # Deploy fortio TCP echo in the demo namespace kubectl apply -f https://raw.githubusercontent.com/flomesh-io/fsm-docs/main/manifests/samples/fortio/fortio.yaml -n demoConfirm the
fortioservice pod is up and running.kubectl get pods -n demo NAME READY STATUS RESTARTS AGE fortio-c4bd7857f-7mm6w 2/2 Running 0 22mDeploy the
fortio-clientapp in thedemonamespace. We will use this client to send TCP traffic to thefortio TCP echoservice deployed previously.kubectl apply -f https://raw.githubusercontent.com/flomesh-io/fsm-docs/main/manifests/samples/fortio/fortio-client.yaml -n demoConfirm the
fortio-clientpod is up and running.NAME READY STATUS RESTARTS AGE fortio-client-b9b7bbfb8-prq7r 2/2 Running 0 7sConfirm the
fortio-clientapp is able to successfully make TCP connections and send data to thefrotioTCP echoservice on port8078. We call thefortioservice with3concurrent connections (-c 3) and send10calls (-n 10).fortio_client="$(kubectl get pod -n demo -l app=fortio-client -o jsonpath='{.items[0].metadata.name}')" kubectl exec "$fortio_client" -n demo -c fortio-client -- fortio load -qps -1 -c 3 -n 10 tcp://fortio.demo.svc.cluster.local:8078 Fortio 1.32.3 running at -1 queries per second, 8->8 procs, for 10 calls: tcp://fortio.demo.svc.cluster.local:8078 20:41:47 I tcprunner.go:238> Starting tcp test for tcp://fortio.demo.svc.cluster.local:8078 with 3 threads at -1.0 qps Starting at max qps with 3 thread(s) [gomax 8] for exactly 10 calls (3 per thread + 1) 20:41:47 I periodic.go:723> T001 ended after 34.0563ms : 3 calls. qps=88.0894283876992 20:41:47 I periodic.go:723> T000 ended after 35.3117ms : 4 calls. qps=113.2769025563765 20:41:47 I periodic.go:723> T002 ended after 44.0273ms : 3 calls. qps=68.13954069406937 Ended after 44.2097ms : 10 calls. qps=226.19 Aggregated Function Time : count 10 avg 0.01096615 +/- 0.01386 min 0.001588 max 0.0386716 sum 0.1096615 # range, mid point, percentile, count >= 0.001588 <= 0.002 , 0.001794 , 40.00, 4 > 0.002 <= 0.003 , 0.0025 , 60.00, 2 > 0.003 <= 0.004 , 0.0035 , 70.00, 1 > 0.025 <= 0.03 , 0.0275 , 90.00, 2 > 0.035 <= 0.0386716 , 0.0368358 , 100.00, 1 # target 50% 0.0025 # target 75% 0.02625 # target 90% 0.03 # target 99% 0.0383044 # target 99.9% 0.0386349 Error cases : no data Sockets used: 3 (for perfect no error run, would be 3) Total Bytes sent: 240, received: 240 tcp OK : 10 (100.0 %) All done 10 calls (plus 0 warmup) 10.966 ms avg, 226.2 qpsAs seen above, all the TCP connections from the
fortio-clientpod succeeded.Total Bytes sent: 240, received: 240 tcp OK : 10 (100.0 %) All done 10 calls (plus 0 warmup) 10.966 ms avg, 226.2 qpsNext, apply a local rate limiting policy to rate limit L4 TCP connections to the
fortio.demo.svc.cluster.localservice to1 connection per minute.kubectl apply -f - <<EOF apiVersion: policy.flomesh.io/v1alpha1 kind: UpstreamTrafficSetting metadata: name: tcp-rate-limit namespace: demo spec: host: fortio.demo.svc.cluster.local rateLimit: local: tcp: connections: 1 unit: minute EOFConfirm no traffic has been rate limited yet by examining the stats on the
fortiobackend pod.fortio_server="$(kubectl get pod -n demo -l app=fortio -o jsonpath='{.items[0].metadata.name}')" fsm proxy get stats "$fortio_server" -n demo | grep fortio.*8078.*rate_limit no matches found: fortio.*8078.*rate_limitConfirm TCP connections are rate limited.
kubectl exec "$fortio_client" -n demo -c fortio-client -- fortio load -qps -1 -c 3 -n 10 tcp://fortio.demo.svc.cluster.local:8078

Fortio 1.32.3 running at -1 queries per second, 8->8 procs, for 10 calls: tcp://fortio.demo.svc.cluster.local:8078
20:49:38 I tcprunner.go:238> Starting tcp test for tcp://fortio.demo.svc.cluster.local:8078 with 3 threads at -1.0 qps
Starting at max qps with 3 thread(s) [gomax 8] for exactly 10 calls (3 per thread + 1)
20:49:38 E tcprunner.go:203> [2] Unable to read: read tcp 10.244.1.19:59244->10.96.83.254:8078: read: connection reset by peer
20:49:38 E tcprunner.go:203> [0] Unable to read: read tcp 10.244.1.19:59246->10.96.83.254:8078: read: connection reset by peer
20:49:38 E tcprunner.go:203> [2] Unable to read: read tcp 10.244.1.19:59258->10.96.83.254:8078: read: connection reset by peer
20:49:38 E tcprunner.go:203> [0] Unable to read: read tcp 10.244.1.19:59260->10.96.83.254:8078: read: connection reset by peer
20:49:38 E tcprunner.go:203> [2] Unable to read: read tcp 10.244.1.19:59266->10.96.83.254:8078: read: connection reset by peer
20:49:38 I periodic.go:723> T002 ended after 9.643ms : 3 calls. qps=311.1065021258944
20:49:38 E tcprunner.go:203> [0] Unable to read: read tcp 10.244.1.19:59268->10.96.83.254:8078: read: connection reset by peer
20:49:38 E tcprunner.go:203> [0] Unable to read: read tcp 10.244.1.19:59274->10.96.83.254:8078: read: connection reset by peer
20:49:38 I periodic.go:723> T000 ended after 14.8212ms : 4 calls. qps=269.8836801338623
20:49:38 I periodic.go:723> T001 ended after 20.3458ms : 3 calls. qps=147.45057948077735
Ended after 20.5468ms : 10 calls. qps=486.69
Aggregated Function Time : count 10 avg 0.00438853 +/- 0.004332 min 0.0014184 max 0.0170216 sum 0.0438853
# range, mid point, percentile, count
>= 0.0014184 <= 0.002 , 0.0017092 , 20.00, 2
> 0.002 <= 0.003 , 0.0025 , 50.00, 3
> 0.003 <= 0.004 , 0.0035 , 70.00, 2
> 0.004 <= 0.005 , 0.0045 , 90.00, 2
> 0.016 <= 0.0170216 , 0.0165108 , 100.00, 1
# target 50% 0.003
# target 75% 0.00425
# target 90% 0.005
# target 99% 0.0169194
# target 99.9% 0.0170114
Error cases : count 7 avg 0.0034268714 +/- 0.0007688 min 0.0024396 max 0.0047932 sum 0.0239881
# range, mid point, percentile, count
>= 0.0024396 <= 0.003 , 0.0027198 , 42.86, 3
> 0.003 <= 0.004 , 0.0035 , 71.43, 2
> 0.004 <= 0.0047932 , 0.0043966 , 100.00, 2
# target 50% 0.00325
# target 75% 0.00409915
# target 90% 0.00451558
# target 99% 0.00476544
# target 99.9% 0.00479042
Sockets used: 8 (for perfect no error run, would be 3)
Total Bytes sent: 240, received: 72
tcp OK : 3 (30.0 %)
tcp short read : 7 (70.0 %)
All done 10 calls (plus 0 warmup) 4.389 ms avg, 486.7 qps
As seen above, only 30% of the 10 calls succeeded, while the remaining 70% was rate limitied. This is because we applied a rate limiting policy of 1 connection per minute at the
fortiobackend service, and thefortio-clientwas able to use 1 connection to make 3/10 calls, resulting in a 30% success rate.Examine the sidecar stats to further confirm this.
fsm proxy get stats "$fortio_server" -n demo | grep 'fortio.*8078.*rate_limit'
local_rate_limit.inbound_demo/fortio_8078_tcp.rate_limited: 7
Next, let’s update our rate limiting policy to allow a burst of connections. Bursts allow a given number of connections over the baseline rate of 1 connection per minute defined by our rate limiting policy.
kubectl apply -f - <<EOF
apiVersion: policy.flomesh.io/v1alpha1
kind: UpstreamTrafficSetting
metadata:
  name: tcp-echo-limit
  namespace: demo
spec:
  host: fortio.demo.svc.cluster.local
  rateLimit:
    local:
      tcp:
        connections: 1
        unit: minute
        burst: 10
EOF
Confirm the burst capability allows a burst of connections within a small window of time.
kubectl exec "$fortio_client" -n demo -c fortio-client -- fortio load -qps -1 -c 3 -n 10 tcp://fortio.demo.svc.cluster.local:8078

Fortio 1.32.3 running at -1 queries per second, 8->8 procs, for 10 calls: tcp://fortio.demo.svc.cluster.local:8078
20:56:56 I tcprunner.go:238> Starting tcp test for tcp://fortio.demo.svc.cluster.local:8078 with 3 threads at -1.0 qps
Starting at max qps with 3 thread(s) [gomax 8] for exactly 10 calls (3 per thread + 1)
20:56:56 I periodic.go:723> T002 ended after 5.1568ms : 3 calls. qps=581.7561278312132
20:56:56 I periodic.go:723> T001 ended after 5.2334ms : 3 calls. qps=573.2411052088509
20:56:56 I periodic.go:723> T000 ended after 5.2464ms : 4 calls. qps=762.4275693809088
Ended after 5.2711ms : 10 calls. qps=1897.1
Aggregated Function Time : count 10 avg 0.00153124 +/- 0.001713 min 0.00033 max 0.0044054 sum 0.0153124
# range, mid point, percentile, count
>= 0.00033 <= 0.001 , 0.000665 , 70.00, 7
> 0.003 <= 0.004 , 0.0035 , 80.00, 1
> 0.004 <= 0.0044054 , 0.0042027 , 100.00, 2
# target 50% 0.000776667
# target 75% 0.0035
# target 90% 0.0042027
# target 99% 0.00438513
# target 99.9% 0.00440337
Error cases : no data
Sockets used: 3 (for perfect no error run, would be 3)
Total Bytes sent: 240, received: 240
tcp OK : 10 (100.0 %)
All done 10 calls (plus 0 warmup) 1.531 ms avg, 1897.1 qps
As seen above, all the TCP connections from the
fortio-clientpod succeeded.Total Bytes sent: 240, received: 240 tcp OK : 10 (100.0 %) All done 10 calls (plus 0 warmup) 1.531 ms avg, 1897.1 qpsFurther, examine the stats to confirm the burst allows additional connections to go through. The number of connections rate limited hasn’t increased since our previous rate limit test before we configured the burst setting.
fsm proxy get stats "$fortio_server" -n demo | grep 'fortio.*8078.*rate_limit'
local_rate_limit.inbound_demo/fortio_8078_tcp.rate_limited: 0
1.7 - Local rate limiting of HTTP requests
This guide demonstrates how to configure rate limiting for HTTP requests destined to a target host that is a part of a FSM managed service mesh.
Prerequisites
- Kubernetes cluster running Kubernetes v1.19.0 or greater.
- Have FSM installed.
- Have
kubectlavailable to interact with the API server. - Have
fsmCLI available for managing the service mesh. - FSM version >= v1.2.0.
Demo
The following demo shows a client sending HTTP requests to the fortio service. We will see the impact of applying local HTTP rate limiting policies targeting the fortio service to control the throughput of requests destined to the service backend.
For simplicity, enable permissive traffic policy mode so that explicit SMI traffic access policies are not required for application connectivity within the mesh.
export FSM_NAMESPACE=fsm-system # Replace fsm-system with the namespace where FSM is installed
kubectl patch meshconfig fsm-mesh-config -n "$FSM_NAMESPACE" -p '{"spec":{"traffic":{"enablePermissiveTrafficPolicyMode":true}}}'  --type=merge
Deploy the
fortioHTTP service in thedemonamespace after enrolling its namespace to the mesh. ThefortioHTTP service runs on port8080.# Create the demo namespace kubectl create namespace demo # Add the namespace to the mesh fsm namespace add demo # Deploy fortio TCP echo in the demo namespace kubectl apply -f https://raw.githubusercontent.com/flomesh-io/fsm-docs/main/manifests/samples/fortio/fortio.yaml -n demoConfirm the
fortioservice pod is up and running.kubectl get pods -n demo NAME READY STATUS RESTARTS AGE fortio-c4bd7857f-7mm6w 2/2 Running 0 22mDeploy the
fortio-clientapp in thedemonamespace. We will use this client to send TCP traffic to thefortio TCP echoservice deployed previously.kubectl apply -f https://raw.githubusercontent.com/flomesh-io/fsm-docs/main/manifests/samples/fortio/fortio-client.yaml -n demoConfirm the
fortio-clientpod is up and running.kubectl get pods -n demo NAME READY STATUS RESTARTS AGE fortio-client-b9b7bbfb8-prq7r 2/2 Running 0 7sConfirm the
fortio-clientapp is able to successfully make HTTP requests to thefortioHTTP service on port8080. We call thefortioservice with3concurrent connections (-c 3) and send10requests (-n 10).fortio_client="$(kubectl get pod -n demo -l app=fortio-client -o jsonpath='{.items[0].metadata.name}')" kubectl exec "$fortio_client" -n demo -c fortio-client -- fortio load -c 3 -n 10 http://fortio.demo.svc.cluster.local:8080You will get the result as below.
Fortio 1.33.0 running at 8 queries per second, 8->8 procs, for 10 calls: http://fortio.demo.svc.cluster.local:8080
20:58:07 I httprunner.go:93> Starting http test for http://fortio.demo.svc.cluster.local:8080 with 3 threads at 8.0 qps and parallel warmup
Starting at 8 qps with 3 thread(s) [gomax 8] : exactly 10, 3 calls each (total 9 + 1)
20:58:08 I periodic.go:723> T002 ended after 1.1273523s : 3 calls. qps=2.661102478790348
20:58:08 I periodic.go:723> T001 ended after 1.1273756s : 3 calls. qps=2.661047480537986
20:58:08 I periodic.go:723> T000 ended after 1.5023464s : 4 calls. qps=2.662501803844972
Ended after 1.5024079s : 10 calls. qps=6.656
Sleep times : count 7 avg 0.52874391 +/- 0.03031 min 0.4865562 max 0.5604152 sum 3.7012074
Aggregated Function Time : count 10 avg 0.0050187 +/- 0.005515 min 0.0012575 max 0.0135401 sum 0.050187
# range, mid point, percentile, count
>= 0.0012575 <= 0.002 , 0.00162875 , 70.00, 7
> 0.012 <= 0.0135401 , 0.01277 , 100.00, 3
# target 50% 0.0017525
# target 75% 0.0122567
# target 90% 0.0130267
# target 99% 0.0134888
# target 99.9% 0.013535
Error cases : no data
20:58:08 I httprunner.go:190> [0] fortio.demo.svc.cluster.local:8080 resolved to 10.96.189.159:8080
20:58:08 I httprunner.go:190> [1] fortio.demo.svc.cluster.local:8080 resolved to 10.96.189.159:8080
20:58:08 I httprunner.go:190> [2] fortio.demo.svc.cluster.local:8080 resolved to 10.96.189.159:8080
Sockets used: 3 (for perfect keepalive, would be 3)
Uniform: false, Jitter: false
IP addresses distribution:
10.96.189.159:8080: 3
Code 200 : 10 (100.0 %)
Response Header Sizes : count 10 avg 124.3 +/- 0.4583 min 124 max 125 sum 1243
Response Body/Total Sizes : count 10 avg 124.3 +/- 0.4583 min 124 max 125 sum 1243
All done 10 calls (plus 0 warmup) 5.019 ms avg, 6.7 qps
As seen above, all the HTTP requests from the
fortio-clientpod succeeded.Code 200 : 10 (100.0 %)Next, apply a local rate limiting policy to rate limit HTTP requests at the virtual host level to
3 requests per minute.kubectl apply -f - <<EOF apiVersion: policy.flomesh.io/v1alpha1 kind: UpstreamTrafficSetting metadata: name: http-rate-limit namespace: demo spec: host: fortio.demo.svc.cluster.local rateLimit: local: http: requests: 3 unit: minute EOFConfirm no HTTP requests have been rate limited yet by examining the stats on the
fortiobackend pod.fortio_server="$(kubectl get pod -n demo -l app=fortio -o jsonpath='{.items[0].metadata.name}')" fsm proxy get stats "$fortio_server" -n demo | grep 'http_local_rate_limiter.http_local_rate_limit.rate_limited' http_local_rate_limiter.http_local_rate_limit.rate_limited: 0Confirm HTTP requests are rate limited.
kubectl exec "$fortio_client" -n demo -c fortio-client -- fortio load -c 3 -n 10 http://fortio.demo.svc.cluster.local:8080

Fortio 1.33.0 running at 8 queries per second, 8->8 procs, for 10 calls: http://fortio.demo.svc.cluster.local:8080
21:06:36 I httprunner.go:93> Starting http test for http://fortio.demo.svc.cluster.local:8080 with 3 threads at 8.0 qps and parallel warmup
Starting at 8 qps with 3 thread(s) [gomax 8] : exactly 10, 3 calls each (total 9 + 1)
21:06:37 W http_client.go:838> [0] Non ok http code 429 (HTTP/1.1 429)
21:06:37 W http_client.go:838> [1] Non ok http code 429 (HTTP/1.1 429)
21:06:37 W http_client.go:838> [2] Non ok http code 429 (HTTP/1.1 429)
21:06:37 W http_client.go:838> [0] Non ok http code 429 (HTTP/1.1 429)
21:06:37 W http_client.go:838> [1] Non ok http code 429 (HTTP/1.1 429)
21:06:37 I periodic.go:723> T001 ended after 1.1269827s : 3 calls. qps=2.661975201571417
21:06:37 W http_client.go:838> [2] Non ok http code 429 (HTTP/1.1 429)
21:06:37 I periodic.go:723> T002 ended after 1.1271942s : 3 calls. qps=2.66147572441377
21:06:38 W http_client.go:838> [0] Non ok http code 429 (HTTP/1.1 429)
21:06:38 I periodic.go:723> T000 ended after 1.5021191s : 4 calls. qps=2.662904692444161
Ended after 1.5021609s : 10 calls. qps=6.6571
Sleep times : count 7 avg 0.53138026 +/- 0.03038 min 0.4943128 max 0.5602373 sum 3.7196618
Aggregated Function Time : count 10 avg 0.00318326 +/- 0.002431 min 0.0012651 max 0.0077951 sum 0.0318326
# range, mid point, percentile, count
>= 0.0012651 <= 0.002 , 0.00163255 , 60.00, 6
> 0.002 <= 0.003 , 0.0025 , 70.00, 1
> 0.005 <= 0.006 , 0.0055 , 80.00, 1
> 0.006 <= 0.007 , 0.0065 , 90.00, 1
> 0.007 <= 0.0077951 , 0.00739755 , 100.00, 1
# target 50% 0.00185302
# target 75% 0.0055
# target 90% 0.007
# target 99% 0.00771559
# target 99.9% 0.00778715
Error cases : count 7 avg 0.0016392143 +/- 0.000383 min 0.0012651 max 0.0023951 sum 0.0114745
# range, mid point, percentile, count
>= 0.0012651 <= 0.002 , 0.00163255 , 85.71, 6
> 0.002 <= 0.0023951 , 0.00219755 , 100.00, 1
# target 50% 0.00163255
# target 75% 0.00188977
# target 90% 0.00211853
# target 99% 0.00236744
# target 99.9% 0.00239233
21:06:38 I httprunner.go:190> [0] fortio.demo.svc.cluster.local:8080 resolved to 10.96.189.159:8080
21:06:38 I httprunner.go:190> [1] fortio.demo.svc.cluster.local:8080 resolved to 10.96.189.159:8080
21:06:38 I httprunner.go:190> [2] fortio.demo.svc.cluster.local:8080 resolved to 10.96.189.159:8080
Sockets used: 7 (for perfect keepalive, would be 3)
Uniform: false, Jitter: false
IP addresses distribution:
10.96.189.159:8080: 3
Code 200 : 3 (30.0 %)
Code 429 : 7 (70.0 %)
Response Header Sizes : count 10 avg 37.2 +/- 56.82 min 0 max 124 sum 372
Response Body/Total Sizes : count 10 avg 166 +/- 27.5 min 124 max 184 sum 1660
All done 10 calls (plus 0 warmup) 3.183 ms avg, 6.7 qps
As seen above, only
3out of10HTTP requests succeeded, while the remaining7requests were rate limited as per the rate limiting policy.Code 200 : 3 (30.0 %) Code 429 : 7 (70.0 %)Examine the stats to further confirm this.
fsm proxy get stats "$fortio_server" -n demo | grep 'http_local_rate_limiter.http_local_rate_limit.rate_limited'

http_local_rate_limiter.http_local_rate_limit.rate_limited: 7
Next, let’s update our rate limiting policy to allow a burst of requests. Bursts allow a given number of requests over the baseline rate of 3 requests per minute defined by our rate limiting policy.
kubectl apply -f - <<EOF
apiVersion: policy.flomesh.io/v1alpha1
kind: UpstreamTrafficSetting
metadata:
  name: http-rate-limit
  namespace: demo
spec:
  host: fortio.demo.svc.cluster.local
  rateLimit:
    local:
      http:
        requests: 3
        unit: minute
        burst: 10
EOF
Confirm the burst capability allows a burst of requests within a small window of time.
kubectl exec "$fortio_client" -n demo -c fortio-client -- fortio load -c 3 -n 10 http://fortio.demo.svc.cluster.local:8080

Fortio 1.33.0 running at 8 queries per second, 8->8 procs, for 10 calls: http://fortio.demo.svc.cluster.local:8080
21:11:04 I httprunner.go:93> Starting http test for http://fortio.demo.svc.cluster.local:8080 with 3 threads at 8.0 qps and parallel warmup
Starting at 8 qps with 3 thread(s) [gomax 8] : exactly 10, 3 calls each (total 9 + 1)
21:11:05 I periodic.go:723> T002 ended after 1.127252s : 3 calls. qps=2.6613392568831107
21:11:05 I periodic.go:723> T001 ended after 1.1273028s : 3 calls. qps=2.661219328116634
21:11:05 I periodic.go:723> T000 ended after 1.5019947s : 4 calls. qps=2.663125242718899
Ended after 1.5020768s : 10 calls. qps=6.6574
Sleep times : count 7 avg 0.53158916 +/- 0.03008 min 0.4943959 max 0.5600713 sum 3.7211241
Aggregated Function Time : count 10 avg 0.00318637 +/- 0.002356 min 0.0012401 max 0.0073302 sum 0.0318637
# range, mid point, percentile, count
>= 0.0012401 <= 0.002 , 0.00162005 , 60.00, 6
> 0.002 <= 0.003 , 0.0025 , 70.00, 1
> 0.005 <= 0.006 , 0.0055 , 80.00, 1
> 0.007 <= 0.0073302 , 0.0071651 , 100.00, 2
# target 50% 0.00184802
# target 75% 0.0055
# target 90% 0.0071651
# target 99% 0.00731369
# target 99.9% 0.00732855
Error cases : no data
21:11:05 I httprunner.go:190> [0] fortio.demo.svc.cluster.local:8080 resolved to 10.96.189.159:8080
21:11:05 I httprunner.go:190> [1] fortio.demo.svc.cluster.local:8080 resolved to 10.96.189.159:8080
21:11:05 I httprunner.go:190> [2] fortio.demo.svc.cluster.local:8080 resolved to 10.96.189.159:8080
Sockets used: 3 (for perfect keepalive, would be 3)
Uniform: false, Jitter: false
IP addresses distribution:
10.96.189.159:8080: 3
Code 200 : 10 (100.0 %)
Response Header Sizes : count 10 avg 124 +/- 0 min 124 max 124 sum 1240
Response Body/Total Sizes : count 10 avg 124 +/- 0 min 124 max 124 sum 1240
All done 10 calls (plus 0 warmup) 3.186 ms avg, 6.7 qps
As seen above, all HTTP requests succeeded as we allowed a burst of 10 requests with our rate limiting policy.
Code 200 : 10 (100.0 %)Further, examine the stats to confirm the burst allows additional requests to go through. The number of requests rate limited hasn’t increased since our previous rate limit test before we configured the burst setting.
fsm proxy get stats "$fortio_server" -n demo | grep 'http_local_rate_limiter.http_local_rate_limit.rate_limited'

http_local_rate_limiter.http_local_rate_limit.rate_limited: 0
Next, let’s configure the rate limting policy for a specific HTTP route allowed on the upstream service.
Note: Since we are using permissive traffic policy mode in the demo, an HTTP route with a wildcard path regex
.*is allowed on the upstream backend, so we will configure a rate limiting policy for this route. However, when using SMI policies in the mesh, paths corresponding to matching allowed SMI HTTP routing rules can be configured.kubectl apply -f - <<EOF apiVersion: policy.flomesh.io/v1alpha1 kind: UpstreamTrafficSetting metadata: name: http-rate-limit namespace: demo spec: host: fortio.demo.svc.cluster.local httpRoutes: - path: .* rateLimit: local: requests: 3 unit: minute EOFConfirm HTTP requests are rate limited at a per-route level.
kubectl exec "$fortio_client" -n demo -c fortio-client -- fortio load -c 3 -n 10 http://fortio.demo.svc.cluster.local:8080

Fortio 1.33.0 running at 8 queries per second, 8->8 procs, for 10 calls: http://fortio.demo.svc.cluster.local:8080
21:19:34 I httprunner.go:93> Starting http test for http://fortio.demo.svc.cluster.local:8080 with 3 threads at 8.0 qps and parallel warmup
Starting at 8 qps with 3 thread(s) [gomax 8] : exactly 10, 3 calls each (total 9 + 1)
21:19:35 W http_client.go:838> [0] Non ok http code 429 (HTTP/1.1 429)
21:19:35 W http_client.go:838> [2] Non ok http code 429 (HTTP/1.1 429)
21:19:35 W http_client.go:838> [1] Non ok http code 429 (HTTP/1.1 429)
21:19:35 W http_client.go:838> [0] Non ok http code 429 (HTTP/1.1 429)
21:19:35 W http_client.go:838> [1] Non ok http code 429 (HTTP/1.1 429)
21:19:35 W http_client.go:838> [2] Non ok http code 429 (HTTP/1.1 429)
21:19:35 I periodic.go:723> T001 ended after 1.126703s : 3 calls. qps=2.6626360274180505
21:19:35 I periodic.go:723> T002 ended after 1.1267472s : 3 calls. qps=2.6625315776245104
21:19:36 W http_client.go:838> [0] Non ok http code 429 (HTTP/1.1 429)
21:19:36 I periodic.go:723> T000 ended after 1.5027817s : 4 calls. qps=2.6617305760377574
Ended after 1.5028359s : 10 calls. qps=6.6541
Sleep times : count 7 avg 0.53089959 +/- 0.03079 min 0.4903791 max 0.5604715 sum 3.7162971
Aggregated Function Time : count 10 avg 0.00369734 +/- 0.003165 min 0.0011174 max 0.0095033 sum 0.0369734
# range, mid point, percentile, count
>= 0.0011174 <= 0.002 , 0.0015587 , 60.00, 6
> 0.002 <= 0.003 , 0.0025 , 70.00, 1
> 0.007 <= 0.008 , 0.0075 , 90.00, 2
> 0.009 <= 0.0095033 , 0.00925165 , 100.00, 1
# target 50% 0.00182348
# target 75% 0.00725
# target 90% 0.008
# target 99% 0.00945297
# target 99.9% 0.00949827
Error cases : count 7 avg 0.0016556 +/- 0.0004249 min 0.0011174 max 0.0025594 sum 0.0115892
# range, mid point, percentile, count
>= 0.0011174 <= 0.002 , 0.0015587 , 85.71, 6
> 0.002 <= 0.0025594 , 0.0022797 , 100.00, 1
# target 50% 0.0015587
# target 75% 0.00186761
# target 90% 0.00216782
# target 99% 0.00252024
# target 99.9% 0.00255548
21:19:36 I httprunner.go:190> [0] fortio.demo.svc.cluster.local:8080 resolved to 10.96.189.159:8080
21:19:36 I httprunner.go:190> [1] fortio.demo.svc.cluster.local:8080 resolved to 10.96.189.159:8080
21:19:36 I httprunner.go:190> [2] fortio.demo.svc.cluster.local:8080 resolved to 10.96.189.159:8080
Sockets used: 7 (for perfect keepalive, would be 3)
Uniform: false, Jitter: false
IP addresses distribution:
10.96.189.159:8080: 3
Code 200 : 3 (30.0 %)
Code 429 : 7 (70.0 %)
Response Header Sizes : count 10 avg 37.2 +/- 56.82 min 0 max 124 sum 372
Response Body/Total Sizes : count 10 avg 166 +/- 27.5 min 124 max 184 sum 1660
All done 10 calls (plus 0 warmup) 3.697 ms avg, 6.7 qps
As seen above, only
3out of10HTTP requests succeeded, while the remaining7requests were rate limited as per the rate limiting policy.Code 200 : 3 (30.0 %) Code 429 : 7 (70.0 %)Examine the stats to further confirm this.
7additional requests have been rate limited after configuring HTTP route level rate limiting since our previous test, indicated by the total of14HTTP requests rate limited in the stats.fsm proxy get stats "$fortio_server" -n demo | grep 'http_local_rate_limiter.http_local_rate_limit.rate_limited' http_local_rate_limiter.http_local_rate_limit.rate_limited: 14
2 - Integration
2.1 - SpringCloud Consul Registry Integration
In this doc, we will demonstrate integrating Spring Cloud Consul microservices into the service mesh and testing the commonly used canary release scenario.
Demo Application
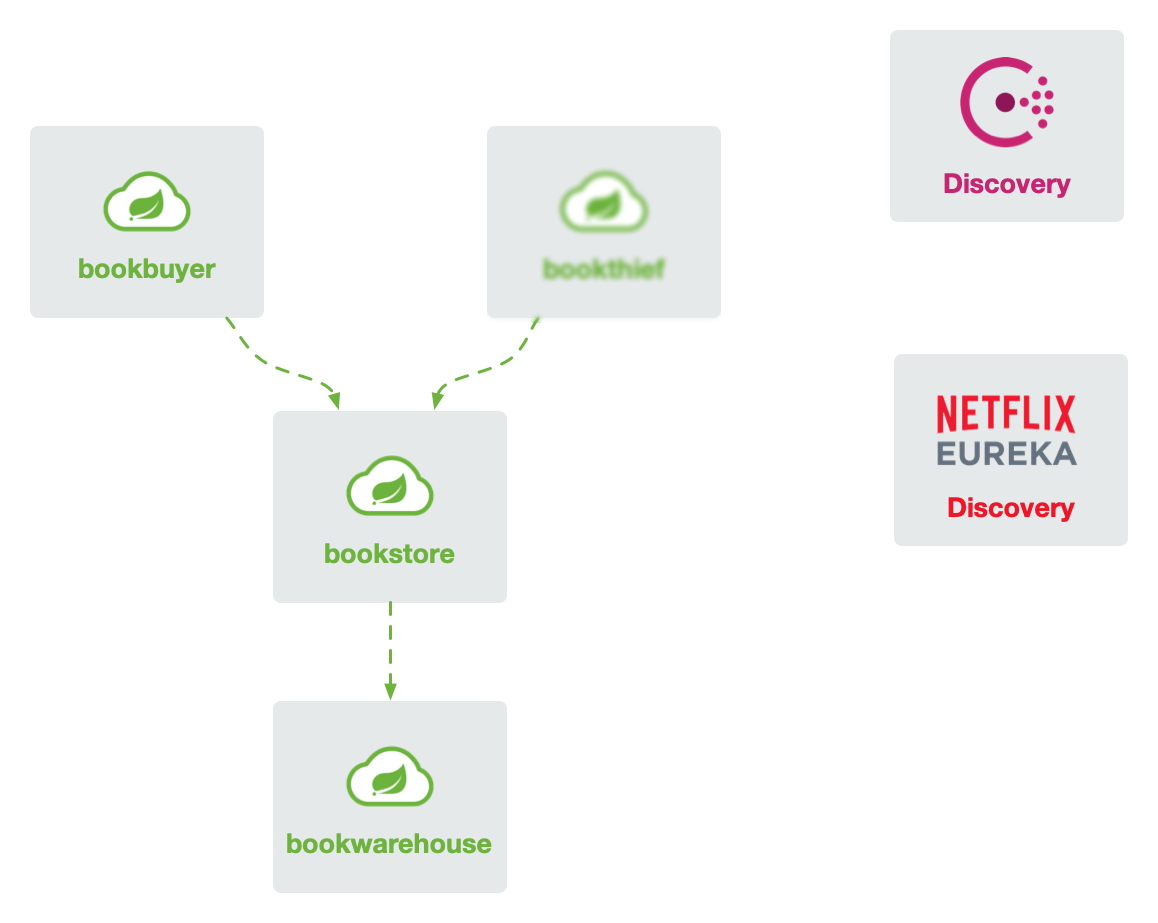
For the demonstration of Spring Cloud microservices integration into the service mesh, we have rewritten the classic BookStore application https://github.com/flomesh-io/springboot-bookstore-demo.
The application currently supports both Netflix Eureka and HashiCorp Consul registries (switchable at compile time), and specific usage can be referred to in the documentation.
Prerequisites
- Kubernetes cluster
- kubectl CLI
- FSM CLI
Initialization
First, clone the repository.
git clone https://github.com/flomesh-io/springboot-bookstore-demo.git
Then deploy Consul using a single-node instance for simplicity.
kubectl apply -n default -f manifests/consul.yaml
Deploying FSM
Deploy the control plane and connectors with the following parameters:
fsm.serviceAccessMode: The service access mode,mixedindicates support for accessing services using both Service names and pod IPs.fsm.deployConsulConnector: Deploy the Consul connector.fsm.cloudConnector.consul.deriveNamespace: The namespace where the encapsulated Consul services as K8s Services will reside.fsm.cloudConnector.consul.httpAddr: The HTTP address for Consul.fsm.cloudConnector.consul.passingOnly: Synchronize only the healthy service nodes.fsm.cloudConnector.consul.suffixTag: By default, the Consul connector creates a Service in the specified namespace with the same name as the service. For canary releases, synchronized Services for different versions are needed, such asbookstore-v1,bookstore-v2for different versions ofbookstore. ThesuffixTagdenotes using the service node’stagversionvalue as the service name suffix. In the example application, the version tag is specified by adding the environment variableSPRING_CLOUD_CONSUL_DISCOVERY_TAGS="version=v1"to the service nodes.
export fsm_namespace=fsm-system
export fsm_mesh_name=fsm
export consul_svc_addr="$(kubectl get svc -l name=consul -o jsonpath='{.items[0].spec.clusterIP}')"
fsm install \
    --mesh-name "$fsm_mesh_name" \
    --fsm-namespace "$fsm_namespace" \
    --set=fsm.serviceAccessMode=mixed \
    --set=fsm.deployConsulConnector=true \
    --set=fsm.cloudConnector.consul.deriveNamespace=consul-derive \
    --set=fsm.cloudConnector.consul.httpAddr=$consul_svc_addr:8500 \
    --set=fsm.cloudConnector.consul.passingOnly=false \
    --set=fsm.cloudConnector.consul.suffixTag=version \
    --timeout=900s
Next, create the namespace specified above and bring it under the management of the service mesh.
kubectl create namespace consul-derive
fsm namespace add consul-derive
kubectl patch namespace consul-derive -p '{"metadata":{"annotations":{"flomesh.io/mesh-service-sync":"consul"}}}'  --type=merge
Configuring Access Control Policies
By default, services within the mesh can access services outside the mesh; however, the reverse is not allowed. Therefore, set up access control policies to allow Consul to access microservices within the mesh for health checks.
kubectl apply -n consul-derive -f - <<EOF
kind: AccessControl
apiVersion: policy.flomesh.io/v1alpha1
metadata:
  name: consul
spec:
  sources:
  - kind: Service
    namespace: default
    name: consul
EOF
Deploying Applications
Create namespaces and add them to the mesh.
kubectl create namespace bookstore
kubectl create namespace bookbuyer
kubectl create namespace bookwarehouse
fsm namespace add bookstore bookbuyer bookwarehouse
Deploy the applications.
kubectl apply -n bookwarehouse -f manifests/consul/bookwarehouse-consul.yaml
kubectl apply -n bookstore -f manifests/consul/bookstore-consul.yaml
kubectl apply -n bookbuyer -f manifests/consul/bookbuyer-consul.yaml
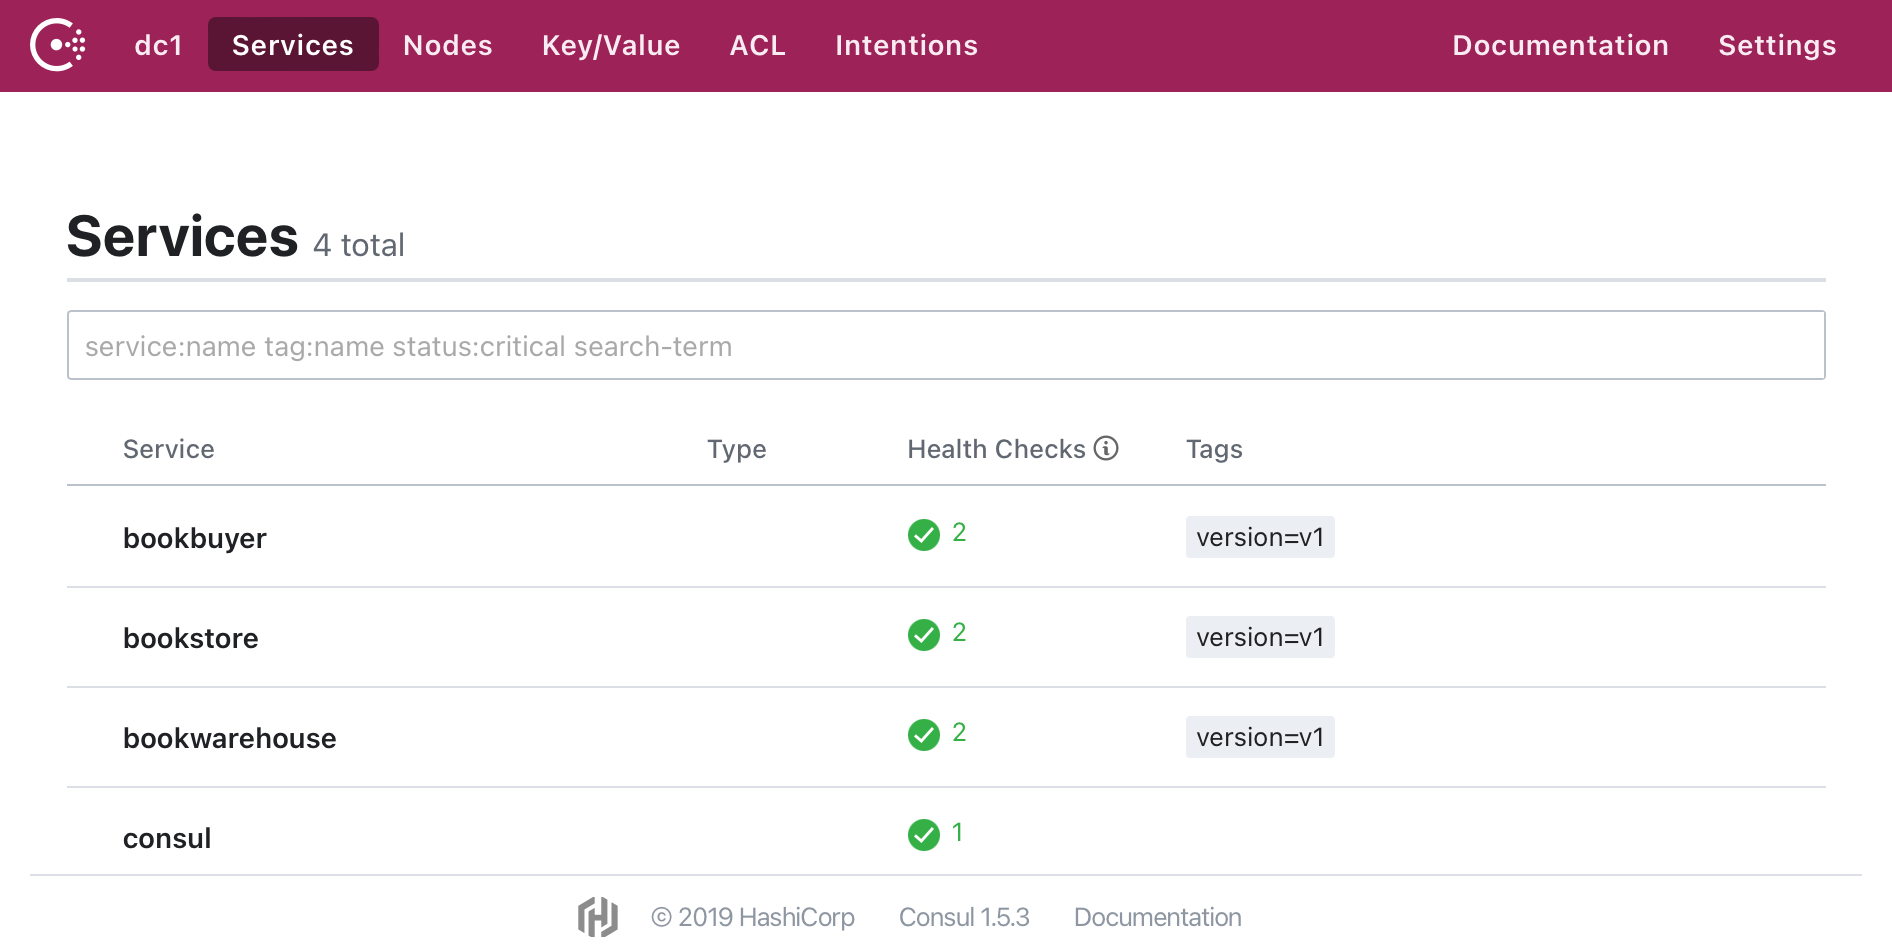
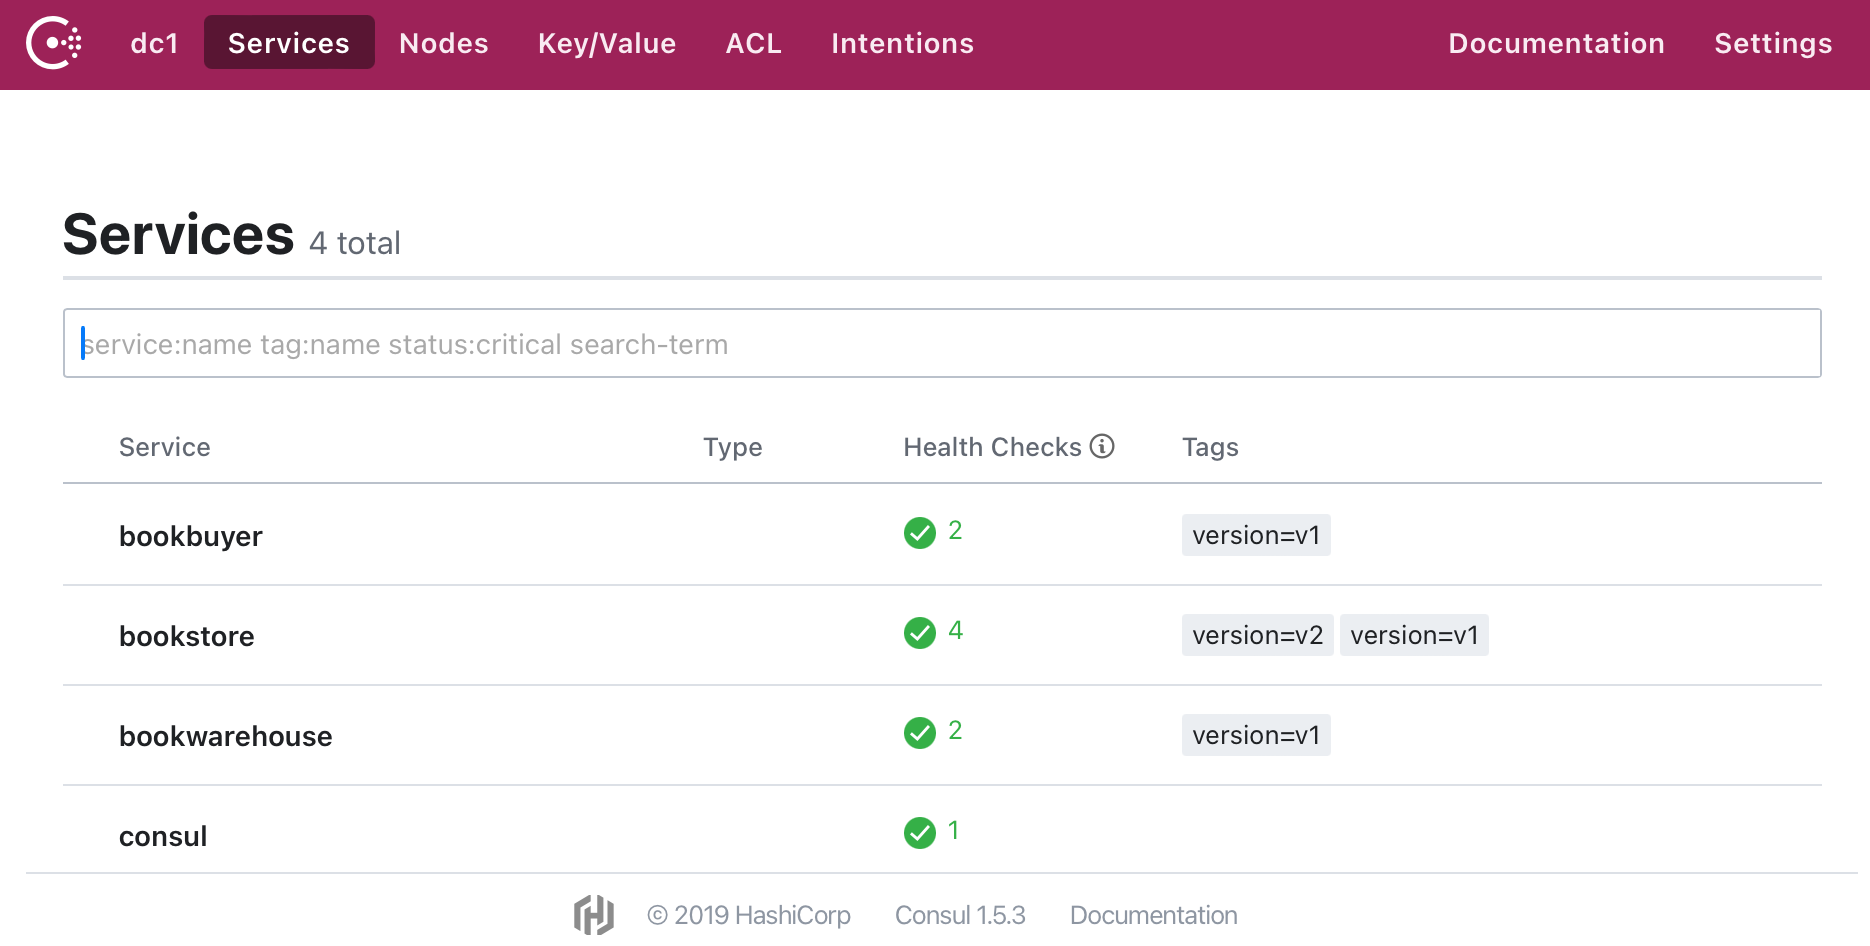
In the consul-derive namespace, you can see the synchronized Services.
kubectl get service -n consul-derive
NAME               TYPE        CLUSTER-IP   EXTERNAL-IP   PORT(S)     AGE
bookstore          ClusterIP   None         <none>        14001/TCP   8m42s
bookstore-v1       ClusterIP   None         <none>        14001/TCP   8m42s
bookwarehouse      ClusterIP   None         <none>        14001/TCP   8m38s
bookwarehouse-v1   ClusterIP   None         <none>        14001/TCP   8m38s
bookbuyer          ClusterIP   None         <none>        14001/TCP   8m38s
bookbuyer-v1       ClusterIP   None         <none>        14001/TCP   8m38s
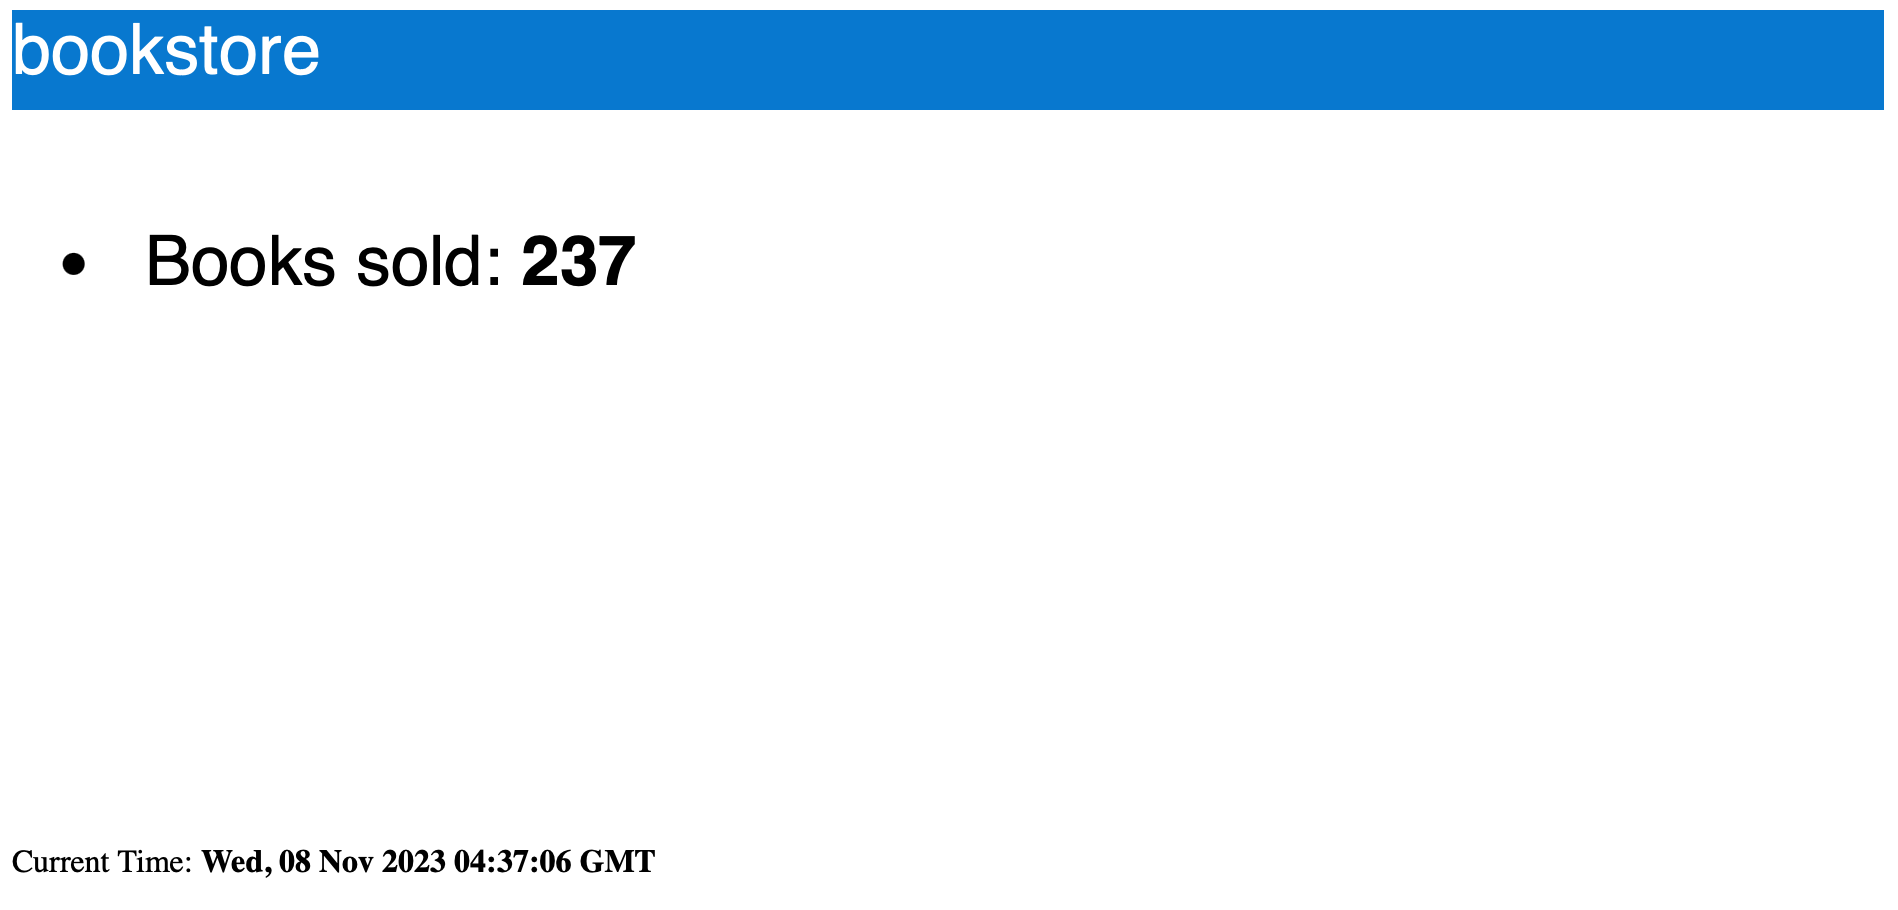
Use port forwarding or create Ingress rules to view the running services: the page auto-refreshes and the counter increases continuously.
Canary Release Testing
Next is the common scenario for canary releases. Referencing FSM documentation examples, we use weight-based canary releases.
Before releasing a new version, create TrafficSplit bookstore-v1 to ensure all traffic routes to bookstore-v1:
kubectl apply -n consul-derive -f - <<EOF
apiVersion: split.smi-spec.io/v1alpha4
kind: TrafficSplit
metadata:
  name: bookstore-split
spec:
  service: bookstore
  backends:
  - service: bookstore-v1
    weight: 100
  - service: bookstore-v2
    weight: 0
EOF
Then deploy the new version bookstore-v2:
kubectl apply -n bookstore -f ./manifests/consul/bookstore-v2-consul.yaml
At this point, viewing the bookstore-v2 page via port forwarding reveals no change in the counter, indicating no traffic is entering the new version of the service node.
Next, modify the traffic split strategy to route 50% of the traffic to the new version, and you will see the bookstore-v2 counter begin to increase.
kubectl apply -n consul-derive -f - <<EOF
apiVersion: split.smi-spec.io/v1alpha4
kind: TrafficSplit
metadata:
  name: bookstore-split
spec:
  service: bookstore
  backends:
  - service: bookstore-v1
    weight: 50
  - service: bookstore-v2
    weight: 50
EOF
Continue adjusting the strategy to route 100% of the traffic to the new version. The counter for the old version bookstore-v1 will cease to increase.
kubectl apply -n consul-derive -f - <<EOF
apiVersion: split.smi-spec.io/v1alpha4
kind: TrafficSplit
metadata:
  name: bookstore-split
spec:
  service: bookstore
  backends:
  - service: bookstore-v1
    weight: 0
  - service: bookstore-v2
    weight: 100
EOF
3 - Ingress
3.1 - Ingress with Service Mesh
FSM can optionally use the FSM ingress controller and Pipy-based edge proxies to route external traffic to the Service Mesh backend. This guide demonstrates how to configure HTTP ingress for services managed by the FSM service mesh.
Prerequisites
- Kubernetes cluster version v1.19.0 or higher.
- Interact with the API server using
kubectl. - FSM CLI installed.
- FSM Ingress Controller installed followed by installation document
Demo
Assume that we have FSM installed under the fsm-system namespace, and named with fsm.
export FSM_NAMESPACE=fsm-system # Replace fsm-system with the namespace where FSM will be installed
export FSM_MESH_NAME=fsm # Replace fsm with the desired FSM mesh name
Save the external IP address and port of the entry gateway, which will be used later to test access to the backend application.
export ingress_host="$(kubectl -n "$FSM_NAMESPACE" get service fsm-ingress -o jsonpath='{.status.loadBalancer.ingress[0].ip}')"
export ingress_port="$(kubectl -n "$FSM_NAMESPACE" get service fsm-ingress -o jsonpath='{.spec.ports[?(@.name=="http")].port}')"
The next step is to deploy the sample httpbin service.
# Create a namespace
kubectl create ns httpbin

# Add the namespace to the mesh
fsm namespace add httpbin

# Deploy the application
kubectl apply -f https://raw.githubusercontent.com/flomesh-io/fsm-docs/main/manifests/samples/httpbin/httpbin.yaml -n httpbin
Ensure that the httpbin service and pod are up and running properly by
kubectl get pods,svc -n httpbin default/fsm-system ⎈
NAME READY STATUS RESTARTS AGE
pod/httpbin-5c4bbfb664-xsk7j 0/2 PodInitializing 0 29s
NAME TYPE CLUSTER-IP EXTERNAL-IP PORT(S) AGE
service/httpbin ClusterIP 10.43.83.102 <none> 14001/TCP 30s
HTTP Ingress
Next, create the necessary HTTPProxy and IngressBackend configurations to allow external clients to access port 14001 of the httpbin service under the httpbin namespace. Because TLS is not used, the link from the fsm entry gateway to the httpbin backend pod is not encrypted.
kubectl apply -f - <<EOF
apiVersion: networking.k8s.io/v1
kind: Ingress
metadata:
  name: httpbin
  namespace: httpbin
spec:
  ingressClassName: pipy
  rules:
  - host: httpbin.org
    http:
      paths:
      - path: /
        pathType: Prefix
        backend:
          service:
            name: httpbin
            port:
              number: 14001
---
kind: IngressBackend
apiVersion: policy.flomesh.io/v1alpha1
metadata:
  name: httpbin
  namespace: httpbin
spec:
  backends:
  - name: httpbin
    port:
      number: 14001 # targetPort of httpbin service
      protocol: http
  sources:
  - kind: Service
    namespace: "$FSM_NAMESPACE"
    name: fsm-ingress
EOF
Now we expect external clients to have access to the httpbin service, with the HOST request header of the HTTP request being httpbin.org.
curl -sI http://"$ingress_host":"$ingress_port"/get -H "Host: httpbin.org"
HTTP/1.1 200 OK
server: gunicorn/19.9.0
date: Tue, 05 Jul 2022 07:34:11 GMT
content-type: application/json
content-length: 241
access-control-allow-origin: *
access-control-allow-credentials: true
connection: keep-alive
3.2 - Ingress Controller - Basics
This guide demonstrate how to serve HTTP and HTTPs traffic via FSM Ingress controller.
Prerequisites
- Kubernetes cluster version v1.19.0 or higher.
- Interact with the API server using
kubectl. - FSM CLI installed.
- FSM Ingress Controller installed followed by installation document
Sample Application
The example application used here provides access through both HTTP at port 8000 and HTTPS at port 8443, with the following URI:
/returns a simple HTML page/hireturns a200response with stringHi, there!/api/privatereturns a401response with stringStaff only
To provide HTTPS, a CA certificate and server certificate need to be issued for the application first.
openssl genrsa 2048 > ca-key.pem

openssl req -new -x509 -nodes -days 365000 \
   -key ca-key.pem \
   -out ca-cert.pem \
   -subj '/CN=flomesh.io'

openssl genrsa -out server-key.pem 2048
openssl req -new -key server-key.pem -out server.csr -subj '/CN=example.com'
openssl x509 -req -in server.csr -CA ca-cert.pem -CAkey ca-key.pem -CAcreateserial -out server-cert.pem -days 365
Before deploying the sample service, first let’s create a secret to save the certificate and key in the secret and mount it in the application pod.
kubectl create namespace httpbin
# mount self-signed cert to sample app pod via secret
kubectl create secret generic -n httpbin server-cert \
  --from-file=./server-cert.pem \
  --from-file=./server-key.pem

kubectl apply -n httpbin -f - <<EOF
apiVersion: v1
kind: ServiceAccount
metadata:
  name: httpbin
---
apiVersion: v1
kind: Service
metadata:
  name: httpbin
  labels:
    app: httpbin
    service: httpbin
spec:
  ports:
  - port: 8443
    name: https
  - port: 8000
    name: http
  selector:
    app: httpbin
---
apiVersion: apps/v1
kind: Deployment
metadata:
  name: httpbin
  labels:
    app: httpbin
spec:
  replicas: 1
  selector:
    matchLabels:
      app: httpbin
  template:
    metadata:
      labels:
        app: httpbin
    spec:
      containers:
        - name: pipy
          image: addozhang/httpbin:latest
          env:
            - name: PIPY_CONFIG_FILE
              value: /etc/pipy/tutorial/gateway/main.js
          ports:
            - containerPort: 8443
            - containerPort: 8000
          volumeMounts:
          - name: cert
            mountPath: "/etc/pipy/tutorial/gateway/secret"
            readOnly: true
      volumes:
      - name: cert
        secret:
          secretName: server-cert
EOF
Basic configurations
HTTP Protocol
In the following example, an Ingress resource is defined that routes requests with host example.com and path /get and / to the back-end service httpbin listening at port 8000.
Note that the
Ingressresource and the back-end service should belong to the same namespace.
apiVersion: networking.k8s.io/v1
kind: Ingress
metadata:
  name: httpbin
spec:
  ingressClassName: pipy
  rules:
  - host: example.com
    http:
      paths:
        - path: /
          pathType: Exact
          backend:
            service:
              name: httpbin
              port:
                number: 8000
        - path: /hi
          pathType: Exact
          backend:
            service:
              name: httpbin
              port:
                number: 8000
Explanation of some of fields:
metadata.namefield defines the resource name of the Ingress.spec.ingressClassNamefield is used to specify the implementation of the entrance controller.Ingressclassis the name defined by the implementation of each entrance controller, and here we usepipy. The installed entrance controllers can be viewed throughkubectl get ingressclass.spec.rulesfield is used to define the routing resource.hostfield defines the hostnameexample.compathsfield defines two path rules: the request matching the path/, and the uri/hibackendfield defines the backend servicehttpbinand port8000used to handle the path rule.
By viewing the Ingress Controller Service, you can see that its type is LoadBalancer, and its external address is 10.0.0.12, which is exactly the node’s IP address.
kubectl get svc -n fsm-system -l app=fsm-ingress
NAME          TYPE           CLUSTER-IP      EXTERNAL-IP   PORT(S)        AGE
fsm-ingress   LoadBalancer   10.43.243.124   10.0.2.4      80:30508/TCP   16h
Applying the Ingress configuration above, when accessing the uri /hi and / endpoints of the httpbin service, we can use the node’s IP address and port 80.
export HOST_IP=$(ip addr show eth0 | grep 'inet ' | awk '{print $2}' | cut -d/ -f1)
curl http://example.com/hi --connect-to example.com:80:$HOST_IP:80
Hi, there!

curl http://example.com/ --connect-to example.com:80:$HOST_IP:80
<!DOCTYPE html>
<html>
  <head>
    <title>Hi, Pipy!</title>
  </head>
  <body>
    <h1>Hi, Pipy!</h1>
    <p>This is a web page served from Pipy.</p>
  </body>
</html>
HTTPS protocol
This example shows how to configure an ingress controller to support HTTPS access. By default, the FSM Ingress does not enable TLS ingress, and you need to turn on the TLS ingress functionality by using the parameter --set fsm.ingress.tls.enabled=true during installation.
Or execute the command below to enable ingress TLS after installed.
export FSM_NAMESPACE=fsm-system
kubectl patch meshconfig fsm-mesh-config -n "$FSM_NAMESPACE" -p '{"spec":{"ingress":{"tls":{"enabled":true}}}}' --type=merge
The Ingress resource in the following example configures the url https://example.com to access ingress.
spec.tlsis the exclusive field for TLS configuration and can configure multiple HTTPS ingresses.hostsfield is used to configure SNI and can configure multiple SNIs. Here,example.comis used, and wildcard*.example.comis also supported.secretNamefield is used to specify theSecretthat stores the certificate and key. Note that the Ingress resource and Secret should belong to the same namespace.
apiVersion: networking.k8s.io/v1
kind: Ingress
metadata:
  name: httpbin
spec:
  ingressClassName: pipy
  rules:
  - host: example.com
    http:
      paths:
        - path: /
          pathType: Prefix
          backend:
            service:
              name: httpbin
              port:
                number: 8000
  tls:
  - hosts:
    - example.com
    secretName: ingress-cert
Issue TLS certificate
openssl genrsa -out ingress-key.pem 2048
openssl req -new -key ingress-key.pem -out ingress.csr -subj '/CN=example.com'
openssl x509 -req -in ingress.csr -CA ca-cert.pem -CAkey ca-key.pem -CAcreateserial -out ingress-cert.pem -days 365
Create a Secret using the certificate and key.
kubectl create secret generic -n httpbin ingress-cert \
  --from-file=tls.crt=./ingress-cert.pem --from-file=tls.key=ingress-key.pem --from-file=ca.crt=./ca-cert.pem
Apply above configuration changes. Test service using the ingress-cert.pem as the CA certificate to make the request, noting that the Ingress mTLS feature is currently disabled.
curl --cacert ingress-cert.pem https://example.com/hi --connect-to example.com:443:$HOST_IP:443
Hi, there!
Advanced Configuration
Next, we will introduce the advanced configuration of FSM Ingress. Advanced configuration is set through the metadata.annotations field of the Ingress resource. The currently supported features are:
- Path Rewrite
- Specifying Load Balancing Algorithm
- Session Persistence
Path Rewrite
This example demonstrates how to use the rewrite path annotation.
FSM provides two annotations, pipy.ingress.kubernetes.io/rewrite-target-from and pipy.ingress.kubernetes.io/rewrite-target-to, to configure path rewrite, both of these are required, when used.
In the following example, a route rule defines that requests with a path prefix of /httpbin will be routed to the 14001 port of the httpbin service, but the service itself does not have this path. This is where the path rewrite feature comes in.
pipy.ingress.kubernetes.io/rewrite-target-from: ^/httpbin/?,This supports regular expressions, where the starting path of/httpbin/is rewritten.pipy.ingress.kubernetes.io/rewrite-target-to: /,Here, the specified rewrite content is/.
In summary, the path starting with /httpbin/ will be replaced with /, for example, /httpbin/get will be rewritten as /get.
apiVersion: networking.k8s.io/v1
kind: Ingress
metadata:
  name: httpbin
  annotations:
    pipy.ingress.kubernetes.io/rewrite-target-from: ^/httpbin/?
    pipy.ingress.kubernetes.io/rewrite-target-to: /
spec:
  ingressClassName: pipy
  rules:
  - host: example.com
    http:
      paths:
        - path: /httpbin
          pathType: Prefix
          backend:
            service:
              name: httpbin
              port:
                number: 8000
After applying above Ingress configuration, we now can use the path /httpbin/hi to access the /hi endpoint of the httpbin service.
curl http://example.com/httpbin/hi --connect-to example.com:80:$HOST_IP:80
Hi, there!
Specifying Load Balancing Algorithm
This example demonstrates specifying the load balancing algorithm when you have multiple replicas running and you want to distribute load among them.
By default, FSM Ingress uses the Round-Robin load balancing algorithm, but other algorithms can be specified using the annotation pipy.ingress.kubernetes.io/lb-type annotation. Other supported load balancing algorithms are:
round-robinhashingleast-work
In the following example, the hashing load balancing algorithm is specified through the annotation.
apiVersion: networking.k8s.io/v1
kind: Ingress
metadata:
  name: httpbin
  annotations:
    pipy.ingress.kubernetes.io/lb-type: 'hashing'
spec:
  ingressClassName: pipy
  rules:
  - host: example.com
    http:
      paths:
        - path: /
          pathType: Prefix
          backend:
            service:
              name: httpbin
              port:
                number: 8000
To demonstrate the effect of the demonstration, deploy the following example application, which has two instances and carries the hostname in the response to distinguish the response request example.
kubectl create namespace httpbin
kubectl apply -n httpbin -f - <<EOF
apiVersion: v1
kind: ServiceAccount
metadata:
  name: httpbin
---
apiVersion: v1
kind: Service
metadata:
  name: httpbin
  labels:
    app: httpbin
    service: httpbin
spec:
  ports:
  - name: http
    port: 8000
  selector:
    app: httpbin
---
apiVersion: apps/v1
kind: Deployment
metadata:
  name: httpbin
  labels:
    app: httpbin
spec:
  replicas: 2
  selector:
    matchLabels:
      app: httpbin
  template:
    metadata:
      labels:
        app: httpbin
    spec:
      containers:
      - name: pipy
        image: addozhang/httpbin:latest
        ports:
          - containerPort: 8000
        command:
        - pipy
        - -e
        - |
          pipy()
          .listen(8000)
          .serveHTTP(new Message('Response from pod ' + os.env["HOSTNAME"]))
EOF
Apply above configuration and send requests to test the configuration.
curl http://example.com/ --connect-to example.com:80:$HOST_IP:80
Response from pod httpbin-5f69c44674-t9cxc
curl http://example.com/ --connect-to example.com:80:$HOST_IP:80
Response from pod httpbin-5f69c44674-t9cxc
curl http://example.com/ --connect-to example.com:80:$HOST_IP:80
Response from pod httpbin-5f69c44674-t9cxc
Session Persistence
This example demonstrates session persistence functionality.
FSM Ingress provides the annotation pipy.ingress.kubernetes.io/session-sticky to configure session persistence, with a default value of false (equivalent to no, 0, off, or ), meaning that the session is not kept. If you need to keep the session, you need to set the value to true, yes, 1, or on.
For example, in the following example, the annotation value is set to true, used to maintain the session between the two instances of the backend service.
apiVersion: networking.k8s.io/v1
kind: Ingress
metadata:
  name: httpbin
  annotations:
    pipy.ingress.kubernetes.io/session-sticky: 'true'
spec:
  ingressClassName: pipy
  rules:
  - host: example.com
    http:
      paths:
        - path: /
          pathType: Prefix
          backend:
            service:
              name: httpbin
              port:
                number: 8000
In order to demonstrate the effect, deploy the following example application, which has two instances and carries the host name in the response to differentiate the response request.
kubectl create namespace httpbin
kubectl apply -n httpbin -f - <<EOF
apiVersion: v1
kind: ServiceAccount
metadata:
  name: httpbin
---
apiVersion: v1
kind: Service
metadata:
  name: httpbin
  labels:
    app: httpbin
    service: httpbin
spec:
  ports:
  - name: http
    port: 8000
  selector:
    app: httpbin
---
apiVersion: apps/v1
kind: Deployment
metadata:
  name: httpbin
  labels:
    app: httpbin
spec:
  replicas: 2
  selector:
    matchLabels:
      app: httpbin
  template:
    metadata:
      labels:
        app: httpbin
    spec:
      containers:
        - name: pipy
          image: addozhang/httpbin:latest
          ports:
            - containerPort: 8000
          command:
            - pipy
            - -e
            - |
              pipy()
              .listen(8000)
              .serveHTTP(new Message('Response from pod ' + os.env["HOSTNAME"]))
EOF
Applying the above Ingress configuration, send multiple requests to test and it can be observed that it’s always the same instance responding to the request.
curl http://example.com/ --connect-to example.com:80:$HOST_IP:80
Response from pod httpbin-5f69c44674-hrvqp
curl http://example.com/ --connect-to example.com:80:$HOST_IP:80
Response from pod httpbin-5f69c44674-hrvqp
curl http://example.com/ --connect-to example.com:80:$HOST_IP:80
Response from pod httpbin-5f69c44674-hrvqp
3.3 - Ingress Controller - Advanced TLS
This guide demonstrate how to configure TLS and its related functionality.
Prerequisites
- Kubernetes cluster version v1.19.0 or higher.
- Interact with the API server using
kubectl. - FSM CLI installed.
- FSM Ingress Controller installed followed by installation document
Continuing with the previous article environment and providing examples of HTTP access at port 8000 and HTTPS access at port 8443.
Sample Application
The example application below provides access through both HTTP at port 8000 and HTTPS at port 8443, with the following URI:
/returns a simple HTML page/hireturns a200response with stringHi, there!/api/privatereturns a401response with stringStaff only
To provide HTTPS, a CA certificate and server certificate need to be issued for the application first.
openssl genrsa 2048 > ca-key.pem

openssl req -new -x509 -nodes -days 365000 \
   -key ca-key.pem \
   -out ca-cert.pem \
   -subj '/CN=flomesh.io'

openssl genrsa -out server-key.pem 2048
openssl req -new -key server-key.pem -out server.csr -subj '/CN=example.com'
openssl x509 -req -in server.csr -CA ca-cert.pem -CAkey ca-key.pem -CAcreateserial -out server-cert.pem -days 365
Before deploying the sample service, first let’s create a secret to save the certificate and key in the secret and mount it in the application pod.
kubectl create namespace httpbin
# mount self-signed cert to sample app pod via secret
kubectl create secret generic -n httpbin server-cert \
  --from-file=./server-cert.pem \
  --from-file=./server-key.pem

kubectl apply -n httpbin -f - <<EOF
apiVersion: v1
kind: ServiceAccount
metadata:
  name: httpbin
---
apiVersion: v1
kind: Service
metadata:
  name: httpbin
  labels:
    app: httpbin
    service: httpbin
spec:
  ports:
  - port: 8443
    name: https
  - port: 8000
    name: http
  selector:
    app: httpbin
---
apiVersion: apps/v1
kind: Deployment
metadata:
  name: httpbin
  labels:
    app: httpbin
spec:
  replicas: 1
  selector:
    matchLabels:
      app: httpbin
  template:
    metadata:
      labels:
        app: httpbin
    spec:
      containers:
        - name: pipy
          image: addozhang/httpbin:latest
          env:
            - name: PIPY_CONFIG_FILE
              value: /etc/pipy/tutorial/gateway/main.js
          ports:
            - containerPort: 8443
            - containerPort: 8000
          volumeMounts:
          - name: cert
            mountPath: "/etc/pipy/tutorial/gateway/secret"
            readOnly: true
      volumes:
      - name: cert
        secret:
          secretName: server-cert
EOF
HTTPS Upstream
This example demonstrates how FSM Ingress can send requests to an HTTPS backend. FSM Ingress provides the following 3 annotations:
pipy.ingress.kubernetes.io/upstream-ssl-name:SNI of the upstream service, such asexample.compipy.ingress.kubernetes.io/upstream-ssl-secret:Secret that contains the TLS certificate, formatted asSECRET_NAMEorNAMESPACE/SECRET_NAME, such ashttpbin/tls-certpipy.ingress.kubernetes.io/upstream-ssl-verify:Whether to verify the certificate of the upstream, defaults tofalse, meaning that the connection will still be established even if the certificate validation fails.
In the following Ingress resource example, the annotation pipy.ingress.kubernetes.io/upstream-ssl-secret specifies the secret tls-cert that contains the TLS certificate in the namespace httpbin.
apiVersion: networking.k8s.io/v1
kind: Ingress
metadata:
  name: httpbin
  annotations:
    pipy.ingress.kubernetes.io/upstream-ssl-secret: httpbin/tls-cert
    pipy.ingress.kubernetes.io/upstream-ssl-verify: 'true'
spec:
  ingressClassName: pipy
  rules:
  - host: example.com
    http:
      paths:
        - path: /
          pathType: Prefix
          backend:
            service:
              name: httpbin
              port:
                number: 8443
To create the secret tls-cert with a certificate and key, you can use the following command:
kubectl create secret generic -n httpbin tls-cert \
  --from-file=tls.crt=./ca-cert.pem --from-file=ca.crt=./ca-cert.pem --from-file=tls.key=ca-key.pem
Apply the above Ingress configuration and access the HTTPS upstream application using HTTP ingress
curl http://example.com/hi --connect-to example.com:80:$HOST_IP:80
Hi, there!
Check the logs of the fsm-ingress pod to see that it is connecting to the upstream HTTPS port 8443.
kubectl logs -n fsm-system -l app=fsm-ingress | tail -5
2023-09-14 04:39:41.933 [INF] [router] Request Host:  example.com
2023-09-14 04:39:41.933 [INF] [router] Request Path:  /hi
2023-09-14 04:39:41.934 [INF] [balancer] _sourceIP 10.42.0.1
2023-09-14 04:39:41.934 [INF] [balancer] _connectTLS true
2023-09-14 04:39:41.934 [INF] [balancer] _mTLS true
2023-09-14 04:39:41.934 [INF] [balancer] _target.id 10.42.0.101:8443
2023-09-14 04:39:41.934 [INF] [balancer] _isOutboundGRPC false
Client Certificate Verification
This example demonstrates how to verify client certificates when TLS termination and mTLS are enabled.
Before using the mTLS feature, ensure that FSM Ingress is enabled and configured with TLS, by providing the parameter --set fsm.serviceLB.enabled=true during FSM installation.
Note: This can be enabled ONLY during FSM installation.
To enable the mTLS feature, you can either enable it during FSM Ingress installation by providing the parameter --set fsm.fsmIngress.tls.mTLS=true or modify the configuration after installation. The specific operation is to modify the ConfigMap fsm-mesh-config under the FSM namespace, and set the value of tls.mTLS to true. Or, enable it when enabling FSM ingress with command below:
fsm ingress enable --tls-enable --mtls
In FSM Ingress, the annotation pipy.ingress.kubernetes.io/tls-trusted-ca-secret is provided to configure trusted client certificates.
apiVersion: networking.k8s.io/v1
kind: Ingress
metadata:
  name: httpbin
  annotations:
    pipy.ingress.kubernetes.io/tls-trusted-ca-secret: httpbin/trust-client-cert
spec:
  ingressClassName: pipy
  rules:
  - host: example.com
    http:
      paths:
        - path: /
          pathType: Prefix
          backend:
            service:
              name: httpbin
              port:
                number: 8000
  tls:
  - hosts:
    - example.com
    secretName: ingress-cert
To issue a self-signed certificate for an Ingress, you can run below command:
openssl req -x509 -newkey rsa:4096 -keyout ingress-key.pem -out ingress-cert.pem -sha256 -days 365 -nodes -subj '/CN=example.com'
Generate a Secret using generated certificate and privatey key by running below command:
kubectl create secret tls ingress-cert --cert=ingress-cert.pem --key=ingress-key.pem -n httpbin
issue a self-signed TLS certificate for client service
openssl req -x509 -newkey rsa:4096 -keyout client-key.pem -out client-cert.pem -sha256 -days 365 -nodes -subj '/CN=flomesh.io'
Generate a Secret resource by using generated self-signed client certificate.
kubectl create secret generic -n httpbin trust-client-cert \
  --from-file=ca.crt=./client-cert.pem
Apply above Ingress configurations.
curl --cacert ingress-cert.pem --cert client-cert.pem --key client-key.pem https://example.com/hi --connect-to example.com:443:$HOST_IP:443
Hi, there!
3.4 - Ingress with Kubernetes Nginx Ingress Controller
This guide will demonstrate how to configure HTTP and HTTPS ingress to a service part of an FSM managed service mesh when using Kubernetes Nginx Ingress Controller.
Prerequisites
- Kubernetes cluster running Kubernetes v1.19.0 or greater.
- Have
kubectlavailable to interact with the API server. - Have FSM version >= v0.10.0 installed.
- Have Kubernetes Nginx Ingress Controller installed. Refer to the deployment guide to install it.
Demo
First, note the details regarding FSM and Nginx installations:
fsm_namespace=fsm-system # Replace fsm-system with the namespace where FSM is installed
fsm_mesh_name=fsm # replace fsm with the mesh name (use `fsm mesh list` command)

nginx_ingress_namespace=<nginx-namespace> # replace <nginx-namespace> with the namespace where Nginx is installed
nginx_ingress_service=<nginx-ingress-controller-service> # replace <nginx-ingress-controller-service> with the name of the nginx ingress controller service
nginx_ingress_host="$(kubectl -n "$nginx_ingress_namespace" get service "$nginx_ingress_service" -o jsonpath='{.status.loadBalancer.ingress[0].ip}')"
nginx_ingress_port="$(kubectl -n "$nginx_ingress_namespace" get service "$nginx_ingress_service" -o jsonpath='{.spec.ports[?(@.name=="http")].port}')"
To restrict ingress traffic on backends to authorized clients, we will set up the IngressBackend configuration such that only ingress traffic from the endpoints of the Nginx Ingress Controller service can route traffic to the service backend. To be able to discover the endpoints of this service, we need FSM controller to monitor the corresponding namespace. However, Nginx must NOT be injected with an Pipy sidecar to function properly.
fsm namespace add "$nginx_ingress_namespace" --mesh-name "$fsm_mesh_name" --disable-sidecar-injection
Next, we will deploy the sample httpbin service.
# Create a namespace
kubectl create ns httpbin

# Add the namespace to the mesh
fsm namespace add httpbin

# Deploy the application
kubectl apply -f https://raw.githubusercontent.com/flomesh-io/fsm-docs/main/manifests/samples/httpbin/httpbin.yaml -n httpbin
Confirm the httpbin service and pod is up and running:
kubectl get pods -n httpbin
NAME                       READY   STATUS    RESTARTS   AGE
httpbin-74677b7df7-zzlm2   2/2     Running   0          11h

kubectl get svc -n httpbin
NAME      TYPE        CLUSTER-IP    EXTERNAL-IP   PORT(S)     AGE
httpbin   ClusterIP   10.0.22.196   <none>        14001/TCP   11h
HTTP Ingress
Next, we will create the Ingress and IngressBackend configurations necessary to allow external clients to access the httpbin service on port 14001 in the httpbin namespace. The connection from the Nginx’s ingress service to the httpbin backend pod will be unencrypted since we aren’t using TLS.
kubectl apply -f - <<EOF
apiVersion: networking.k8s.io/v1
kind: Ingress
metadata:
  name: httpbin
  namespace: httpbin
spec:
  ingressClassName: nginx
  rules:
  - http:
      paths:
      - path: /
        pathType: Prefix
        backend:
          service:
            name: httpbin
            port:
              number: 14001
---
kind: IngressBackend
apiVersion: policy.flomesh.io/v1alpha1
metadata:
  name: httpbin
  namespace: httpbin
spec:
  backends:
  - name: httpbin
    port:
      number: 14001 # targetPort of httpbin service
      protocol: http
  sources:
  - kind: Service
    namespace: "$nginx_ingress_namespace"
    name: "$nginx_ingress_service"
EOF
Now, we expect external clients to be able to access the httpbin service for HTTP requests:
curl -sI http://"$nginx_ingress_host":"$nginx_ingress_port"/get
HTTP/1.1 200 OK
Date: Mon, 04 Jul 2022 06:55:26 GMT
Content-Type: application/json
Content-Length: 346
Connection: keep-alive
access-control-allow-origin: *
access-control-allow-credentials: true
HTTPS Ingress (mTLS and TLS)
To proxy connections to HTTPS backends, we will configure the Ingress and IngressBackend configurations to use https as the backend protocol, and have FSM issue a certificate that Nginx will use as the client certificate to proxy HTTPS connections to TLS backends. The client certificate and CA certificate will be stored in a Kubernetes secret that Nginx will use to authenticate service mesh backends.
To issue a client certificate for the Nginx ingress service, update the fsm-mesh-config MeshConfig resource.
kubectl edit meshconfig fsm-mesh-config -n "$fsm_namespace"
Add the ingressGateway field under spec.certificate:
certificate:
  ingressGateway:
    secret:
      name: fsm-nginx-client-cert
      namespace: <fsm-namespace> # replace <fsm-namespace> with the namespace where FSM is installed
    subjectAltNames:
    - ingress-nginx.ingress-nginx.cluster.local
    validityDuration: 24h
Note: The Subject Alternative Name (SAN) is of the form
<service-account>.<namespace>.cluster.local, where the service account and namespace correspond to the Ngnix service.
Next, we need to create an Ingress and IngressBackend configuration to use TLS proxying to the backend service, while enabling proxying to the backend over mTLS. For this to work, we must create an IngressBackend resource that specifies HTTPS ingress traffic directed to the httpbin service must only accept traffic from a trusted client. FSM provisioned a client certificate for the Nginx ingress service with the Subject ALternative Name (SAN) ingress-nginx.ingress-nginx.cluster.local, so the IngressBackend configuration needs to reference the same SAN for mTLS authentication between the Nginx ingress service and the httpbin backend.
Apply the configurations:
kubectl apply -f - <<EOF
apiVersion: networking.k8s.io/v1
kind: Ingress
metadata:
  name: httpbin
  namespace: httpbin
  annotations:
    nginx.ingress.kubernetes.io/backend-protocol: "HTTPS"
    # proxy_ssl_name for a service is of the form <service-account>.<namespace>.cluster.local
    nginx.ingress.kubernetes.io/configuration-snippet: |
      proxy_ssl_name "httpbin.httpbin.cluster.local";
    nginx.ingress.kubernetes.io/proxy-ssl-secret: "fsm-system/fsm-nginx-client-cert"
    nginx.ingress.kubernetes.io/proxy-ssl-verify: "on"
spec:
  ingressClassName: nginx
  rules:
  - http:
      paths:
      - path: /
        pathType: Prefix
        backend:
          service:
            name: httpbin
            port:
              number: 14001
---
apiVersion: policy.flomesh.io/v1alpha1
kind: IngressBackend
metadata:
  name: httpbin
  namespace: httpbin
spec:
  backends:
  - name: httpbin
    port:
      number: 14001 # targetPort of httpbin service
      protocol: https
    tls:
      skipClientCertValidation: false
  sources:
  - kind: Service
    name: "$nginx_ingress_service"
    namespace: "$nginx_ingress_namespace"
  - kind: AuthenticatedPrincipal
    name: ingress-nginx.ingress-nginx.cluster.local
EOF
Now, we expect external clients to be able to access the httpbin service for requests with HTTPS proxying over mTLS between the ingress gateway and service backend:
curl -sI http://"$nginx_ingress_host":"$nginx_ingress_port"/get
HTTP/1.1 200 OK
Date: Mon, 04 Jul 2022 06:55:26 GMT
Content-Type: application/json
Content-Length: 346
Connection: keep-alive
access-control-allow-origin: *
access-control-allow-credentials: true
To verify that unauthorized clients are not allowed to access the backend, update the sources specified in the IngressBackend configuration. Let’s update the principal to something other than the SAN encoded in the Nginx client’s certificate.
kubectl apply -f - <<EOF
apiVersion: policy.flomesh.io/v1alpha1
kind: IngressBackend
metadata:
  name: httpbin
  namespace: httpbin
spec:
  backends:
  - name: httpbin
    port:
      number: 14001 # targetPort of httpbin service
      protocol: https
    tls:
      skipClientCertValidation: false
  sources:
  - kind: Service
    name: "$nginx_ingress_service"
    namespace: "$nginx_ingress_namespace"
  - kind: AuthenticatedPrincipal
    name: untrusted-client.cluster.local # untrusted
EOF
Confirm the requests are rejected with an HTTP 403 Forbidden response:
curl -sI http://"$nginx_ingress_host":"$nginx_ingress_port"/get
HTTP/1.1 403 Forbidden
Date: Wed, 18 Aug 2021 18:36:09 GMT
Content-Type: text/plain
Content-Length: 19
Connection: keep-alive
Next, we demonstrate support for disabling client certificate validation on the service backend if necessary, by updating our IngressBackend configuration to set skipClientCertValidation: true, while still using an untrusted client:
kubectl apply -f - <<EOF
apiVersion: policy.flomesh.io/v1alpha1
kind: IngressBackend
metadata:
  name: httpbin
  namespace: httpbin
spec:
  backends:
  - name: httpbin
    port:
      number: 14001 # targetPort of httpbin service
      protocol: https
    tls:
      skipClientCertValidation: true
  sources:
  - kind: Service
    name: "$nginx_ingress_service"
    namespace: "$nginx_ingress_namespace"
  - kind: AuthenticatedPrincipal
    name: untrusted-client.cluster.local # untrusted
EOF
Confirm the requests succeed again since untrusted authenticated principals are allowed to connect to the backend:
curl -sI http://"$nginx_ingress_host":"$nginx_ingress_port"/get
HTTP/1.1 200 OK
Date: Mon, 04 Jul 2022 06:55:26 GMT
Content-Type: application/json
Content-Length: 346
Connection: keep-alive
access-control-allow-origin: *
access-control-allow-credentials: true
3.5 - Ingress with Traefik
This article demonstrates how to use Traefik Ingress to access the services hosted by the FSM service mesh.
Prerequisites
- Kubernetes cluster version v1.19.0 or higher.
- Use kubectl to interact with the API server.
- FSM is not installed, and must be removed first if installed.
- fsm cli is installed to install FSM.
- Helm 3 command line tool is installed for traefik installation.
- FSM version >= v1.1.0.
Demo
Install Traefik
helm repo add traefik https://helm.traefik.io/traefik
helm repo update
helm install traefik traefik/traefik -n traefik --create-namespace
Verify that the pod is up and running.
kubectl get po -n traefik
NAME READY STATUS RESTARTS AGE
traefik-69fb598d54-9v9vf 1/1 Running 0 24s
Retrieve and store external IP address and port of the entry gateway to environment variables, which will be used later to access the application.
export ingress_host="$(kubectl -n traefik get service traefik -o jsonpath='{.status.loadBalancer.ingress[0].ip}')"
export ingress_port="$(kubectl -n traefik get service traefik -o jsonpath='{.spec.ports[? (@.name=="web")].port}')"
Install FSM
export fsm_namespace=fsm-system
export fsm_mesh_name=fsm

fsm install \
    --mesh-name "$fsm_mesh_name" \
    --fsm-namespace "$fsm_namespace" \
    --set=fsm.enablePermissiveTrafficPolicy=true
Confirm that the pod is up and running.
kubectl get po -n fsm-system
NAME READY STATUS RESTARTS AGE
fsm-bootstrap-6477f776cc-d5r89 1/1 Running 0 2m51s
fsm-injector-5696694cf6-7kvpt 1/1 Running 0 2m51s
fsm-controller-86d68c557b-tvgtm 2/2 Running 0 2m51s
Deploy sample service
kubectl create ns httpbin
fsm namespace add httpbin
kubectl apply -f https://raw.githubusercontent.com/flomesh-io/fsm-docs/main/manifests/samples/httpbin/httpbin.yaml -n httpbin
Confirm that the service has been created and the pod is up and running.
kubectl get svc -n httpbin
NAME TYPE CLUSTER-IP EXTERNAL-IP PORT(S) AGE
httpbin ClusterIP 10.43.51.114 <none> 14001/TCP 9s

kubectl get po -n httpbin
NAME READY STATUS RESTARTS AGE
httpbin-69dc7d545c-bsjxx 2/2 Running 0 77s
HTTP Ingress
Next, create an ingress to expose the 14001 port of the httpbin service under the httpbin namespace.
kubectl apply -f - <<EOF
kind: Ingress
apiVersion: networking.k8s.io/v1
metadata:
  name: httpbin
  namespace: httpbin
  annotations:
    kubernetes.io/ingress.class: "traefik"
spec:
  rules:
  - host: httpbin.org
     http:
      paths:
      - path: /
        pathType: Prefix
        backend:
          service:
            name: httpbin
            port:
              number: 14001
EOF
Using the entry gateway address and port saved earlier to access the service, you should receive a response of 502 at this point. This is normal, because you still need to create IngressBackend to allow the entry gateway to access the httpbin service.
curl -sI http://"$ingress_host":"$ingress_port"/get -H "Host: httpbin.org"
HTTP/1.1 502 Bad Gateway
Date: Tue, 09 Aug 2022 13:17:11 GMT
Content-Length: 11
Content-Type: text/plain; charset=utf-8
Execute the following command to create IngressBackend.
kubectl apply -f - <<EOF
kind: IngressBackend
apiVersion: policy.flomesh.io/v1alpha1
metadata:
  name: httpbin
  namespace: httpbin
spec:
  backends:
  - name: httpbin
    port:
      number: 14001 # targetPort of httpbin service
      protocol: http
  sources:
  - kind: Service
    namespace: traefik
    name: traefik
EOF
Now, re-visit httpbin and you will be able to access it successfully.
curl -sI http://"$ingress_host":"$ingress_port"/get -H "Host: httpbin.org"
HTTP/1.1 200 OK
Access-Control-Allow-Credentials: true
Access-Control-Allow-Origin: *
Content-Length: 338
Content-Type: application/json
Date: Tue, 09 Aug 2022 13:17:41 GMT
fsm-Stats-Kind: Deployment
fsm-Stats-Name: httpbin
fsm-Stats-Namespace: httpbin
fsm-Stats-Pod: httpbin-69dc7d545c-bsjxx
Server: gunicorn/19.9.0
3.6 - FSM Ingress Controller - SSL Passthrough
This guide demonstrate how to configure SSL passthrough feature of FSM Ingress
Prerequisites
- Kubernetes cluster version v1.19.0 or higher.
- Interact with the API server using
kubectl. - FSM CLI installed.
- TLS passthrough enabled following by installation document
Setup
Once all done, let’s retrieve Ingress host IP and port information.
export FSM_NAMESPACE=fsm-system #change this to the namespace your FSM ingress installed in

export ingress_host="$(kubectl -n "$FSM_NAMESPACE" get service fsm-ingress -o jsonpath='{.status.loadBalancer.ingress[0].ip}')"
export ingress_port="$(kubectl -n "$FSM_NAMESPACE" get service fsm-ingress -o jsonpath='{.spec.ports[?(@.name=="https")].port}')"
Test
For simplicity, we will not deploy an upstream service here, but instead use https://httpbin.org directly as the upstream, and resolve it to the ingress address obtained above through the curl’s revolve parameter. If the port of ingress is not 433, you can use the connect-to parameter --connect-to httpbin.org:443:$ingress_host:$ingress_port.
curl https://httpbin.org/get -i --resolve httpbin.org:443:$ingress_host:$ingress_port

HTTP/2 200
date: Tue, 31 Jan 2023 11:21:41 GMT
content-type: application/json
content-length: 255
server: gunicorn/19.9.0
access-control-allow-origin: *
access-control-allow-credentials: true

{
  "args": {},
  "headers": {
    "Accept": "*/*",
    "Host": "httpbin.org",
    "User-Agent": "curl/7.68.0",
    "X-Amzn-Trace-Id": "Root=1-63d8f9c5-5af02436470161040dc68f1e"
  },
  "origin": "20.205.11.203",
  "url": "https://httpbin.org/get"
}
4 - Egress
4.1 - Egress Passthrough to Unknown Destinations
This guide demonstrates a client within the service mesh accessing destinations external to the mesh using FSM’s Egress capability to passthrough traffic to unknown destinations without an Egress policy.
Prerequisites
- Kubernetes cluster version v1.19.0 or higher.
- Interact with the API server using
kubectl. - FSM CLI installed.
- FSM Ingress Controller installed followed by installation document
HTTP(S) mesh-wide Egress passthrough demo
Enable global egress passthrough if not enabled:
export FSM_NAMESPACE=fsm-system # Replace fsm-system with the namespace where FSM is installed
kubectl patch meshconfig fsm-mesh-config -n "$FSM_NAMESPACE" -p '{"spec":{"traffic":{"enableEgress":true}}}'  --type=merge
Deploy the
curlclient into thecurlnamespace after enrolling its namespace to the mesh.# Create the curl namespace kubectl create namespace curl # Add the namespace to the mesh fsm namespace add curl # Deploy curl client in the curl namespace kubectl apply -f https://raw.githubusercontent.com/flomesh-io/fsm-docs/main/manifests/samples/curl/curl.yaml -n curlConfirm the
curlclient pod is up and running.kubectl get pods -n curl NAME READY STATUS RESTARTS AGE curl-54ccc6954c-9rlvp 2/2 Running 0 20sConfirm the
curlclient is able to make successful HTTPS requests to thehttpbin.orgwebsite on port443.kubectl exec -n curl -ti "$(kubectl get pod -n curl -l app=curl -o jsonpath='{.items[0].metadata.name}')" -c curl -- curl -I https://httpbin.org:443 HTTP/2 200 date: Tue, 16 Mar 2021 22:19:00 GMT content-type: text/html; charset=utf-8 content-length: 9593 server: gunicorn/19.9.0 access-control-allow-origin: * access-control-allow-credentials: trueA
200 OKresponse indicates the HTTPS request from thecurlclient to thehttpbin.orgwebsite was successful.Confirm the HTTPS requests fail when mesh-wide egress is disabled.
kubectl patch meshconfig fsm-mesh-config -n "$FSM_NAMESPACE" -p '{"spec":{"traffic":{"enableEgress":false}}}' --type=mergeLet’s trigger the request again, and you will find it failed this time.
kubectl exec -n curl -ti "$(kubectl get pod -n curl -l app=curl -o jsonpath='{.items[0].metadata.name}')" -c curl -- curl -I https://httpbin.org:443

curl: (7) Failed to connect to httpbin.org port 443 after 114 ms: Couldn't connect to server
command terminated with exit code 7 ```
4.2 - Egress Gateway Passthrough to Unknown Destinations
This guide demonstrates a client within the service mesh accessing destinations external to the mesh via egress gateway using FSM’s Egress capability to passthrough traffic to unknown destinations without an Egress policy.
Prerequisites
- Kubernetes cluster version v1.19.0 or higher.
- Interact with the API server using
kubectl. - FSM CLI installed.
- FSM Ingress Controller installed followed by installation document
Egress Gateway passthrough demo
Deploy egress gateway via fsm.
fsm install --set=fsm.egressGateway.enabled=trueOr, enable egress gateway with FSM CLI.
fsm egressgateway enableThere are more options supported by
fsm egressgateway enable.Enable global egress passthrough if not enabled:
export FSM_NAMESPACE=fsm-system # Replace fsm-system with the namespace where FSM is installed
kubectl patch meshconfig fsm-mesh-config -n "$FSM_NAMESPACE" -p '{"spec":{"traffic":{"enableEgress":true}}}' --type=merge
Deploy the
curlclient into thecurlnamespace after enrolling its namespace to the mesh.# Create the curl namespace kubectl create namespace curl # Add the namespace to the mesh fsm namespace add curl # Deploy curl client in the curl namespace kubectl apply -n curl -f https://raw.githubusercontent.com/flomesh-io/fsm-docs/main/manifests/samples/curl/curl.yamlConfirm the
curlclient pod is up and running.kubectl get pods -n curl NAME READY STATUS RESTARTS AGE curl-7bb5845476-8s9kv 2/2 Running 0 29sConfirm the
curlclient is able to make successful HTTP requests to thehttpbin.orgwebsite on port80.kubectl exec "$(kubectl get pod -n curl -l app=curl -o jsonpath='{.items..metadata.name}')" -n curl -c curl -- curl -sI http://httpbin.org:80/get HTTP/1.1 200 OK Date: Fri, 27 Jan 2023 22:27:53 GMT Content-Type: application/json Content-Length: 258 Connection: keep-alive Server: gunicorn/19.9.0 Access-Control-Allow-Origin: * Access-Control-Allow-Credentials: trueA
200 OKresponse indicates the HTTP request from thecurlclient to thehttpbin.orgwebsite was successful.Confirm the HTTP requests fail when mesh-wide egress is disabled.
kubectl patch meshconfig fsm-mesh-config -n "$FSM_NAMESPACE" -p '{"spec":{"traffic":{"enableEgress":false}}}' --type=mergekubectl exec "$(kubectl get pod -n curl -l app=curl -o jsonpath='{.items..metadata.name}')" -n curl -c curl -- curl -sI http://httpbin.org:80/get command terminated with exit code 7
4.3 - Egress Policy
This guide demonstrates a client within the service mesh accessing destinations external to the mesh using FSM’s Egress policy API.
Prerequisites
- Kubernetes cluster version v1.19.0 or higher.
- Interact with the API server using
kubectl. - FSM CLI installed.
- FSM Ingress Controller installed followed by installation document
Demo
Enable egress policy if not enabled, at the same time we should confirm egress passthrough is disabled:
# Replace fsm-system with the namespace where FSM is installed
kubectl patch meshconfig fsm-mesh-config -n fsm-system -p '{"spec":{"featureFlags":{"enableEgressPolicy":true},"traffic":{"enableEgress":false}}}' --type=merge
Deploy the
curlclient into thecurlnamespace after enrolling its namespace to the mesh.# Create the curl namespace kubectl create namespace curl # Add the namespace to the mesh fsm namespace add curl # Deploy curl client in the curl namespace kubectl apply -f https://raw.githubusercontent.com/flomesh-io/fsm-docs/main/manifests/samples/curl/curl.yaml -n curlConfirm the
curlclient pod is up and running.kubectl get pods -n curl NAME READY STATUS RESTARTS AGE curl-54ccc6954c-9rlvp 2/2 Running 0 20s
HTTP Egress
Confirm the
curlclient is unable make the HTTP requesthttp://httpbin.org:80/getto thehttpbin.orgwebsite on port80.kubectl exec $(kubectl get pod -n curl -l app=curl -o jsonpath='{.items..metadata.name}') -n curl -c curl -- curl -sI http://httpbin.org:80/get command terminated with exit code 7Apply an Egress policy to allow the
curlclient’s ServiceAccount to access thehttpbin.orgwebsite on port80serving thehttpprotocol.kubectl apply -f - <<EOF kind: Egress apiVersion: policy.flomesh.io/v1alpha1 metadata: name: httpbin-80 namespace: curl spec: sources: - kind: ServiceAccount name: curl namespace: curl hosts: - httpbin.org ports: - number: 80 protocol: http EOFConfirm the
curlclient is able to make successful HTTP requests tohttp://httpbin.org:80/get.kubectl exec $(kubectl get pod -n curl -l app=curl -o jsonpath='{.items..metadata.name}') -n curl -c curl -- curl -sI http://httpbin.org:80/get HTTP/1.1 200 OK date: Mon, 04 Jul 2022 07:48:24 GMT content-type: application/json content-length: 313 server: gunicorn/19.9.0 access-control-allow-origin: * access-control-allow-credentials: true connection: keep-aliveConfirm the
curlclient can no longer make successful HTTP requests tohttp://httpbin.org:80/getwhen the above policy is removed.kubectl delete egress httpbin-80 -n curlkubectl exec $(kubectl get pod -n curl -l app=curl -o jsonpath='{.items..metadata.name}') -n curl -c curl -- curl -sI http://httpbin.org:80/get command terminated with exit code 7
HTTPS Egress
Since HTTPS traffic is encrypted with TLS, FSM routes HTTPS based traffic by proxying it to its original destination as a TCP stream. The Server Name Indication (SNI) indicated by the HTTPS client application in the TLS handshake is matched against hosts specified in the Egress policy.
Confirm the
curlclient is unable make the HTTPS requesthttps://httpbin.org:443/getto thehttpbin.orgwebsite on port443.kubectl exec $(kubectl get pod -n curl -l app=curl -o jsonpath='{.items..metadata.name}') -n curl -c curl -- curl -sI https://httpbin.org:443/get command terminated with exit code 7Apply an Egress policy to allow the
curlclient’s ServiceAccount to access thehttpbin.orgwebsite on port443serving thehttpsprotocol.kubectl apply -f - <<EOF kind: Egress apiVersion: policy.flomesh.io/v1alpha1 metadata: name: httpbin-443 namespace: curl spec: sources: - kind: ServiceAccount name: curl namespace: curl hosts: - httpbin.org ports: - number: 443 protocol: https EOFConfirm the
curlclient is able to make successful HTTPS requests tohttps://httpbin.org:443/get.kubectl exec $(kubectl get pod -n curl -l app=curl -o jsonpath='{.items..metadata.name}') -n curl -c curl -- curl -sI https://httpbin.org:443/get HTTP/2 200 date: Thu, 13 May 2021 22:09:36 GMT content-type: application/json content-length: 260 server: gunicorn/19.9.0 access-control-allow-origin: * access-control-allow-credentials: trueConfirm the
curlclient can no longer make successful HTTPS requests tohttps://httpbin.org:443/getwhen the above policy is removed.kubectl delete egress httpbin-443 -n curlkubectl exec $(kubectl get pod -n curl -l app=curl -o jsonpath='{.items..metadata.name}') -n curl -c curl -- curl -sI https://httpbin.org:443/get command terminated with exit code 7
TCP Egress
TCP based Egress traffic is matched against the destination port and IP address ranges specified in an egress policy. If an IP address range is not specified, traffic will be matched only based on the destination port.
Confirm the
curlclient is unable make the HTTPS requesthttps://flomesh.io:443to theflomesh.iowebsite on port443. Since HTTPS uses TCP as the underlying transport protocol, TCP based routing should implicitly enable access to any HTTP(s) host on the specified port.kubectl exec $(kubectl get pod -n curl -l app=curl -o jsonpath='{.items..metadata.name}') -n curl -c curl -- curl -sI https://flomesh.io:443 command terminated with exit code 7Apply an Egress policy to allow the
curlclient’s ServiceAccount to access the any destination on port443serving thetcpprotocol.kubectl apply -f - <<EOF kind: Egress apiVersion: policy.flomesh.io/v1alpha1 metadata: name: tcp-443 namespace: curl spec: sources: - kind: ServiceAccount name: curl namespace: curl ports: - number: 443 protocol: tcp EOFNote: For
server-firstprotocols such asMySQL,PostgreSQL, etc., where the server initiates the first bytes of data between the client and server, the protocol must be set totcp-server-firstto indicate to FSM to not perform protocol detection on the port. Protocol detection relies on inspecting the initial bytes of a connection, which is incompatible withserver-firstprotocols. When the port’s protocol is set totcp-server-first, protocol detection is skipped for that port number. It is also important to note thatserver-firstport numbers must not be used for other application ports that require protocol detection to performed, which means the port numbers used forserver-firstprotocols must not be used with other protocols such asHTTPandTCPthat require protocol detection to be performed.Confirm the
curlclient is able to make successful HTTPS requests tohttps://flomesh.io:443.kubectl exec $(kubectl get pod -n curl -l app=curl -o jsonpath='{.items..metadata.name}') -n curl -c curl -- curl -sI https://flomesh.io:443 HTTP/2 200 content-type: text/htmlConfirm the
curlclient can no longer make successful HTTPS requests tohttps://flomesh.io:443when the above policy is removed.kubectl delete egress tcp-443 -n curlkubectl exec $(kubectl get pod -n curl -l app=curl -o jsonpath='{.items..metadata.name}') -n curl -c curl -- curl -sI https://flomesh.io:443 command terminated with exit code 7
HTTP Egress with SMI route matches
HTTP Egress policies can specify SMI HTTPRouteGroup matches for fine grained traffic control based on HTTP methods, headers and paths.
Confirm the
curlclient is unable make HTTP requests tohttp://httpbin.org:80/getandhttp://httpbin.org:80/status/200to thehttpbin.orgwebsite on port80.kubectl exec $(kubectl get pod -n curl -l app=curl -o jsonpath='{.items..metadata.name}') -n curl -c curl -- curl -sI http://httpbin.org:80/get command terminated with exit code 7 kubectl exec $(kubectl get pod -n curl -l app=curl -o jsonpath='{.items..metadata.name}') -n curl -c curl -- curl -sI http://httpbin.org:80/status/200 command terminated with exit code 7Apply an SMI HTTPRouteGroup resource to allow access to the HTTP path
/getand an Egress policy to access thehttpbin.orgon website port80that matches on the SMI HTTPRouteGroup.kubectl apply -f - <<EOF apiVersion: specs.smi-spec.io/v1alpha4 kind: HTTPRouteGroup metadata: name: egress-http-route namespace: curl spec: matches: - name: get pathRegex: /get --- kind: Egress apiVersion: policy.flomesh.io/v1alpha1 metadata: name: httpbin-80 namespace: curl spec: sources: - kind: ServiceAccount name: curl namespace: curl hosts: - httpbin.org ports: - number: 80 protocol: http matches: - apiGroup: specs.smi-spec.io/v1alpha4 kind: HTTPRouteGroup name: egress-http-route EOFConfirm the
curlclient is able to make successful HTTP requests tohttp://httpbin.org:80/get.kubectl exec $(kubectl get pod -n curl -l app=curl -o jsonpath='{.items..metadata.name}') -n curl -c curl -- curl -sI http://httpbin.org:80/get HTTP/1.1 200 OK date: Thu, 13 May 2021 21:49:35 GMT content-type: application/json content-length: 335 access-control-allow-origin: * access-control-allow-credentials: trueConfirm the
curlclient is unable to make successful HTTP requests tohttp://httpbin.org:80/status/200.kubectl exec $(kubectl get pod -n curl -l app=curl -o jsonpath='{.items..metadata.name}') -n curl -c curl -- curl -sI http://httpbin.org:80/status/200 HTTP/1.1 403 Forbidden content-length: 13 connection: keep-aliveUpdate the matching SMI HTTPRouteGroup resource to allow requests to HTTP paths matching the regex
/status.*.kubectl apply -f - <<EOF apiVersion: specs.smi-spec.io/v1alpha4 kind: HTTPRouteGroup metadata: name: egress-http-route namespace: curl spec: matches: - name: get pathRegex: /get - name: status pathRegex: /status.* EOFConfirm the
curlclient can now make successful HTTP requests tohttp://httpbin.org:80/status/200.kubectl exec $(kubectl get pod -n curl -l app=curl -o jsonpath='{.items..metadata.name}') -n curl -c curl -- curl -sI http://httpbin.org:80/status/200 HTTP/1.1 200 OK date: Fri, 14 May 2021 17:10:48 GMT content-type: text/html; charset=utf-8 content-length: 0 access-control-allow-origin: * access-control-allow-credentials: true
4.4 - Egress Gateway Policy
This guide demonstrates a client within the service mesh accessing destinations external to the mesh via egress gateway using FSM’s Egress policy API.
Prerequisites
- Kubernetes cluster version v1.19.0 or higher.
- Interact with the API server using
kubectl. - FSM CLI installed.
- FSM Ingress Controller installed followed by installation document
Egress Gateway passthrough demo
Deploy egress gateway during FSM installation.
fsm install --set=fsm.egressGateway.enabled=trueOr, enable egress gateway with FSM CLI.
fsm egressgateway enableThere are more options supported by
fsm egressgateway enable.Disable global egress passthrough to enable egress policy if not disabled:
export FSM_NAMESPACE=fsm-system # Replace fsm-system with the namespace where FSM is installed
kubectl patch meshconfig fsm-mesh-config -n "$FSM_NAMESPACE" -p '{"spec":{"traffic":{"enableEgress":false}}}'  --type=merge
Deploy the
curlclient into thecurlnamespace after enrolling its namespace to the mesh.# Create the curl namespace kubectl create namespace curl # Add the namespace to the mesh fsm namespace add curl # Deploy curl client in the curl namespace kubectl apply -n curl -f https://raw.githubusercontent.com/flomesh-io/fsm-docs/main/manifests/samples/curl/curl.yamlConfirm the
curlclient pod is up and running.kubectl get pods -n curl NAME READY STATUS RESTARTS AGE curl-7bb5845476-8s9kv 2/2 Running 0 29sConfirm the
curlclient is unable make the HTTP requesthttp://httpbin.org:80/getto thehttpbin.orgwebsite on port80.kubectl exec $(kubectl get pod -n curl -l app=curl -o jsonpath='{.items..metadata.name}') -n curl -c curl -- curl -sI http://httpbin.org:80/get command terminated with exit code 7Apply an Egress policy to allow the
curlclient’s ServiceAccount to access thehttpbin.orgwebsite on port80serving thehttpprotocol.kubectl apply -f - <<EOF kind: Egress apiVersion: policy.flomesh.io/v1alpha1 metadata: name: httpbin-80 namespace: curl spec: sources: - kind: ServiceAccount name: curl namespace: curl hosts: - httpbin.org ports: - number: 80 protocol: http EOFConfirm the
curlclient is able to make successful HTTP requests tohttp://httpbin.org:80/get.kubectl exec $(kubectl get pod -n curl -l app=curl -o jsonpath='{.items..metadata.name}') -n curl -c curl -- curl -sI http://httpbin.org:80/get HTTP/1.1 200 OK date: Fri, 27 Jan 2023 22:31:46 GMT content-type: application/json content-length: 314 server: gunicorn/19.9.0 access-control-allow-origin: * access-control-allow-credentials: true connection: keep-alive
5 - Multi Cluster
5.1 - Multi-cluster services access control
Pre-requisites
- Tools and clusters created in demo Multi-cluster services discovery & communication
This guide will expand on the knowledge we covered in previous guides and demonstrate how to configure and enable cross-cluster access control based on SMI. With FSM support for multi-clusters, users can define and enforce fine-grained access policies for services running across multiple Kubernetes clusters. This allows users to easily and securely manage access to services and resources, ensuring that only authorized users and applications have access to the appropriate services and resources.
Before we start, let’s review the SMI Access Control Specification. There are two forms of traffic policies: Permissive Mode and Traffic Policy Mode. The former allows services in the mesh to access each other, while the latter requires the provision of the appropriate traffic policy to be accessible.
SMI Access Control Policy
In traffic policy mode, SMI defines ServiceAccount-based access control through the Kubernetes Custom Resource Definition(CRD) TrafficTarget, which defines traffic sources (sources), destinations (destinations), and rules (rules). What is expressed is that applications that use the ServiceAccount specified in sources can access applications that have the ServiceAccount specified in destinations, and the accessible traffic is specified by rules.
For example, the following example represents a load running with ServiceAccount promethues sending a GET request to the /metrics endpoint of a load running with ServiceAccount service-a. The HTTPRouteGroup defines the identity of the traffic: i.e. the GET request to access the endpoint /metrics.
kind: HTTPRouteGroup
metadata:
  name: the-routes
spec:
  matches:
  - name: metrics
    pathRegex: "/metrics"
    methods:
    - GET
---
kind: TrafficTarget
metadata:
  name: path-specific
  namespace: default
spec:
  destination:
    kind: ServiceAccount
    name: service-a
    namespace: default
  rules:
  - kind: HTTPRouteGroup
    name: the-routes
    matches:
    - metrics
  sources:
  - kind: ServiceAccount
    name: prometheus
    namespace: default
So how does access control perform in a multi-cluster?
FSM’s ServiceExport
FSM’s ServiceExport is used to export services to other clusters, which is the process of service registration. The field spec.serviceAccountName of ServiceExport can be used to specify the ServiceAccount used for the service load.
apiVersion: flomesh.io/v1alpha1
kind: ServiceExport
metadata:
  namespace: httpbin
  name: httpbin
spec:
  serviceAccountName: "*"
  rules:
    - portNumber: 8080
      path: "/cluster-1/httpbin-mesh"
      pathType: Prefix
Deploy the application
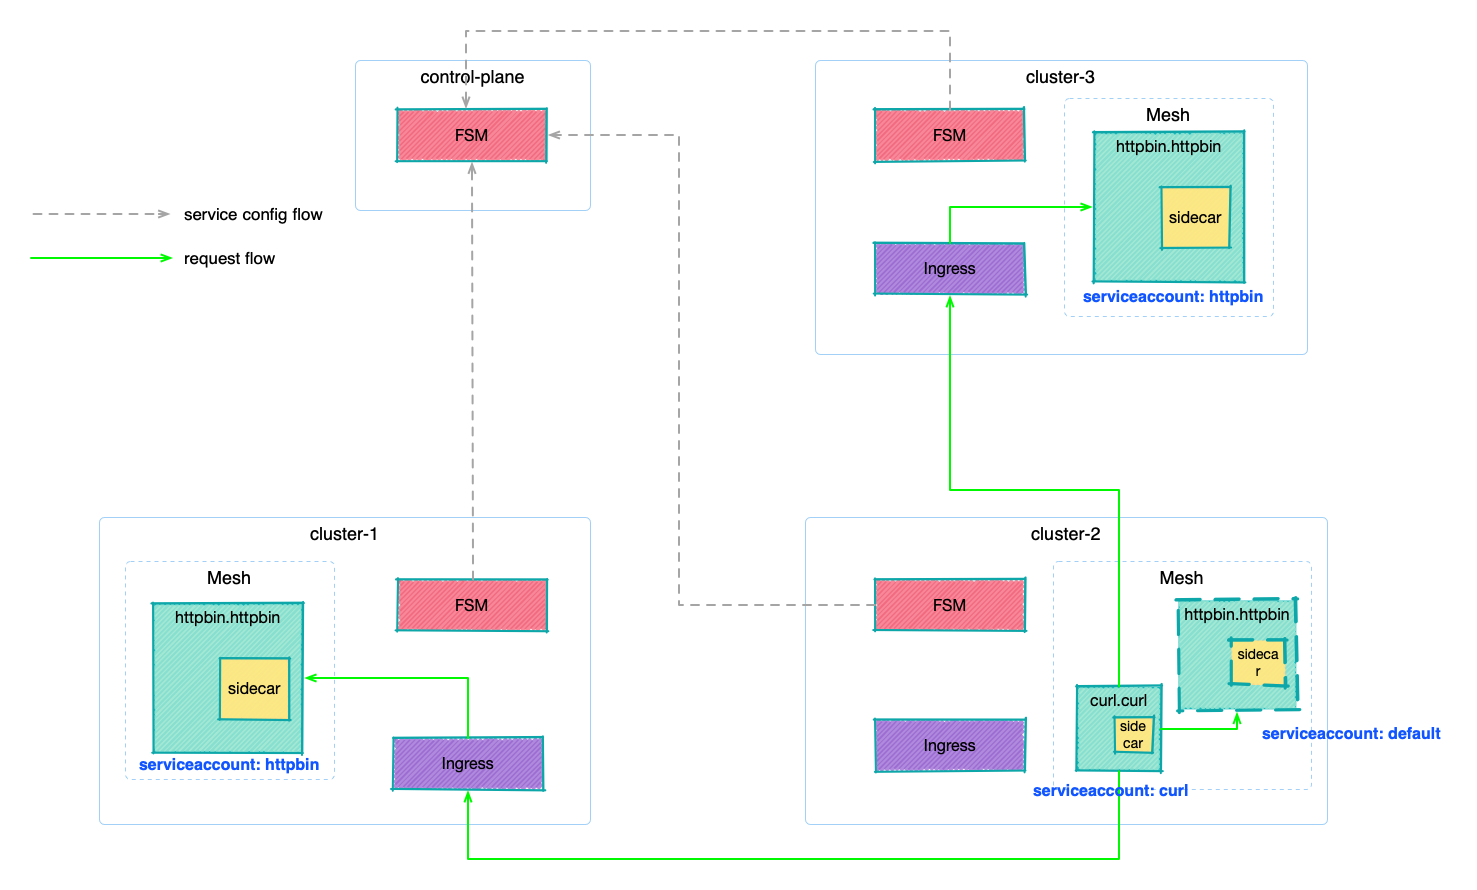
Deploy the sample application
Deploy the httpbin application under the httpbin namespace (managed by the mesh, which injects sidecar) in clusters cluster-1 and cluster-3. Here we specify ServiceAccount as httpbin.
export NAMESPACE=httpbin
for CLUSTER_NAME in cluster-1 cluster-3
do
  kubectx k3d-${CLUSTER_NAME}
  kubectl create namespace ${NAMESPACE}
  fsm namespace add ${NAMESPACE}
  kubectl apply -n ${NAMESPACE} -f - <<EOF
apiVersion: v1
kind: ServiceAccount
metadata:
  name: httpbin
---
apiVersion: apps/v1
kind: Deployment
metadata:
  name: httpbin
  labels:
    app: pipy
spec:
  replicas: 1
  selector:
    matchLabels:
      app: pipy
  template:
    metadata:
      labels:
        app: pipy
    spec:
      serviceAccountName: httpbin
      containers:
        - name: pipy
          image: flomesh/pipy:latest
          ports:
            - containerPort: 8080
          command:
            - pipy
            - -e
            - |
              pipy()
              .listen(8080)
              .serveHTTP(new Message('Hi, I am from ${CLUSTER_NAME} and controlled by mesh!\n'))
---
apiVersion: v1
kind: Service
metadata:
  name: httpbin
spec:
  ports:
    - port: 8080
      targetPort: 8080
      protocol: TCP
  selector:
    app: pipy
---
apiVersion: v1
kind: Service
metadata:
  name: httpbin-${CLUSTER_NAME}
spec:
  ports:
    - port: 8080
      targetPort: 8080
      protocol: TCP
  selector:
    app: pipy
EOF

  sleep 3
  kubectl wait --for=condition=ready pod -n ${NAMESPACE} --all --timeout=60s
done
Deploy the httpbin application under the cluster-2 namespace httpbin, but do not specify a ServiceAccount and use the default ServiceAccount default.
export NAMESPACE=httpbin
export CLUSTER_NAME=cluster-2

kubectx k3d-${CLUSTER_NAME}
kubectl create namespace ${NAMESPACE}
fsm namespace add ${NAMESPACE}
kubectl apply -n ${NAMESPACE} -f - <<EOF
apiVersion: apps/v1
kind: Deployment
metadata:
  name: httpbin
  labels:
    app: pipy
spec:
  replicas: 1
  selector:
    matchLabels:
      app: pipy
  template:
    metadata:
      labels:
        app: pipy
    spec:
      containers:
        - name: pipy
          image: flomesh/pipy:latest
          ports:
            - containerPort: 8080
          command:
            - pipy
            - -e
            - |
              pipy()
              .listen(8080)
              .serveHTTP(new Message('Hi, I am from ${CLUSTER_NAME}! and controlled by mesh!\n'))
---
apiVersion: v1
kind: Service
metadata:
  name: httpbin
spec:
  ports:
    - port: 8080
      targetPort: 8080
      protocol: TCP
  selector:
    app: pipy
---
apiVersion: v1
kind: Service
metadata:
  name: httpbin-${CLUSTER_NAME}
spec:
  ports:
    - port: 8080
      targetPort: 8080
      protocol: TCP
  selector:
    app: pipy
EOF

sleep 3
kubectl wait --for=condition=ready pod -n ${NAMESPACE} --all --timeout=60s
Deploy the curl application under the namespace curl in cluster cluster-2, which is managed by the mesh, and the injected sidecar will be fully traffic dispatched across the cluster. Specify here to use ServiceAccout curl.
export NAMESPACE=curl
kubectx k3d-cluster-2
kubectl create namespace ${NAMESPACE}
fsm namespace add ${NAMESPACE}
kubectl apply -n ${NAMESPACE} -f - <<EOF
apiVersion: v1
kind: ServiceAccount
metadata:
  name: curl
---
apiVersion: v1
kind: Service
metadata:
  name: curl
  labels:
    app: curl
    service: curl
spec:
  ports:
    - name: http
      port: 80
  selector:
    app: curl
---
apiVersion: apps/v1
kind: Deployment
metadata:
  name: curl
spec:
  replicas: 1
  selector:
    matchLabels:
      app: curl
  template:
    metadata:
      labels:
        app: curl
    spec:
      serviceAccountName: curl
      containers:
      - image: curlimages/curl
        imagePullPolicy: IfNotPresent
        name: curl
        command: ["sleep", "365d"]
EOF

sleep 3
kubectl wait --for=condition=ready pod -n ${NAMESPACE} --all --timeout=60s
Export service
export NAMESPACE_MESH=httpbin
for CLUSTER_NAME in cluster-1 cluster-3
do
  kubectx k3d-${CLUSTER_NAME}
  kubectl apply -f - <<EOF
apiVersion: flomesh.io/v1alpha1
kind: ServiceExport
metadata:
  namespace: ${NAMESPACE_MESH}
  name: httpbin
spec:
  serviceAccountName: "httpbin"
  rules:
    - portNumber: 8080
      path: "/${CLUSTER_NAME}/httpbin-mesh"
      pathType: Prefix
---
apiVersion: flomesh.io/v1alpha1
kind: ServiceExport
metadata:
  namespace: ${NAMESPACE_MESH}
  name: httpbin-${CLUSTER_NAME}
spec:
  serviceAccountName: "httpbin"
  rules:
    - portNumber: 8080
      path: "/${CLUSTER_NAME}/httpbin-mesh-${CLUSTER_NAME}"
      pathType: Prefix
EOF
sleep 1
done
Test
We switch back to the cluster cluster-2.
kubectx k3d-cluster-2
The default route type is Locality and we need to create an ActiveActive policy to allow requests to be processed using service instances from other clusters.
kubectl apply -n httpbin -f  - <<EOF
apiVersion: flomesh.io/v1alpha1
kind: GlobalTrafficPolicy
metadata:
  name: httpbin
spec:
  lbType: ActiveActive
  targets:
    - clusterKey: default/default/default/cluster-1
    - clusterKey: default/default/default/cluster-3
EOF
In the curl application of the cluster-2 cluster, we send a request to httpbin.httpbin.
curl_client="$(kubectl get pod -n curl -l app=curl -o jsonpath='{.items[0].metadata.name}')"
kubectl exec "${curl_client}" -n curl -c curl -- curl -s http://httpbin.httpbin:8080/
A few more requests will see the following response.
Hi, I am from cluster-1 and controlled by mesh!
Hi, I am from cluster-2 and controlled by mesh!
Hi, I am from cluster-3 and controlled by mesh!
Hi, I am from cluster-1 and controlled by mesh!
Hi, I am from cluster-2 and controlled by mesh!
Hi, I am from cluster-3 and controlled by mesh!
Demo
Adjusting the traffic policy mode
Let’s adjust the traffic policy mode of cluster cluster-2 so that the traffic policy can be applied.
kubectx k3d-cluster-2
export fsm_namespace=fsm-system
kubectl patch meshconfig fsm-mesh-config -n "$fsm_namespace" -p '{"spec":{"traffic":{"enablePermissiveTrafficPolicyMode":false}}}' --type=merge
In this case, if you try to send the request again, you will find that the request fails. This is because in traffic policy mode, inter-application access is prohibited if no policy is configured.
kubectl exec "${curl_client}" -n curl -c curl -- curl -s http://httpbin.httpbin:8080/
command terminated with exit code 52
Application Access Control Policy
The access control policy of SMI is based on ServiceAccount as mentioned at the beginning of the guide, that’s why our deployed httpbin service uses different ServiceAccount in cluster cluster-1, cluster-3, and cluster cluster-2.
- cluster-1:
httpbin - cluster-2:
default - cluster-3:
httpbin
Next, we will set different access control policies TrafficTarget for in-cluster and out-of-cluster services, differentiated by the ServiceAccount of the target load in TrafficTarget.

Execute the following command to create a traffic policy curl-to-httpbin that allows curl to access loads under the namespace httpbin that uses ServiceAccount default.
kubectl apply -n httpbin -f - <<EOF
apiVersion: specs.smi-spec.io/v1alpha4
kind: HTTPRouteGroup
metadata:
name: httpbin-route
spec:
matches:
- name: all
pathRegex: "/"
methods:
- GET
---
kind: TrafficTarget
apiVersion: access.smi-spec.io/v1alpha3
metadata:
name: curl-to-httpbin
spec:
destination:
kind: ServiceAccount
name: default
namespace: httpbin
rules:
- kind: HTTPRouteGroup
name: httpbin-route
matches:
- all
sources:
- kind: ServiceAccount
name: curl
namespace: curl
EOF
Multiple request attempts are sent and the service of cluster cluster-2 responds, while clusters cluster-1 and cluster-3 will not participate in the service.
Hi, I am from cluster-2 and controlled by mesh!
Hi, I am from cluster-2 and controlled by mesh!
Hi, I am from cluster-2 and controlled by mesh!
Execute the following command to check ServiceImports and you can see that cluster-1 and cluster-3 export services using ServiceAccount httpbin.
kubectl get serviceimports httpbin -n httpbin -o jsonpath='{.spec}' | jq
{
"ports": [
{
"endpoints": [
{
"clusterKey": "default/default/default/cluster-1",
"target": {
"host": "192.168.1.110",
"ip": "192.168.1.110",
"path": "/cluster-1/httpbin-mesh",
"port": 81
}
},
{
"clusterKey": "default/default/default/cluster-3",
"target": {
"host": "192.168.1.110",
"ip": "192.168.1.110",
"path": "/cluster-3/httpbin-mesh",
"port": 83
}
}
],
"port": 8080,
"protocol": "TCP"
}
],
"serviceAccountName": "httpbin",
"type": "ClusterSetIP"
}
So, we create another TrafficTarget curl-to-ext-httpbin that allows curl to access the load using ServiceAccount httpbin.
kubectl apply -n httpbin -f - <<EOF
kind: TrafficTarget
apiVersion: access.smi-spec.io/v1alpha3
metadata:
name: curl-to-ext-httpbin
spec:
destination:
kind: ServiceAccount
name: httpbin
namespace: httpbin
rules:
- kind: HTTPRouteGroup
name: httpbin-route
matches:
- all
sources:
- kind: ServiceAccount
name: curl
namespace: curl
EOF
After applying the policy, test it again and all requests are successful.
Hi, I am from cluster-2 and controlled by mesh!
Hi, I am from cluster-1 and controlled by mesh!
Hi, I am from cluster-3 and controlled by mesh!
5.2 - Multi-cluster services discovery & communication
Demo Architecture
For demonstration purposes we will be creating 4 Kubernetes clusters and high-level architecture will look something like the below:
As a convention and for this demo we will be creating a separate stand-alone cluster to serve as a control plane cluster, but that isn’t strictly required as a separate cluster and it could be one of any existing cluster.
Pre-requisites
kubectx: for switching between multiplekubeconfig contexts(clusters)k3d: for creating multiplek3sclusters locally using containers- FSM CLI: for deploying
FSM docker: required to runk3d- Have
fsmCLI available for managing the service mesh. - FSM version >= v1.2.0.
Demo clusters & environment setup
In this demo, we will be using k3d a lightweight wrapper to run k3s (Rancher Lab’s minimal Kubernetes distribution) in docker, to create 4 separate clusters named control-plane, cluster-1, cluster-2, and cluster-3 respectively.
We will be using the HOST machine IP address and separate ports during the installation, for us to easily access the individual clusters. My demo host machine IP address is 192.168.1.110 (it might be different for your machine).
| cluster | cluster ip | api-server port | LB external-port | description |
|---|---|---|---|---|
| control-plane | HOST_IP(192.168.1.110) | 6444 | N/A | control-plane cluster |
| cluster-1 | HOST_IP(192.168.1.110) | 6445 | 81 | application-cluster |
| cluster-2 | HOST_IP(192.168.1.110) | 6446 | 82 | Application Cluster |
| cluster-3 | HOST_IP(192.168.1.110) | 6447 | 83 | Application Cluster |
Network
Creates a docker bridge type network named multi-clusters, which run all containers.
docker network create multi-clusters
Find your machine host IP address, mine is 192.168.1.110, and export that as an environment variable to be used later.
export HOST_IP=192.168.1.110
Cluster creation
We are going to use k3d to create 4 clusters.
API_PORT=6444 #6444 6445 6446 6447
PORT=80 #81 82 83
for CLUSTER_NAME in control-plane cluster-1 cluster-2 cluster-3
do
k3d cluster create ${CLUSTER_NAME} \
--image docker.io/rancher/k3s:v1.23.8-k3s2 \
--api-port "${HOST_IP}:${API_PORT}" \
--port "${PORT}:80@server:0" \
--servers-memory 4g \
--k3s-arg "--disable=traefik@server:0" \
--network multi-clusters \
--timeout 120s \
--wait
((API_PORT=API_PORT+1))
((PORT=PORT+1))
done
Install FSM
Install the service mesh FSM to the clusters cluster-1, cluster-2, and cluster-3. The control plane does not handle application traffic and does not need to be installed.
export FSM_NAMESPACE=fsm-system
export FSM_MESH_NAME=fsm
for CONFIG in kubeconfig_cp kubeconfig_c1 kubeconfig_c2 kubeconfig_c3; do
DNS_SVC_IP="$(kubectl --kubeconfig ${!CONFIG} get svc -n kube-system -l k8s-app=kube-dns -o jsonpath='{.items[0].spec.clusterIP}')"
CLUSTER_NAME=$(if [ "${CONFIG}" == "kubeconfig_c1" ]; then echo "cluster-1"; elif [ "${CONFIG}" == "kubeconfig_c2" ]; then echo "cluster-2"; else echo "cluster-3"; fi)
desc "Installing fsm service mesh in cluster ${CLUSTER_NAME}"
KUBECONFIG=${!CONFIG} $fsm_binary install \
--mesh-name "$FSM_MESH_NAME" \
--fsm-namespace "$FSM_NAMESPACE" \
--set=fsm.certificateProvider.kind=tresor \
--set=fsm.image.pullPolicy=Always \
--set=fsm.sidecarLogLevel=error \
--set=fsm.controllerLogLevel=warn \
--set=fsm.fsmIngress.enabled=true \
--timeout=900s \
--set=fsm.localDNSProxy.enable=true \
--set=fsm.localDNSProxy.primaryUpstreamDNSServerIPAddr="${DNS_SVC_IP}"
kubectl --kubeconfig ${!CONFIG} wait --for=condition=ready pod --all -n $FSM_NAMESPACE --timeout=120s
done
We have our clusters ready, now we need to federate them together, but before we do that, let’s first understand the mechanics on how FSM is configured.
Federate clusters
We will enroll clusters cluster-1, cluster-2, and cluster-3 into the management of control-plane cluster.
export HOST_IP=192.168.1.110
kubectx k3d-control-plane
sleep 1
PORT=81
for CLUSTER_NAME in cluster-1 cluster-2 cluster-3
do
cat <<EOF
apiVersion: flomesh.io/v1alpha1
kind: Cluster
metadata:
name: ${CLUSTER_NAME}
spec:
gatewayHost: ${HOST_IP}
gatewayPort: ${PORT}
fsmMeshConfigName: ${FSM_NAMESPACE}
kubeconfig: |+
`k3d kubeconfig get ${CLUSTER_NAME} | sed 's|^| |g' | sed "s|0.0.0.0|$HOST_IP|g"`
EOF
((PORT=PORT+1))
done
Deploy Demo application
Deploying mesh-managed applications
Deploy the httpbin application under the httpbin namespace of clusters cluster-1 and cluster-3 (which are managed by the mesh and will inject sidecar). Here the httpbin application is implemented by Pipy and will return the current cluster name.
export NAMESPACE=httpbin
for CLUSTER_NAME in cluster-1 cluster-3
do
kubectx k3d-${CLUSTER_NAME}
kubectl create namespace ${NAMESPACE}
fsm namespace add ${NAMESPACE}
kubectl apply -n ${NAMESPACE} -f - <<EOF
apiVersion: apps/v1
kind: Deployment
metadata:
name: httpbin
labels:
app: pipy
spec:
replicas: 1
selector:
matchLabels:
app: pipy
template:
metadata:
labels:
app: pipy
spec:
containers:
- name: pipy
image: flomesh/pipy:latest
ports:
- containerPort: 8080
command:
- pipy
- -e
- |
pipy()
.listen(8080)
.serveHTTP(new Message('Hi, I am from ${CLUSTER_NAME} and controlled by mesh!\n'))
---
apiVersion: v1
kind: Service
metadata:
name: httpbin
spec:
ports:
- port: 8080
targetPort: 8080
protocol: TCP
selector:
app: pipy
---
apiVersion: v1
kind: Service
metadata:
name: httpbin-${CLUSTER_NAME}
spec:
ports:
- port: 8080
targetPort: 8080
protocol: TCP
selector:
app: pipy
EOF
sleep 3
kubectl wait --for=condition=ready pod -n ${NAMESPACE} --all --timeout=60s
done
Deploy the curl application under the namespace curl in cluster cluster-2, which is managed by the mesh.
export NAMESPACE=curl
kubectx k3d-cluster-2
kubectl create namespace ${NAMESPACE}
fsm namespace add ${NAMESPACE}
kubectl apply -n ${NAMESPACE} -f - <<EOF
apiVersion: v1
kind: ServiceAccount
metadata:
name: curl
---
apiVersion: v1
kind: Service
metadata:
name: curl
labels:
app: curl
service: curl
spec:
ports:
- name: http
port: 80
selector:
app: curl
---
apiVersion: apps/v1
kind: Deployment
metadata:
name: curl
spec:
replicas: 1
selector:
matchLabels:
app: curl
template:
metadata:
labels:
app: curl
spec:
serviceAccountName: curl
containers:
- image: curlimages/curl
imagePullPolicy: IfNotPresent
name: curl
command: ["sleep", "365d"]
EOF
sleep 3
kubectl wait --for=condition=ready pod -n ${NAMESPACE} --all --timeout=60s
Export Service
Let’s export services in cluster-1 and cluster-3
export NAMESPACE_MESH=httpbin
for CLUSTER_NAME in cluster-1 cluster-3
do
kubectx k3d-${CLUSTER_NAME}
kubectl apply -f - <<EOF
apiVersion: flomesh.io/v1alpha1
kind: ServiceExport
metadata:
namespace: ${NAMESPACE_MESH}
name: httpbin
spec:
serviceAccountName: "*"
rules:
- portNumber: 8080
path: "/${CLUSTER_NAME}/httpbin-mesh"
pathType: Prefix
---
apiVersion: flomesh.io/v1alpha1
kind: ServiceExport
metadata:
namespace: ${NAMESPACE_MESH}
name: httpbin-${CLUSTER_NAME}
spec:
serviceAccountName: "*"
rules:
- portNumber: 8080
path: "/${CLUSTER_NAME}/httpbin-mesh-${CLUSTER_NAME}"
pathType: Prefix
EOF
sleep 1
done
After exporting the services, FSM will automatically create Ingress rules for them, and with the rules, you can access these services through Ingress.
for CLUSTER_NAME_INDEX in 1 3
do
CLUSTER_NAME=cluster-${CLUSTER_NAME_INDEX}
((PORT=80+CLUSTER_NAME_INDEX))
kubectx k3d-${CLUSTER_NAME}
echo "Getting service exported in cluster ${CLUSTER_NAME}"
echo '-----------------------------------'
kubectl get serviceexports.flomesh.io -A
echo '-----------------------------------'
curl -s "http://${HOST_IP}:${PORT}/${CLUSTER_NAME}/httpbin-mesh"
curl -s "http://${HOST_IP}:${PORT}/${CLUSTER_NAME}/httpbin-mesh-${CLUSTER_NAME}"
echo '-----------------------------------'
done
To view one of the ServiceExports resources.
kubectl get serviceexports httpbin -n httpbin -o jsonpath='{.spec}' | jq
{
"loadBalancer": "RoundRobinLoadBalancer",
"rules": [
{
"path": "/cluster-3/httpbin-mesh",
"pathType": "Prefix",
"portNumber": 8080
}
],
"serviceAccountName": "*"
}
The exported services can be imported into other managed clusters. For example, if we look at the cluster cluster-2, we can have multiple services imported.
kubectx k3d-cluster-2
kubectl get serviceimports -A
NAMESPACE NAME AGE
httpbin httpbin-cluster-1 13m
httpbin httpbin-cluster-3 13m
httpbin httpbin 13m
Testing
Staying in the cluster-2 cluster (kubectx k3d-cluster-2), we test if we can access these imported services from the curl application in the mesh.
Get the pod of the curl application, from which we will later launch requests to simulate service access.
curl_client="$(kubectl get pod -n curl -l app=curl -o jsonpath='{.items[0].metadata.name}')"
At this point you will find that it is not accessible.
kubectl exec "${curl_client}" -n curl -c curl -- curl -s http://httpbin.httpbin:8080/
command terminated with exit code 7
Note that this is normal, by default no other cluster instance will be used to respond to requests, which means no calls to other clusters will be made by default. So how to access it, then we need to be clear about the global traffic policy GlobalTrafficPolicy.
Global Traffic Policy
Note that all global traffic policies are set on the user’s side, so this demo is about setting global traffic policies on the cluster cluster-2 side. So before you start, switch to cluster cluster-2: kubectx k3d-cluster-2.
The global traffic policy is set via CRD GlobalTrafficPolicy.
type GlobalTrafficPolicy struct {
metav1.TypeMeta `json:",inline"`
metav1.ObjectMeta `json:"metadata,omitempty"`
Spec GlobalTrafficPolicySpec `json:"spec,omitempty"`
Status GlobalTrafficPolicyStatus `json:"status,omitempty"`
}
type GlobalTrafficPolicySpec struct {
LbType LoadBalancerType `json:"lbType"`
LoadBalanceTarget []TrafficTarget `json:"targets"`
}
Global load balancing types .spec.lbType There are three types.
Locality: uses only the services of this cluster, and is also the default type. This is why accessing thehttpbinapplication fails when we don’t provide any global policy, because there is no such service in clustercluster-2.FailOver: proxies to other clusters only when access to this cluster fails, which is often referred to as failover, similar to primary backup.ActiveActive: Proxy to other clusters under normal conditions, similar to multi-live.
The FailOver and ActiveActive policies are used with the targets field to specify the id of the standby cluster, which is the cluster that can be routed to in case of failure or load balancing. ** For example, if you look at the import service httpbin/httpbin in cluster cluster-2, you can see that it has two endpoints for the outer cluster, note that endpoints here is a different concept than the native endpoints.v1 and will contain more information. In addition, there is the cluster id clusterKey.
kubectl get serviceimports httpbin -n httpbin -o jsonpath='{.spec}' | jq
{
"ports": [
{
"endpoints": [
{
"clusterKey": "default/default/default/cluster-1",
"target": {
"host": "192.168.1.110",
"ip": "192.168.1.110",
"path": "/cluster-1/httpbin-mesh",
"port": 81
}
},
{
"clusterKey": "default/default/default/cluster-3",
"target": {
"host": "192.168.1.110",
"ip": "192.168.1.110",
"path": "/cluster-3/httpbin-mesh",
"port": 83
}
}
],
"port": 8080,
"protocol": "TCP"
}
],
"serviceAccountName": "*",
"type": "ClusterSetIP"
}
Routing Type - Locality
The default routing type is Locality, and as tested above, traffic cannot be dispatched to other clusters.
kubectl exec "${curl_client}" -n curl -c curl -- curl -s http://httpbin.httpbin:8080/
command terminated with exit code 7
Routing Type - FailOver
Since setting a global traffic policy for causes access failure, we start by enabling FailOver mode. Note that the global policy traffic, to be consistent with the target service name and namespace. For example, if we want to access http://httpbin.httpbin:8080/, we need to create GlobalTrafficPolicy resource named httpbin under the namespace httpbin.
kubectl apply -n httpbin -f - <<EOF
apiVersion: flomesh.io/v1alpha1
kind: GlobalTrafficPolicy
metadata:
name: httpbin
spec:
lbType: FailOver
targets:
- clusterKey: default/default/default/cluster-1
- clusterKey: default/default/default/cluster-3
EOF
After setting the policy, let’s try it again by requesting.
kubectl exec "${curl_client}" -n curl -c curl -- curl -s http://httpbin.httpbin:8080/
Hi, I am from cluster-1!
The request is successful and the request is proxied to the service in cluster cluster-1. Another request is made, and it is proxied to cluster cluster-3, as expected for load balancing.
kubectl exec "${curl_client}" -n curl -c curl -- curl -s http://httpbin.httpbin:8080/
Hi, I am from cluster-3!
What will happen if we deploy the application httpbin in the namespace httpbin of the cluster cluster-2?
export NAMESPACE=httpbin
export CLUSTER_NAME=cluster-2
kubectx k3d-${CLUSTER_NAME}
kubectl create namespace ${NAMESPACE}
fsm namespace add ${NAMESPACE}
kubectl apply -n ${NAMESPACE} -f - <<EOF
apiVersion: apps/v1
kind: Deployment
metadata:
name: httpbin
labels:
app: pipy
spec:
replicas: 1
selector:
matchLabels:
app: pipy
template:
metadata:
labels:
app: pipy
spec:
containers:
- name: pipy
image: flomesh/pipy:latest
ports:
- containerPort: 8080
command:
- pipy
- -e
- |
pipy()
.listen(8080)
.serveHTTP(new Message('Hi, I am from ${CLUSTER_NAME}!\n'))
---
apiVersion: v1
kind: Service
metadata:
name: httpbin
spec:
ports:
- port: 8080
targetPort: 8080
protocol: TCP
selector:
app: pipy
---
apiVersion: v1
kind: Service
metadata:
name: httpbin-${CLUSTER_NAME}
spec:
ports:
- port: 8080
targetPort: 8080
protocol: TCP
selector:
app: pipy
EOF
sleep 3
kubectl wait --for=condition=ready pod -n ${NAMESPACE} --all --timeout=60s
After the application is running normally, this time we send the request to test again. From the results, it looks like the request is processed in the current cluster.
kubectl exec "${curl_client}" -n curl -c curl -- curl -s http://httpbin.httpbin:8080/
Hi, I am from cluster-2!
Even if the request is repeated multiple times, it will always return Hi, I am from cluster-2!, which indicates that the services of same cluster are used in preference to the services imported from other clusters.
In some cases, we also want other clusters to participate in the service as well, because the resources of other clusters are wasted if only the services of this cluster are used. This is where the ActiveActive routing type comes into play.
Routing Type - ActiveActive
Moving on from the status above, let’s test the ActiveActive type by modifying the policy created earlier and updating it to ActiveActive: `ActiveActive
kubectl apply -n httpbin -f - <<EOF
apiVersion: flomesh.io/v1alpha1
kind: GlobalTrafficPolicy
metadata:
name: httpbin
spec:
lbType: ActiveActive
targets:
- clusterKey: default/default/default/cluster-1
- clusterKey: default/default/default/cluster-3
EOF
Multiple requests will show that httpbin from all three clusters will participate in the service. This indicates that the load is being proxied to multiple clusters in a balanced manner.
kubectl exec "${curl_client}" -n curl -c curl -- curl -s http://httpbin.httpbin:8080/
Hi, I am from cluster-1 and controlled by mesh!
kubectl exec "${curl_client}" -n curl -c curl -- curl -s http://httpbin.httpbin:8080/
Hi, I am from cluster-2!
kubectl exec "${curl_client}" -n curl -c curl -- curl -s http://httpbin.httpbin:8080/
Hi, I am from cluster-3 and controlled by mesh!
6 - Security
6.1 - Permissive Traffic Policy Mode
This guide demonstrates a client and server application within the service mesh communicating using FSM’s permissive traffic policy mode, which configures application connectivity using service discovery without the need for explicit SMI traffic access policies.
Prerequisites
- Kubernetes cluster running Kubernetes v1.19.0 or greater.
- Have FSM installed.
- Have
kubectlavailable to interact with the API server. - Have
fsmCLI available for managing the service mesh.
Demo
The following demo shows an HTTP curl client making HTTP requests to the httpbin service using permissive traffic policy mode.
Enable permissive mode if not enabled.
export FSM_NAMESPACE=fsm-system # Replace fsm-system with the namespace where FSM is installed kubectl patch meshconfig fsm-mesh-config -n "$FSM_NAMESPACE" -p '{"spec":{"traffic":{"enablePermissiveTrafficPolicyMode":true}}}' --type=mergeDeploy the
httpbinservice into thehttpbinnamespace after enrolling its namespace to the mesh. Thehttpbinservice runs on port14001.# Create the httpbin namespace kubectl create namespace httpbin # Add the namespace to the mesh fsm namespace add httpbin # Deploy httpbin service in the httpbin namespace kubectl apply -f https://raw.githubusercontent.com/flomesh-io/fsm-docs/main/manifests/samples/httpbin/httpbin.yaml -n httpbinConfirm the
httpbinservice and pods are up and running.$ kubectl get svc -n httpbin NAME TYPE CLUSTER-IP EXTERNAL-IP PORT(S) AGE httpbin ClusterIP 10.96.198.23 <none> 14001/TCP 20s$ kubectl get pods -n httpbin NAME READY STATUS RESTARTS AGE httpbin-5b8b94b9-lt2vs 2/2 Running 0 20sDeploy the
curlclient into thecurlnamespace after enrolling its namespace to the mesh.# Create the curl namespace kubectl create namespace curl # Add the namespace to the mesh fsm namespace add curl # Deploy curl client in the curl namespace kubectl apply -f https://raw.githubusercontent.com/flomesh-io/fsm-docs/main/manifests/samples/curl/curl.yaml -n curlConfirm the
curlclient pod is up and running.$ kubectl get pods -n curl NAME READY STATUS RESTARTS AGE curl-54ccc6954c-9rlvp 2/2 Running 0 20sConfirm the
curlclient is able to access thehttpbinservice on port14001.$ kubectl exec -n curl -ti "$(kubectl get pod -n curl -l app=curl -o jsonpath='{.items[0].metadata.name}')" -c curl -- curl -I http://httpbin.httpbin:14001 HTTP/1.1 200 OK server: gunicorn/19.9.0 date: Wed, 29 Jun 2022 08:50:33 GMT content-type: text/html; charset=utf-8 content-length: 9593 access-control-allow-origin: * access-control-allow-credentials: true connection: keep-aliveA
200 OKresponse indicates the HTTP request from thecurlclient to thehttpbinservice was successful.Confirm the HTTP requests fail when permissive traffic policy mode is disabled.
kubectl patch meshconfig fsm-mesh-config -n "$FSM_NAMESPACE" -p '{"spec":{"traffic":{"enablePermissiveTrafficPolicyMode":false}}}' --type=merge$ kubectl exec -n curl -ti "$(kubectl get pod -n curl -l app=curl -o jsonpath='{.items[0].metadata.name}')" -c curl -- curl -I http://httpbin.httpbin:14001 curl: (52) Empty reply from server command terminated with exit code 52
6.2 - Bi-direction TLS with FSM Ingress
This guide will demonstrate with multiple scenarios on how to configure different TLS certificates for Flomesh Service Mesh (FSM) Ingress and Egress communication.
Prerequisites
- Kubernetes cluster running Kubernetes v1.19.0 or greater.
- Have FSM installed.
- Have
kubectlavailable to interact with the API server. - Have
fsmCLI available for managing the service mesh. - Have FSM Ingress Controller installed.
Install FSM Ingress Controller
if you haven’t yet installed FSM Ingress controller, you can install that quickly via
fsm install \
--set=fsm.fsmIngress.enabled=true \
--set=fsm.fsmIngress.tls.enabled=true \
--set=fsm.fsmIngress.tls.mTLS=true
kubectl wait --namespace fsm-system \
--for=condition=ready pod \
--selector=app=fsm-ingress \
--timeout=300s
Deploy demo pods
#Sample server service
kubectl create namespace egress-server
kubectl apply -n egress-server -f https://raw.githubusercontent.com/flomesh-io/fsm-docs/main/manifests/samples/bidir-mtls/server.yaml
#Sample middle-ware service
kubectl create namespace egress-middle
fsm namespace add egress-middle
kubectl apply -n egress-middle -f https://raw.githubusercontent.com/flomesh-io/fsm-docs/main/manifests/samples/bidir-mtls/middle.yaml
#Sample client
kubectl create namespace egress-client
kubectl apply -n egress-client -f https://raw.githubusercontent.com/flomesh-io/fsm-docs/main/manifests/samples/bidir-mtls/client.yaml
#Wait for POD to start properly
kubectl wait --for=condition=ready pod -n egress-server -l app=server --timeout=180s
kubectl wait --for=condition=ready pod -n egress-middle -l app=middle --timeout=180s
kubectl wait --for=condition=ready pod -n egress-client -l app=client --timeout=180s
Scenario#1: Client HTTP & HTTP Ingress & mTLS Egress
Test commands
Traffic flow:
Client –http–> ingress-pipy Controller
kubectl exec "$(kubectl get pod -n egress-client -l app=client -o jsonpath='{.items..metadata.name}')" -n egress-client -- curl -si http://fsm-ingress.fsm-system/hello
Test results
The correct return result is similar to :
HTTP/1.1 404 Not Found
Server: pipy/0.90.0
content-length: 17
connection: keep-alive
Service Not Found
Setup Ingress Rules
kubectl apply -f - <<EOF
apiVersion: networking.k8s.io/v1
kind: Ingress
metadata:
name: egress-middle
namespace: egress-middle
spec:
ingressClassName: pipy
rules:
- host: fsm-ingress.fsm-system
http:
paths:
- path: /
pathType: Prefix
backend:
service:
name: middle
port:
number: 8080
EOF
Setup IngressBackend
kubectl apply -f - <<EOF
kind: IngressBackend
apiVersion: policy.flomesh.io/v1alpha1
metadata:
name: egress-middle
namespace: egress-middle
spec:
backends:
- name: middle
port:
number: 8080 # targetPort of middle service
protocol: http
sources:
- kind: Service
namespace: fsm-system
name: fsm-ingress
EOF
Test Commands
Traffic Flow:
Client –http–> FSM Ingress –http –> sidecar –> Middle
kubectl exec "$(kubectl get pod -n egress-client -l app=client -o jsonpath='{.items..metadata.name}')" -n egress-client -- curl -si http://fsm-ingress.fsm-system/hello
Test Results
The correct return result is similar to :
HTTP/1.1 200 OK
date: Fri, 17 Nov 2023 09:10:45 GMT
content-type: text/plain; charset=utf-8
fsm-stats: egress-middle,Deployment,middle,middle-7965485977-nlnl2
content-length: 13
connection: keep-alive
hello world.
Disable Egress Permissive mode
export FSM_NAMESPACE=fsm-system
kubectl patch meshconfig fsm-mesh-config -n "$FSM_NAMESPACE" -p '{"spec":{"traffic":{"enableEgress":false}}}' --type=merge
Enable Egress Policy
export FSM_NAMESPACE=fsm-system
kubectl patch meshconfig fsm-mesh-config -n "$FSM_NAMESPACE" -p '{"spec":{"featureFlags":{"enableEgressPolicy":true}}}' --type=merge
Create Egress mTLS Secret
curl -s https://raw.githubusercontent.com/flomesh-io/fsm-docs/main/manifests/samples/bidir-mtls/certs/pipy-ca.crt -o pipy-ca.crt
curl -s https://raw.githubusercontent.com/flomesh-io/fsm-docs/main/manifests/samples/bidir-mtls/certs/middle.crt -o middle.crt
curl -s https://raw.githubusercontent.com/flomesh-io/fsm-docs/main/manifests/samples/bidir-mtls/certs/middle.key -o middle.key
kubectl create secret generic -n fsm-system egress-middle-cert \
--from-file=ca.crt=./pipy-ca.crt \
--from-file=tls.crt=./middle.crt \
--from-file=tls.key=./middle.key
Setup Egress Policy
kubectl apply -f - <<EOF
kind: Egress
apiVersion: policy.flomesh.io/v1alpha1
metadata:
name: server-8443
namespace: egress-middle
spec:
sources:
- kind: ServiceAccount
name: middle
namespace: egress-middle
mtls:
issuer: other
cert:
sn: 1
subjectAltNames:
- flomesh.io
expiration: 2030-1-1 00:00:00
secret:
name: egress-middle-cert
namespace: fsm-system
hosts:
- server.egress-server.svc.cluster.local
ports:
- number: 8443
protocol: http
EOF
Test Commands
Traffic Flow:
Client –http–> FSM Ingress –http–> sidecar –> Middle –> sidecar –egress mtls–> Server
kubectl exec "$(kubectl get pod -n egress-client -l app=client -o jsonpath='{.items..metadata.name}')" -n egress-client -- curl -si http://fsm-ingress.fsm-system/time
Test Results
The correct return result is similar to :
HTTP/1.1 200 OK
date: Fri, 17 Nov 2023 09:11:53 GMT
content-type: text/plain; charset=utf-8
fsm-stats: egress-middle,Deployment,middle,middle-7965485977-nlnl2
content-length: 74
connection: keep-alive
The current time: 2023-11-17 09:11:53.67111584 +0000 UTC m=+110.875627674
This business scenario is tested and the strategy is cleaned up to avoid affecting subsequent tests
kubectl delete ingress -n egress-middle egress-middle
kubectl delete ingressbackend -n egress-middle egress-middle
kubectl delete egress -n egress-middle server-8443
kubectl delete secrets -n fsm-system egress-middle-cert
Scenario#2: HTTP FSM & mTLS Ingress & mTLS Egress
Test Commands
Traffic flow:
Client –http–> FSM Ingress Controller
kubectl exec "$(kubectl get pod -n egress-client -l app=client -o jsonpath='{.items..metadata.name}')" -n egress-client -- curl -si http://fsm-ingress.fsm-system/hello
Test Results
The correct return result is similar to :
HTTP/1.1 404 Not Found
Server: pipy/0.90.0
content-length: 17
connection: keep-alive
Service Not Found
Setup Ingress Controller TLS Certificate
export FSM_NAMESPACE=fsm-system
kubectl patch meshconfig fsm-mesh-config -n "$FSM_NAMESPACE" -p \
'{
"spec":{
"certificate":{
"ingressGateway":{
"secret":{
"name":"ingress-controller-cert",
"namespace":"fsm-system"
},
"subjectAltNames":["fsm.fsm-system.cluster.local"],
"validityDuration":"24h"
}
}
}
}' \
--type=merge
Note: The Subject Alternative Name (SAN) is of the form
. .cluster.local, where the service account and namespace correspond to the ingress-pipy service.
Setup Ingress Rules
kubectl apply -f - <<EOF
apiVersion: networking.k8s.io/v1
kind: Ingress
metadata:
name: egress-middle
namespace: egress-middle
annotations:
# upstream-ssl-name for a service is of the form <service-account>.<namespace>.cluster.local
pipy.ingress.kubernetes.io/upstream-ssl-name: "middle.egress-middle.cluster.local"
pipy.ingress.kubernetes.io/upstream-ssl-secret: "fsm-system/ingress-controller-cert"
pipy.ingress.kubernetes.io/upstream-ssl-verify: "on"
spec:
ingressClassName: pipy
rules:
- host: fsm-ingress.fsm-system
http:
paths:
- path: /
pathType: Prefix
backend:
service:
name: middle
port:
number: 8080
EOF
Setup IngressBackend Policy
kubectl apply -f - <<EOF
kind: IngressBackend
apiVersion: policy.flomesh.io/v1alpha1
metadata:
name: egress-middle
namespace: egress-middle
spec:
backends:
- name: middle
port:
number: 8080 # targetPort of middle service
protocol: https
tls:
skipClientCertValidation: false
sources:
- kind: Service
namespace: fsm-system
name: fsm-ingress
- kind: AuthenticatedPrincipal
name: fsm.fsm-system.cluster.local
EOF
Test Commands
Traffic flow:
Client –http–> FSM Ingress –mtls –> sidecar –> Middle
kubectl exec "$(kubectl get pod -n egress-client -l app=client -o jsonpath='{.items..metadata.name}')" -n egress-client -- curl -si http://fsm-ingress.fsm-system/hello
Test Results
The correct return result is similar to :
HTTP/1.1 200 OK
date: Fri, 17 Nov 2023 09:12:39 GMT
content-type: text/plain; charset=utf-8
fsm-stats: egress-middle,Deployment,middle,middle-7965485977-nlnl2
content-length: 13
connection: keep-alive
hello world.
Disable Egress Permissive mode
export FSM_NAMESPACE=fsm-system
kubectl patch meshconfig fsm-mesh-config -n "$FSM_NAMESPACE" -p '{"spec":{"traffic":{"enableEgress":false}}}' --type=merge
Enable Egress Policy
export FSM_NAMESPACE=fsm-system
kubectl patch meshconfig fsm-mesh-config -n "$FSM_NAMESPACE" -p '{"spec":{"featureFlags":{"enableEgressPolicy":true}}}' --type=merge
Create Egress mTLS Secret
curl -s https://raw.githubusercontent.com/flomesh-io/fsm-docs/main/manifests/samples/bidir-mtls/certs/pipy-ca.crt -o pipy-ca.crt
curl -s https://raw.githubusercontent.com/flomesh-io/fsm-docs/main/manifests/samples/bidir-mtls/certs/middle.crt -o middle.crt
curl -s https://raw.githubusercontent.com/flomesh-io/fsm-docs/main/manifests/samples/bidir-mtls/certs/middle.key -o middle.key
kubectl create secret generic -n fsm-system egress-middle-cert \
--from-file=ca.crt=./pipy-ca.crt \
--from-file=tls.crt=./middle.crt \
--from-file=tls.key=./middle.key
Setup Egress Policy
kubectl apply -f - <<EOF
kind: Egress
apiVersion: policy.flomesh.io/v1alpha1
metadata:
name: server-8443
namespace: egress-middle
spec:
sources:
- kind: ServiceAccount
name: middle
namespace: egress-middle
mtls:
issuer: other
cert:
sn: 1
subjectAltNames:
- flomesh.io
expiration: 2030-1-1 00:00:00
secret:
name: egress-middle-cert
namespace: fsm-system
hosts:
- server.egress-server.svc.cluster.local
ports:
- number: 8443
protocol: http
EOF
Test Commands
Traffic flow:
Client –http–> FSM Ingress –mtls–> sidecar –> Middle –> sidecar –egress mtls–> Server
kubectl exec "$(kubectl get pod -n egress-client -l app=client -o jsonpath='{.items..metadata.name}')" -n egress-client -- curl -si http://fsm-ingress.fsm-system/time
Test Results
The correct return result is similar to :
HTTP/1.1 200 OK
date: Fri, 17 Nov 2023 09:13:09 GMT
content-type: text/plain; charset=utf-8
fsm-stats: egress-middle,Deployment,middle,middle-7965485977-nlnl2
content-length: 72
connection: keep-alive
The current time: 2023-11-17 09:13:09.478407 +0000 UTC m=+186.682918839
This business scenario is tested and the strategy is cleaned up to avoid affecting subsequent tests
export FSM_NAMESPACE=fsm-system
kubectl patch meshconfig fsm-mesh-config -n "$FSM_NAMESPACE" -p '{"spec":{"certificate":{"ingressGateway":null}}}' --type=merge
kubectl delete ingress -n egress-middle egress-middle
kubectl delete ingressbackend -n egress-middle egress-middle
kubectl delete egress -n egress-middle server-8443
kubectl delete secrets -n fsm-system egress-middle-cert
Scenario#3:TLS FSM Ingress & mTLS Ingress & mTLS Egress
Test Commands
Traffic flow:
Client –http–> FSM Ingress Controller
kubectl exec "$(kubectl get pod -n egress-client -l app=client -o jsonpath='{.items..metadata.name}')" -n egress-client -- curl -si http://fsm-ingress.fsm-system/hello
Test Results
The correct return result is similar to :
HTTP/1.1 404 Not Found
Server: pipy/0.90.0
content-length: 17
connection: keep-alive
Service Not Found
Setup Ingress Controller Cert
export FSM_NAMESPACE=fsm-system
kubectl patch meshconfig fsm-mesh-config -n "$FSM_NAMESPACE" -p '{"spec":{"certificate":{"ingressGateway":{"secret":{"name":"ingress-controller-cert","namespace":"fsm-system"},"subjectAltNames":["fsm.fsm-system.cluster.local"],"validityDuration":"24h"}}}}' --type=merge
Create Ingress TLS Secret
curl -s https://raw.githubusercontent.com/flomesh-io/fsm-docs/main/manifests/samples/bidir-mtls/certs/pipy-ca.crt -o pipy-ca.crt
curl -s https://raw.githubusercontent.com/flomesh-io/fsm-docs/main/manifests/samples/bidir-mtls/certs/ingress-pipy.crt -o ingress-pipy.crt
curl -s https://raw.githubusercontent.com/flomesh-io/fsm-docs/main/manifests/samples/bidir-mtls/certs/ingress-pipy.key -o ingress-pipy.key
kubectl create secret generic -n egress-middle ingress-pipy-cert-secret \
--from-file=ca.crt=./pipy-ca.crt \
--from-file=tls.crt=./ingress-pipy.crt \
--from-file=tls.key=./ingress-pipy.key
Create Egress mTLS Secret
curl -s https://raw.githubusercontent.com/flomesh-io/fsm-docs/main/manifests/samples/bidir-mtls/certs/pipy-ca.crt -o pipy-ca.crt
curl -s https://raw.githubusercontent.com/flomesh-io/fsm-docs/main/manifests/samples/bidir-mtls/certs/middle.crt -o middle.crt
curl -s https://raw.githubusercontent.com/flomesh-io/fsm-docs/main/manifests/samples/bidir-mtls/certs/middle.key -o middle.key
kubectl create secret generic -n fsm-system egress-middle-cert \
--from-file=ca.crt=./pipy-ca.crt \
--from-file=tls.crt=./middle.crt \
--from-file=tls.key=./middle.key
Setup Ingress Rules
kubectl apply -f - <<EOF
apiVersion: networking.k8s.io/v1
kind: Ingress
metadata:
name: egress-middle
namespace: egress-middle
annotations:
# upstream-ssl-name for a service is of the form <service-account>.<namespace>.cluster.local
pipy.ingress.kubernetes.io/upstream-ssl-name: "middle.egress-middle.cluster.local"
pipy.ingress.kubernetes.io/upstream-ssl-secret: "fsm-system/ingress-controller-cert"
pipy.ingress.kubernetes.io/upstream-ssl-verify: "on"
spec:
ingressClassName: pipy
rules:
- host: fsm-ingress.fsm-system
http:
paths:
- path: /
pathType: Prefix
backend:
service:
name: middle
port:
number: 8080
tls:
- hosts:
- fsm-ingress.fsm-system
secretName: ingress-pipy-cert-secret
EOF
Setup IngressBackend Policy
kubectl apply -f - <<EOF
kind: IngressBackend
apiVersion: policy.flomesh.io/v1alpha1
metadata:
name: egress-middle
namespace: egress-middle
spec:
backends:
- name: middle
port:
number: 8080 # targetPort of middle service
protocol: https
tls:
skipClientCertValidation: false
sources:
- kind: Service
namespace: fsm-system
name: fsm-ingress
- kind: AuthenticatedPrincipal
name: fsm.fsm-system.cluster.local
EOF
Replace client TLS certificate
curl -s https://raw.githubusercontent.com/flomesh-io/fsm-docs/main/manifests/samples/bidir-mtls/certs/client.crt -o client.crt
curl -s https://raw.githubusercontent.com/flomesh-io/fsm-docs/main/manifests/samples/bidir-mtls/certs/client.key -o client.key
kubectl create secret generic -n egress-client egress-client-secret \
--from-file=ca.crt=./pipy-ca.crt \
--from-file=tls.crt=./client.crt \
--from-file=tls.key=./client.key
kubectl -n egress-client patch deploy client -p \
'
{
"spec": {
"template": {
"spec": {
"containers": [{
"name": "client",
"volumeMounts": [{
"mountPath": "/client",
"name": "client-certs"
}]
}],
"volumes": [{
"secret": {
"secretName": "egress-client-secret"
},
"name": "client-certs"
}]
}
}
}
}
'
FSM disable inbound mTLS
kubectl patch meshconfig fsm-mesh-config -n "$FSM_NAMESPACE" -p '{"spec":{"ingress":{"tls":{"mTLS": false}}}}' --type=merge
Test Commands
Traffic flow:
Client –tls–> Ingress FSM –mtls –> sidecar –> Middle
kubectl exec "$(kubectl get pod -n egress-client -l app=client -o jsonpath='{.items..metadata.name}')" -n egress-client -- curl -si https://fsm-ingress.fsm-system/hello --cacert /client/ca.crt
Test Results
The correct return result is similar to :
HTTP/2 200
date: Fri, 17 Nov 2023 09:17:43 GMT
content-type: text/plain; charset=utf-8
fsm-stats: egress-middle,Deployment,middle,middle-7965485977-nlnl2
content-length: 13
hello world.
Disable Egress Permissive mode
export FSM_NAMESPACE=fsm-system
kubectl patch meshconfig fsm-mesh-config -n "$FSM_NAMESPACE" -p '{"spec":{"traffic":{"enableEgress":false}}}' --type=merge
Enable Egress Policy
export FSM_NAMESPACE=fsm-system
kubectl patch meshconfig fsm-mesh-config -n "$FSM_NAMESPACE" -p '{"spec":{"featureFlags":{"enableEgressPolicy":true}}}' --type=merge
Setup Egress Policy
kubectl apply -f - <<EOF
kind: Egress
apiVersion: policy.flomesh.io/v1alpha1
metadata:
name: server-8443
namespace: egress-middle
spec:
sources:
- kind: ServiceAccount
name: middle
namespace: egress-middle
mtls:
issuer: other
cert:
sn: 1
expiration: 2030-1-1 00:00:00
subjectAltNames:
- flomesh.io
secret:
name: egress-middle-cert
namespace: fsm-system
hosts:
- server.egress-server.svc.cluster.local
ports:
- number: 8443
protocol: http
EOF
Test Commands
Traffic flow:
Client –tls–> Ingress FSM –mtls–> sidecar –> Middle –> sidecar –egress mtls–> Server
kubectl exec "$(kubectl get pod -n egress-client -l app=client -o jsonpath='{.items..metadata.name}')" -n egress-client -- curl -si https://fsm-ingress.fsm-system/time --cacert /client/ca.crt
Test Results
The correct return result is similar to :
HTTP/2 200
date: Fri, 17 Nov 2023 09:18:02 GMT
content-type: text/plain; charset=utf-8
fsm-stats: egress-middle,Deployment,middle,middle-7965485977-nlnl2
content-length: 75
The current time: 2023-11-17 09:18:02.826626944 +0000 UTC m=+480.031138782
This business scenario is tested and the strategy is cleaned up to avoid affecting subsequent tests
export FSM_NAMESPACE=fsm-system
kubectl patch meshconfig fsm-mesh-config -n "$FSM_NAMESPACE" -p '{"spec":{"certificate":{"ingressGateway":null}}}' --type=merge
kubectl delete ingress -n egress-middle egress-middle
kubectl delete ingressbackend -n egress-middle egress-middle
kubectl delete egress -n egress-middle server-8443
kubectl delete secrets -n fsm-system egress-middle-cert
kubectl delete secrets -n egress-middle ingress-pipy-cert-secret
kubectl delete secrets -n egress-client egress-client-secret
Scenario#4:mTLS FSM & mTLS Ingress & mTLS Egress
Test Commands
Traffic flow:
Client –http–> FSM Ingress Controller
kubectl exec "$(kubectl get pod -n egress-client -l app=client -o jsonpath='{.items..metadata.name}')" -n egress-client -- curl -si http://fsm-ingress.fsm-system/hello
Test Results
The correct return result is similar to :
HTTP/1.1 404 Not Found
Server: pipy/0.90.0
content-length: 17
connection: keep-alive
Service Not Found
Setup Ingress Controller Cert
export FSM_NAMESPACE=fsm-system
kubectl patch meshconfig fsm-mesh-config -n "$FSM_NAMESPACE" -p '{"spec":{"certificate":{"ingressGateway":{"secret":{"name":"ingress-controller-cert","namespace":"fsm-system"},"subjectAltNames":["fsm.fsm-system.cluster.local"],"validityDuration":"24h"}}}}' --type=merge
Create FSM TLS Secret and CA Secret
curl -s https://raw.githubusercontent.com/flomesh-io/fsm-docs/main/manifests/samples/bidir-mtls/certs/pipy-ca.crt -o pipy-ca.crt
curl -s https://raw.githubusercontent.com/flomesh-io/fsm-docs/main/manifests/samples/bidir-mtls/certs/ingress-pipy.crt -o ingress-pipy.crt
curl -s https://raw.githubusercontent.com/flomesh-io/fsm-docs/main/manifests/samples/bidir-mtls/certs/ingress-pipy.key -o ingress-pipy.key
kubectl create secret generic -n egress-middle ingress-pipy-cert-secret \
--from-file=ca.crt=./pipy-ca.crt \
--from-file=tls.crt=./ingress-pipy.crt \
--from-file=tls.key=./ingress-pipy.key
kubectl create secret generic -n egress-middle ingress-controller-ca-secret \
--from-file=ca.crt=./pipy-ca.crt
Replace client TLS certificate
curl -s https://raw.githubusercontent.com/flomesh-io/fsm-docs/main/manifests/samples/bidir-mtls/certs/client.crt -o client.crt
curl -s https://raw.githubusercontent.com/flomesh-io/fsm-docs/main/manifests/samples/bidir-mtls/certs/client.key -o client.key
kubectl create secret generic -n egress-client egress-client-secret \
--from-file=ca.crt=./pipy-ca.crt \
--from-file=tls.crt=./client.crt \
--from-file=tls.key=./client.key
kubectl -n egress-client patch deploy client -p \
'
{
"spec": {
"template": {
"spec": {
"containers": [{
"name": "client",
"volumeMounts": [{
"mountPath": "/client",
"name": "client-certs"
}]
}],
"volumes": [{
"secret": {
"secretName": "egress-client-secret"
},
"name": "client-certs"
}]
}
}
}
}
'
Setup Ingress Rules
kubectl apply -f - <<EOF
apiVersion: networking.k8s.io/v1
kind: Ingress
metadata:
name: egress-middle
namespace: egress-middle
annotations:
# mTLS
pipy.ingress.kubernetes.io/tls-trusted-ca-secret: egress-middle/ingress-controller-ca-secret
pipy.ingress.kubernetes.io/tls-verify-client: "on"
pipy.ingress.kubernetes.io/tls-verify-depth: "1"
# upstream-ssl-name for a service is of the form <service-account>.<namespace>.cluster.local
pipy.ingress.kubernetes.io/upstream-ssl-name: "middle.egress-middle.cluster.local"
pipy.ingress.kubernetes.io/upstream-ssl-secret: "fsm-system/ingress-controller-cert"
pipy.ingress.kubernetes.io/upstream-ssl-verify: "on"
spec:
ingressClassName: pipy
rules:
- host: fsm-ingress.fsm-system
http:
paths:
- path: /
pathType: Prefix
backend:
service:
name: middle
port:
number: 8080
tls:
- hosts:
- fsm-ingress.fsm-system
secretName: ingress-pipy-cert-secret
EOF
Setup IngressBackend Policy
kubectl apply -f - <<EOF
kind: IngressBackend
apiVersion: policy.flomesh.io/v1alpha1
metadata:
name: egress-middle
namespace: egress-middle
spec:
backends:
- name: middle
port:
number: 8080 # targetPort of middle service
protocol: https
tls:
skipClientCertValidation: false
sources:
- kind: Service
namespace: fsm-system
name: fsm-ingress
- kind: AuthenticatedPrincipal
name: fsm.fsm-system.cluster.local
EOF
FSM enable inbound mTLS
kubectl patch meshconfig fsm-mesh-config -n "$FSM_NAMESPACE" -p '{"spec":{"ingress":{"tls":{"mTLS": true}}}}' --type=merge
Test Commands
Traffic flow:
Client –mtls–> Ingress FSM –mtls –> sidecar –> Middle
kubectl exec "$(kubectl get pod -n egress-client -l app=client -o jsonpath='{.items..metadata.name}')" -n egress-client -- curl -si https://fsm-ingress.fsm-system/hello --cacert /client/ca.crt --key /client/tls.key --cert /client/tls.crt
Test Results
The correct return result is similar to :
HTTP/2 200
date: Fri, 17 Nov 2023 09:19:57 GMT
content-type: text/plain; charset=utf-8
fsm-stats: egress-middle,Deployment,middle,middle-7965485977-nlnl2
content-length: 13
hello world.
Disable Egress Permissive mode
export FSM_NAMESPACE=fsm-system
kubectl patch meshconfig fsm-mesh-config -n "$FSM_NAMESPACE" -p '{"spec":{"traffic":{"enableEgress":false}}}' --type=merge
Enable Egress Policy
export FSM_NAMESPACE=fsm-system
kubectl patch meshconfig fsm-mesh-config -n "$FSM_NAMESPACE" -p '{"spec":{"featureFlags":{"enableEgressPolicy":true}}}' --type=merge
Create Egress mTLS Secret
curl https://raw.githubusercontent.com/flomesh-io/fsm-docs/main/manifests/samples/bidir-mtls/certs/pipy-ca.crt -o pipy-ca.crt
curl https://raw.githubusercontent.com/flomesh-io/fsm-docs/main/manifests/samples/bidir-mtls/certs/middle.crt -o middle.crt
curl https://raw.githubusercontent.com/flomesh-io/fsm-docs/main/manifests/samples/bidir-mtls/certs/middle.key -o middle.key
kubectl create secret generic -n fsm-system egress-middle-cert \
--from-file=ca.crt=./pipy-ca.crt \
--from-file=tls.crt=./middle.crt \
--from-file=tls.key=./middle.key
Setup Egress Policy
kubectl apply -f - <<EOF
kind: Egress
apiVersion: policy.flomesh.io/v1alpha1
metadata:
name: server-8443
namespace: egress-middle
spec:
sources:
- kind: ServiceAccount
name: middle
namespace: egress-middle
mtls:
issuer: other
cert:
sn: 1
subjectAltNames:
- flomesh.io
expiration: 2030-1-1 00:00:00
secret:
name: egress-middle-cert
namespace: fsm-system
hosts:
- server.egress-server.svc.cluster.local
ports:
- number: 8443
protocol: http
EOF
Test Commands
Traffic flow:
Client –mtls–> Ingress FSM –mtls–> sidecar –> Middle –> sidecar –egress mtls–> Server
kubectl exec "$(kubectl get pod -n egress-client -l app=client -o jsonpath='{.items..metadata.name}')" -n egress-client -- curl -si https://fsm-ingress.fsm-system/time --cacert /client/ca.crt --key /client/tls.key --cert /client/tls.crt
Test Results
The correct return result is similar to :
HTTP/2 200
date: Fri, 17 Nov 2023 09:20:24 GMT
content-type: text/plain; charset=utf-8
fsm-stats: egress-middle,Deployment,middle,middle-7965485977-nlnl2
content-length: 75
The current time: 2023-11-17 09:20:24.101929396 +0000 UTC m=+621.306441226
This business scenario is tested and the strategy is cleaned up to avoid affecting subsequent tests
export FSM_NAMESPACE=fsm-system
kubectl patch meshconfig fsm-mesh-config -n "$FSM_NAMESPACE" -p '{"spec":{"certificate":{"ingressGateway":null}}}' --type=merge
kubectl patch meshconfig fsm-mesh-config -n "$FSM_NAMESPACE" -p '{"spec":{"ingress":{"tls":{"mTLS": false}}}}' --type=merge
kubectl delete ingress -n egress-middle egress-middle
kubectl delete ingressbackend -n egress-middle egress-middle
kubectl delete egress -n egress-middle server-8443
kubectl delete secrets -n fsm-system egress-middle-cert
kubectl delete secrets -n egress-middle ingress-pipy-cert-secret
kubectl delete secrets -n egress-middle ingress-controller-ca-secret
kubectl delete secrets -n egress-client egress-client-secret
6.3 - Service-based access control
This guide demonstrates an access control mechanism applied at Service level to services within the mesh.
Prerequisites
- Kubernetes cluster running Kubernetes v1.19.0 or greater.
- Have FSM installed.
- Have
kubectlavailable to interact with the API server. - Have
fsmCLI available for managing the service mesh.
Demo
Deploy the sample services httpbin and curl.
#Mock target service
kubectl create namespace httpbin
fsm namespace add httpbin
kubectl apply -n httpbin -f https://raw.githubusercontent.com/flomesh-io/fsm-docs/main/manifests/samples/httpbin/httpbin.yaml
#Mock external service
kubectl create namespace curl
kubectl apply -n curl -f https://raw.githubusercontent.com/flomesh-io/fsm-docs/main/manifests/samples/curl/curl.yaml
#Wait for the dependent POD to start normally
kubectl wait --for=condition=ready pod -n httpbin -l app=httpbin --timeout=180s
kubectl wait --for=condition=ready pod -n curl -l app=curl --timeout=180s
At this point, we send a request from service curl to target service httpbin by executing the following command.
kubectl exec "$(kubectl get pod -n curl -l app=curl -o jsonpath='{.items..metadata.name}')" -n curl -- curl -sI http://httpbin.httpbin:14001/get
# You will get error as below
command terminated with exit code 56
The access fails because by default the services outside the mesh cannot access the services inside the mesh and we need to apply an access control policy.
Before applying the policy, you need to enable the access control feature, which is disabled by default.
kubectl patch meshconfig fsm-mesh-config -n "$FSM_NAMESPACE" -p '{"spec":{"featureFlags":{"enableAccessControlPolicy":true}}}' --type=merge
Plaintext transfer
Data can be transferred in plaintext or with two-way TLS encryption. Plaintext transfer is relatively simple, so let’s demonstrate the plaintext transfer scenario first.
Service-based access control
First, create a Service for service curl.
kubectl apply -n curl -f - <<EOF
apiVersion: v1
kind: Service
metadata:
name: curl
labels:
app: curl
service: curl
spec:
ports:
- name: http
port: 80
selector:
app: curl
EOF
Next, create an access control policy with the source Service curl and the target service httpbin.
kubectl apply -f - <<EOF
kind: AccessControl
apiVersion: policy.flomesh.io/v1alpha1
metadata:
name: httpbin
namespace: httpbin
spec:
backends:
- name: httpbin
port:
number: 14001 # targetPort of httpbin service
protocol: http
sources:
- kind: Service
namespace: curl
name: curl
EOF
Execute the command again to send the authentication request, and you can see that this time an HTTP 200 response is received.
kubectl exec "$(kubectl get pod -n curl -l app=curl -o jsonpath='{.items..metadata.name}')" -n curl -- curl -sI http://httpbin.httpbin:14001/get
#Response as below
HTTP/1.1 200 OK
server: gunicorn/19.9.0
date: Mon, 07 Nov 2022 08:47:55 GMT
content-type: application/json
content-length: 267
access-control-allow-origin: *
access-control-allow-credentials: true
fsm-stats-namespace: httpbin
fsm-stats-kind: Deployment
fsm-stats-name: httpbin
fsm-stats-pod: httpbin-69dc7d545c-qphrh
connection: keep-alive
Remember to execute kubectl delete accesscontrol httpbin -n httpbin to clean up the policy.
The previous ones we used were plaintext transfers, next we look at encrypted transfers.
Encrypted transfers
The default access policy certificate feature is off, turn it on by executing the following command.
kubectl patch meshconfig fsm-mesh-config -n "$FSM_NAMESPACE" -p '{"spec":{"featureFlags":{"enableAccessCertPolicy":true}}}' --type=merge
Create AccessCert for the access source to assign a certificate for data encryption. The controller will store the certificate information in Secret curl-mtls-secret under the namespace curl, and here also assign SAN curl.curl.cluster.local for the access source.
kubectl apply -f - <<EOF
kind: AccessCert
apiVersion: policy.flomesh.io/v1alpha1
metadata:
name: curl-mtls-cert
namespace: httpbin
spec:
subjectAltNames:
- curl.curl.cluster.local
secret:
name: curl-mtls-secret
namespace: curl
EOF
Redeploy curl and mount the system-assigned Secret to the pod.
kubectl apply -n curl -f - <<EOF
apiVersion: apps/v1
kind: Deployment
metadata:
name: curl
spec:
replicas: 1
selector:
matchLabels:
app: curl
template:
metadata:
labels:
app: curl
spec:
serviceAccountName: curl
containers:
- image: curlimages/curl
imagePullPolicy: IfNotPresent
name: curl
command: ["sleep", "365d"]
volumeMounts:
- name: curl-mtls-secret
mountPath: "/certs"
readOnly: true
volumes:
- name: curl-mtls-secret
secret:
secretName: curl-mtls-secret
EOF
6.4 - IP range-based access control
This guide demonstrates an access control mechanism applied to services at IP Range level within the FSM mesh.
Prerequisites
- Kubernetes cluster running Kubernetes v1.19.0 or greater.
- Have FSM installed.
- Have
kubectlavailable to interact with the API server. - Have
fsmCLI available for managing the service mesh.
Demo
deploy the sample services httpbin and curl
#Mock target service
kubectl create namespace httpbin
fsm namespace add httpbin
kubectl apply -n httpbin -f https://raw.githubusercontent.com/flomesh-io/fsm-docs/main/manifests/samples/httpbin/httpbin.yaml
#Mock external service
kubectl create namespace curl
kubectl apply -n curl -f https://raw.githubusercontent.com/flomesh-io/fsm-docs/main/manifests/samples/curl/curl.yaml
#Wait for the dependent POD to start normally
kubectl wait --for=condition=ready pod -n httpbin -l app=httpbin --timeout=180s
kubectl wait --for=condition=ready pod -n curl -l app=curl --timeout=180s
At this point, we send a request from service curl to target service httpbin by executing the following command.
kubectl exec "$(kubectl get pod -n curl -l app=curl -o jsonpath='{.items..metadata.name}')" -n curl -- curl -sI http://httpbin.httpbin:14001/get
# You will get error as below
command terminated with exit code 56
The access fails because by default the services outside the mesh cannot access the services inside the mesh and we need to apply an access control policy.
Before applying the policy, you need to enable the access control feature, which is disabled by default.
kubectl patch meshconfig fsm-mesh-config -n "$FSM_NAMESPACE" -p '{"spec":{"featureFlags":{"enableAccessControlPolicy":true}}}' --type=merge
IP Range-Based Access Control
IP range-based control is simple. You just need to specify the type of access source as IPRange and specify the IP address of the access source. As the application curl is redeployed, its IP address needs to be retrieved (perhaps you have discovered the drawbacks of IP range-based access control).
curl_pod_ip="$(kubectl get pod -n curl -l app=curl -o jsonpath='{.items[0].status.podIP}')"
Plaintext transfer
Data can be transferred in plaintext or with two-way TLS encryption. Plaintext transfer is relatively simple, so let’s demonstrate the plaintext transfer scenario first.
kubectl apply -f - <<EOF
kind: AccessControl
apiVersion: policy.flomesh.io/v1alpha1
metadata:
name: httpbin
namespace: httpbin
spec:
backends:
- name: httpbin
port:
number: 14001 # targetPort of httpbin service
protocol: http
sources:
- kind: IPRange
name: ${curl_pod_ip}/32
- kind: AuthenticatedPrincipal
name: curl.curl.cluster.local
EOF
Send the request again for testing.
kubectl exec "$(kubectl get pod -n curl -l app=curl -o jsonpath='{.items..metadata.name}')" -n curl -- curl -sI http://httpbin.httpbin:14001/get
#Response as below
HTTP/2 200
server: gunicorn/19.9.0
date: Mon, 07 Nov 2022 10:58:55 GMT
content-type: application/json
content-length: 267
access-control-allow-origin: *
access-control-allow-credentials: true
fsm-stats-namespace: httpbin
fsm-stats-kind: Deployment
fsm-stats-name: httpbin
fsm-stats-pod: httpbin-69dc7d545c-qphrh
Remember to execute kubectl delete accesscontrol httpbin -n httpbin to clean up the policy.
The previous ones we used were plaintext transfers, next we look at encrypted transfers.
Encrypted transfers
The default access policy certificate feature is off, turn it on by executing the following command.
kubectl patch meshconfig fsm-mesh-config -n "$FSM_NAMESPACE" -p '{"spec":{"featureFlags":{"enableAccessCertPolicy":true}}}' --type=merge
Create AccessCert for the access source to assign a certificate for data encryption. The controller will store the certificate information in Secret curl-mtls-secret under the namespace curl, and here also assign SAN curl.curl.cluster.local for the access source.
kubectl apply -f - <<EOF
kind: AccessCert
apiVersion: policy.flomesh.io/v1alpha1
metadata:
name: curl-mtls-cert
namespace: httpbin
spec:
subjectAltNames:
- curl.curl.cluster.local
secret:
name: curl-mtls-secret
namespace: curl
EOF
Redeploy curl and mount the system-assigned Secret to the pod.
kubectl apply -n curl -f - <<EOF
apiVersion: apps/v1
kind: Deployment
metadata:
name: curl
spec:
replicas: 1
selector:
matchLabels:
app: curl
template:
metadata:
labels:
app: curl
spec:
serviceAccountName: curl
containers:
- image: curlimages/curl
imagePullPolicy: IfNotPresent
name: curl
command: ["sleep", "365d"]
volumeMounts:
- name: curl-mtls-secret
mountPath: "/certs"
readOnly: true
volumes:
- name: curl-mtls-secret
secret:
secretName: curl-mtls-secret
EOF
6.5 - Cert-manager Certificate Provider
This guide demonstrates the usage of cert-manager as a certificate provider to manage and issue certificates in FSM.
Prerequisites
- Kubernetes cluster running Kubernetes v1.19.0 or greater.
- Have
kubectlavailable to interact with the API server. - Have
fsmCLI available for installing and managing the service mesh.
Demo
The following demo uses cert-manager as the certificate provider to issue certificates to the curl and httpbin applications communicating over Mutual TLS (mTLS) in an FSM managed service mesh.
Install
cert-manager. This demo usescert-manager v1.6.1.kubectl apply -f https://github.com/jetstack/cert-manager/releases/download/v1.6.1/cert-manager.yamlConfirm the pods are ready and running in the
cert-managernamespace.kubectl get pod -n cert-manager NAME READY STATUS RESTARTS AGE cert-manager-55658cdf68-pdnzg 1/1 Running 0 2m33s cert-manager-cainjector-967788869-prtjq 1/1 Running 0 2m33s cert-manager-webhook-6668fbb57d-vzm4j 1/1 Running 0 2m33sConfigure
cert-managerIssuerandCertificateresources required bycert-managerto be able to issue certificates in FSM. These resources must be created in the namespace where FSM will be installed later.Note:
cert-managermust first be installed, with an issuer ready, before FSM can be installed usingcert-manageras the certificate provider.Create the namespace where FSM will be installed.
export FSM_NAMESPACE=fsm-system # Replace fsm-system with the namespace where FSM is installed kubectl create namespace "$FSM_NAMESPACE"Next, we use a
SelfSignedissuer to bootstrap a custom root certificate. This will create aSelfSignedissuer, issue a root certificate, and use that root as aCAissuer for certificates issued to workloads within the mesh.# Create Issuer and Certificate resources kubectl apply -f - <<EOF apiVersion: cert-manager.io/v1 kind: Issuer metadata: name: selfsigned namespace: "$FSM_NAMESPACE" spec: selfSigned: {} --- apiVersion: cert-manager.io/v1 kind: Certificate metadata: name: fsm-ca namespace: "$FSM_NAMESPACE" spec: isCA: true duration: 87600h # 365 days secretName: fsm-ca-bundle commonName: fsm-system issuerRef: name: selfsigned kind: Issuer group: cert-manager.io --- apiVersion: cert-manager.io/v1 kind: Issuer metadata: name: fsm-ca namespace: "$FSM_NAMESPACE" spec: ca: secretName: fsm-ca-bundle EOFConfirm the
fsm-ca-bundleCA secret is created bycert-managerin FSM’s namespace.kubectl get secret fsm-ca-bundle -n "$FSM_NAMESPACE" NAME TYPE DATA AGE fsm-ca-bundle kubernetes.io/tls 3 84sThe CA certificate saved in this secret will be used by FSM upon install to bootstrap its ceritifcate provider utility.
Install FSM with its certificate provider kind set to
cert-manager.fsm install --set fsm.certificateProvider.kind="cert-manager"Confirm the FSM control plane pods are ready and running.
kubectl get pod -n "$FSM_NAMESPACE" NAME READY STATUS RESTARTS AGE fsm-bootstrap-7ddc6f9b85-k8ptp 1/1 Running 0 2m52s fsm-controller-79b777889b-mqk4g 1/1 Running 0 2m52s fsm-injector-5f96468fb7-p77ps 1/1 Running 0 2m52sEnable permissive traffic policy mode to set up automatic application connectivity.
Note: this is not a requirement to use
cert-managerbut simplifies the demo by not requiring explicit traffic policies for application connectivity.kubectl patch meshconfig fsm-mesh-config -n "$FSM_NAMESPACE" -p '{"spec":{"traffic":{"enablePermissiveTrafficPolicyMode":true}}}' --type=mergeDeploy the
httpbinservice into thehttpbinnamespace after enrolling its namespace to the mesh. Thehttpbinservice runs on port14001.# Create the httpbin namespace kubectl create namespace httpbin # Add the namespace to the mesh fsm namespace add httpbin # Deploy httpbin service in the httpbin namespace kubectl apply -f https://raw.githubusercontent.com/flomesh-io/fsm-docs/main/manifests/samples/httpbin/httpbin.yaml -n httpbinConfirm the
httpbinservice and pods are up and running.kubectl get svc -n httpbin NAME TYPE CLUSTER-IP EXTERNAL-IP PORT(S) AGE httpbin ClusterIP 10.96.198.23 <none> 14001/TCP 20skubectl get pods -n httpbin NAME READY STATUS RESTARTS AGE httpbin-5b8b94b9-lt2vs 2/2 Running 0 20sDeploy the
curlclient into thecurlnamespace after enrolling its namespace to the mesh.# Create the curl namespace kubectl create namespace curl # Add the namespace to the mesh fsm namespace add curl # Deploy curl client in the curl namespace kubectl apply -f https://raw.githubusercontent.com/flomesh-io/fsm-docs/main/manifests/samples/curl/curl.yaml -n curlConfirm the
curlclient pod is up and running.kubectl get pods -n curl NAME READY STATUS RESTARTS AGE curl-54ccc6954c-9rlvp 2/2 Running 0 20sConfirm the
curlclient is able to access thehttpbinservice on port14001.kubectl exec -n curl -ti "$(kubectl get pod -n curl -l app=curl -o jsonpath='{.items[0].metadata.name}')" -c curl -- curl -I http://httpbin.httpbin:14001 #Response as below HTTP/1.1 200 OK server: gunicorn/19.9.0 date: Mon, 04 Jul 2022 09:34:11 GMT content-type: text/html; charset=utf-8 content-length: 9593 access-control-allow-origin: * access-control-allow-credentials: true connection: keep-aliveA
200 OKresponse indicates the HTTP request from thecurlclient to thehttpbinservice was successful. The traffic between the application sidecar proxies is encrypted and authenticated usingMutual TLS (mTLS)by leverging the certificates issued by thecert-managercertificate provider.
7 - Observability
7.1 - Distributed Tracing Collaboration between FSM and OpenTelemetry
This doc shows you the example bring your own (BYO) tracing colloctor for distributed tracing. The OpenTelemetry Collector works as the tracing collector to aggregate spans and sinks to Jaeger (in this example) or other system.
Prerequisites
- Kubernetes cluster running Kubernetes v1.19.0 or greater.
- FSM installed on the Kubernetes cluster.
kubectlinstalled and access to the cluster’s API server.fsmCLI installed.
Jaeger
For the sake of demonstration, we use the jaegertracing/all-in-one image to deploy Jaeger here. This image includes components such as the Jaeger collector, memory storage, query service, and UI, making it very suitable for development and testing.
Enable support for OTLP (OpenTelemetry Protocol) through the environment variable COLLECTOR_OTLP_ENABLED.
kubectl apply -f - <<EOF
apiVersion: apps/v1
kind: Deployment
metadata:
name: jaeger
spec:
replicas: 1
selector:
matchLabels:
app: jaeger
template:
metadata:
labels:
app: jaeger
spec:
containers:
- name: jaeger
image: jaegertracing/all-in-one:latest
env:
- name: COLLECTOR_OTLP_ENABLED
value: "true"
ports:
- containerPort: 16686
- containerPort: 14268
---
apiVersion: v1
kind: Service
metadata:
name: jaeger
spec:
selector:
app: jaeger
type: ClusterIP
ports:
- name: ui
port: 16686
targetPort: 16686
- name: collector
port: 14268
targetPort: 14268
- name: http
protocol: TCP
port: 4318
targetPort: 4318
- name: grpc
protocol: TCP
port: 4317
targetPort: 4317
EOF
Install cert-manager
The Otel Operator relies on cert-manager for certificate management, and cert-manager needs to be installed before installing the operator.
kubectl apply -f https://github.com/cert-manager/cert-manager/releases/download/v1.13.2/cert-manager.yaml
Install OpenTelemetry Operator
Execute the following command to install Otel Operator.
kubectl apply -f https://github.com/open-telemetry/opentelemetry-operator/releases/latest/download/opentelemetry-operator.yaml
Configuring OpenTelemetry Collector
For detailed configuration of the Otel collector, refer to the official documentation.
- Receivers: configure
otlpto receive tracing information from applications, andzipkinto receive reports from sidecar, using endpoint0.0.0.0:9411. - Exporters: configure Jager’s otlp endpoint
jaeger.default:4317. - Pipeline services: use
otlpandzipkinas input sources, directing output to jaeger.
kubectl apply -f - <<EOF
apiVersion: opentelemetry.io/v1alpha1
kind: OpenTelemetryCollector
metadata:
name: otel
spec:
config: |
receivers:
zipkin:
endpoint: "0.0.0.0:9411"
exporters:
otlp/jaeger:
endpoint: "jaeger.default:4317"
tls:
insecure: true
service:
pipelines:
traces:
receivers: [zipkin]
exporters: [otlp/jaeger]
EOF
Update Mesh Configuration
In order to aggregate spans to OpenTelemetry Collector, we need to let mesh know the address of aggregator.
Following the FSM Tracing Doc, we can enable it during installation or update the configuration after installed.
kubectl patch meshconfig fsm-mesh-config -n fsm-system -p '{"spec":{"observability":{"tracing":{"enable":true,"address": "otel-collector.default","port":9411,"endpoint":"/api/v2/spans"}}}}' --type=merge
Deploy Sample Application
kubectl create namespace bookstore
kubectl create namespace bookbuyer
kubectl create namespace bookthief
kubectl create namespace bookwarehouse
fsm namespace add bookstore bookbuyer bookthief bookwarehouse
kubectl apply -f https://raw.githubusercontent.com/flomesh-io/fsm-docs/main/manifests/apps/bookbuyer.yaml
kubectl apply -f https://raw.githubusercontent.com/flomesh-io/fsm-docs/main/manifests/apps/bookthief.yaml
kubectl apply -f https://raw.githubusercontent.com/flomesh-io/fsm-docs/main/manifests/apps/bookstore.yaml
kubectl apply -f https://raw.githubusercontent.com/flomesh-io/fsm-docs/main/manifests/apps/bookwarehouse.yaml
kubectl apply -f https://raw.githubusercontent.com/flomesh-io/fsm-docs/main/manifests/apps/mysql.yaml
Check Tracing
Check the Jaeger UI and you will get the tracing data there.
jaeger_pod="$(kubectl get pod -l app=jaeger -o jsonpath='{.items[0].metadata.name}')" default ⎈
kubectl port-forward $jaeger_pod 16686:16686 &
7.2 - Integrate FSM with Prometheus and Grafana
The following article shows you how to create an example bring your own (BYO) Prometheus and Grafana stack on your cluster and configure that stack for observability and monitoring of FSM. For an example using an automatic provisioning of a Prometheus and Grafana stack with FSM, see the Observability getting started guide.
IMPORTANT: The configuration created in this article should not be used in production environments. For production-grade deployments, see Prometheus Operator and Deploy Grafana in Kubernetes.
Prerequisites
- Kubernetes cluster running Kubernetes v1.19.0 or greater.
- FSM installed on the Kubernetes cluster.
kubectlinstalled and access to the cluster’s API server.fsmCLI installed.helmCLI installed.
Deploy an example Prometheus instance
Use helm to deploy a Prometheus instance to your cluster in the default namespace.
helm repo add prometheus-community https://prometheus-community.github.io/helm-charts
helm repo update
helm install stable prometheus-community/prometheus
The output of the helm install command contains the DNS name of the Prometheus server. For example:
...
The Prometheus server can be accessed via port 80 on the following DNS name from within your cluster:
stable-prometheus-server.metrics.svc.cluster.local
...
Record this DNS name for use in a later step.
Configure Prometheus for FSM
Prometheus needs to be configured to scape the FSM endpoints and properly handle FSM’s labeling, relabelling, and endpoint configuration. This configuration also helps the FSM Grafana dashboards, which are configured in a later step, properly display the data scraped from FSM.
Use kubectl get configmap to verify the stable-prometheus-sever configmap has been created. For example:
kubectl get configmap
NAME DATA AGE
...
stable-prometheus-alertmanager 1 18m
stable-prometheus-server 5 18m
...
Create update-prometheus-configmap.yaml with the following:
apiVersion: v1
kind: ConfigMap
metadata:
name: stable-prometheus-server
data:
prometheus.yml: |
global:
scrape_interval: 15s
scrape_timeout: 15s
evaluation_interval: 30s
scrape_configs:
- job_name: 'kubernetes-apiservers'
kubernetes_sd_configs:
- role: endpoints
scheme: https
tls_config:
ca_file: /var/run/secrets/kubernetes.io/serviceaccount/ca.crt
# TODO need to remove this when the CA and SAN match
insecure_skip_verify: true
bearer_token_file: /var/run/secrets/kubernetes.io/serviceaccount/token
metric_relabel_configs:
- source_labels: [__name__]
regex: '(apiserver_watch_events_total|apiserver_admission_webhook_rejection_count)'
action: keep
relabel_configs:
- source_labels: [__meta_kubernetes_namespace, __meta_kubernetes_service_name, __meta_kubernetes_endpoint_port_name]
action: keep
regex: default;kubernetes;https
- job_name: 'kubernetes-nodes'
scheme: https
tls_config:
ca_file: /var/run/secrets/kubernetes.io/serviceaccount/ca.crt
bearer_token_file: /var/run/secrets/kubernetes.io/serviceaccount/token
kubernetes_sd_configs:
- role: node
relabel_configs:
- action: labelmap
regex: __meta_kubernetes_node_label_(.+)
- target_label: __address__
replacement: kubernetes.default.svc:443
- source_labels: [__meta_kubernetes_node_name]
regex: (.+)
target_label: __metrics_path__
replacement: /api/v1/nodes/${1}/proxy/metrics
- job_name: 'kubernetes-pods'
kubernetes_sd_configs:
- role: pod
metric_relabel_configs:
- source_labels: [__name__]
regex: '(sidecar_server_live|sidecar_cluster_health_check_.*|sidecar_cluster_upstream_rq_xx|sidecar_cluster_upstream_cx_active|sidecar_cluster_upstream_cx_tx_bytes_total|sidecar_cluster_upstream_cx_rx_bytes_total|sidecar_cluster_upstream_rq_total|sidecar_cluster_upstream_cx_destroy_remote_with_active_rq|sidecar_cluster_upstream_cx_connect_timeout|sidecar_cluster_upstream_cx_destroy_local_with_active_rq|sidecar_cluster_upstream_rq_pending_failure_eject|sidecar_cluster_upstream_rq_pending_overflow|sidecar_cluster_upstream_rq_timeout|sidecar_cluster_upstream_rq_rx_reset|^fsm.*)'
action: keep
relabel_configs:
- source_labels: [__meta_kubernetes_pod_annotation_prometheus_io_scrape]
action: keep
regex: true
- source_labels: [__meta_kubernetes_pod_annotation_prometheus_io_path]
action: replace
target_label: __metrics_path__
regex: (.+)
- source_labels: [__address__, __meta_kubernetes_pod_annotation_prometheus_io_port]
action: replace
regex: ([^:]+)(?::\d+)?;(\d+)
replacement: $1:$2
target_label: __address__
- source_labels: [__meta_kubernetes_namespace]
action: replace
target_label: source_namespace
- source_labels: [__meta_kubernetes_pod_name]
action: replace
target_label: source_pod_name
- regex: '(__meta_kubernetes_pod_label_app)'
action: labelmap
replacement: source_service
- regex: '(__meta_kubernetes_pod_label_fsm_sidecar_uid|__meta_kubernetes_pod_label_pod_template_hash|__meta_kubernetes_pod_label_version)'
action: drop
# for non-ReplicaSets (DaemonSet, StatefulSet)
# __meta_kubernetes_pod_controller_kind=DaemonSet
# __meta_kubernetes_pod_controller_name=foo
# =>
# workload_kind=DaemonSet
# workload_name=foo
- source_labels: [__meta_kubernetes_pod_controller_kind]
action: replace
target_label: source_workload_kind
- source_labels: [__meta_kubernetes_pod_controller_name]
action: replace
target_label: source_workload_name
# for ReplicaSets
# __meta_kubernetes_pod_controller_kind=ReplicaSet
# __meta_kubernetes_pod_controller_name=foo-bar-123
# =>
# workload_kind=Deployment
# workload_name=foo-bar
# deplyment=foo
- source_labels: [__meta_kubernetes_pod_controller_kind]
action: replace
regex: ^ReplicaSet$
target_label: source_workload_kind
replacement: Deployment
- source_labels:
- __meta_kubernetes_pod_controller_kind
- __meta_kubernetes_pod_controller_name
action: replace
regex: ^ReplicaSet;(.*)-[^-]+$
target_label: source_workload_name
- job_name: 'smi-metrics'
kubernetes_sd_configs:
- role: pod
relabel_configs:
- source_labels: [__meta_kubernetes_pod_annotation_prometheus_io_scrape]
action: keep
regex: true
- source_labels: [__meta_kubernetes_pod_annotation_prometheus_io_path]
action: replace
target_label: __metrics_path__
regex: (.+)
- source_labels: [__address__, __meta_kubernetes_pod_annotation_prometheus_io_port]
action: replace
regex: ([^:]+)(?::\d+)?;(\d+)
replacement: $1:$2
target_label: __address__
metric_relabel_configs:
- source_labels: [__name__]
regex: 'sidecar_.*fsm_request_(total|duration_ms_(bucket|count|sum))'
action: keep
- source_labels: [__name__]
action: replace
regex: sidecar_response_code_(\d{3})_source_namespace_.*_source_kind_.*_source_name_.*_source_pod_.*_destination_namespace_.*_destination_kind_.*_destination_name_.*_destination_pod_.*_fsm_request_total
target_label: response_code
- source_labels: [__name__]
action: replace
regex: sidecar_response_code_\d{3}_source_namespace_(.*)_source_kind_.*_source_name_.*_source_pod_.*_destination_namespace_.*_destination_kind_.*_destination_name_.*_destination_pod_.*_fsm_request_total
target_label: source_namespace
- source_labels: [__name__]
action: replace
regex: sidecar_response_code_\d{3}_source_namespace_.*_source_kind_(.*)_source_name_.*_source_pod_.*_destination_namespace_.*_destination_kind_.*_destination_name_.*_destination_pod_.*_fsm_request_total
target_label: source_kind
- source_labels: [__name__]
action: replace
regex: sidecar_response_code_\d{3}_source_namespace_.*_source_kind_.*_source_name_(.*)_source_pod_.*_destination_namespace_.*_destination_kind_.*_destination_name_.*_destination_pod_.*_fsm_request_total
target_label: source_name
- source_labels: [__name__]
action: replace
regex: sidecar_response_code_\d{3}_source_namespace_.*_source_kind_.*_source_name_.*_source_pod_(.*)_destination_namespace_.*_destination_kind_.*_destination_name_.*_destination_pod_.*_fsm_request_total
target_label: source_pod
- source_labels: [__name__]
action: replace
regex: sidecar_response_code_\d{3}_source_namespace_.*_source_kind_.*_source_name_.*_source_pod_.*_destination_namespace_(.*)_destination_kind_.*_destination_name_.*_destination_pod_.*_fsm_request_total
target_label: destination_namespace
- source_labels: [__name__]
action: replace
regex: sidecar_response_code_\d{3}_source_namespace_.*_source_kind_.*_source_name_.*_source_pod_.*_destination_namespace_.*_destination_kind_(.*)_destination_name_.*_destination_pod_.*_fsm_request_total
target_label: destination_kind
- source_labels: [__name__]
action: replace
regex: sidecar_response_code_\d{3}_source_namespace_.*_source_kind_.*_source_name_.*_source_pod_.*_destination_namespace_.*_destination_kind_.*_destination_name_(.*)_destination_pod_.*_fsm_request_total
target_label: destination_name
- source_labels: [__name__]
action: replace
regex: sidecar_response_code_\d{3}_source_namespace_.*_source_kind_.*_source_name_.*_source_pod_.*_destination_namespace_.*_destination_kind_.*_destination_name_.*_destination_pod_(.*)_fsm_request_total
target_label: destination_pod
- source_labels: [__name__]
action: replace
regex: .*(fsm_request_total)
target_label: __name__
- source_labels: [__name__]
action: replace
regex: sidecar_source_namespace_(.*)_source_kind_.*_source_name_.*_source_pod_.*_destination_namespace_.*_destination_kind_.*_destination_name_.*_destination_pod_.*_fsm_request_duration_ms_(bucket|sum|count)
target_label: source_namespace
- source_labels: [__name__]
action: replace
regex: sidecar_source_namespace_.*_source_kind_(.*)_source_name_.*_source_pod_.*_destination_namespace_.*_destination_kind_.*_destination_name_.*_destination_pod_.*_fsm_request_duration_ms_(bucket|sum|count)
target_label: source_kind
- source_labels: [__name__]
action: replace
regex: sidecar_source_namespace_.*_source_kind_.*_source_name_(.*)_source_pod_.*_destination_namespace_.*_destination_kind_.*_destination_name_.*_destination_pod_.*_fsm_request_duration_ms_(bucket|sum|count)
target_label: source_name
- source_labels: [__name__]
action: replace
regex: sidecar_source_namespace_.*_source_kind_.*_source_name_.*_source_pod_(.*)_destination_namespace_.*_destination_kind_.*_destination_name_.*_destination_pod_.*_fsm_request_duration_ms_(bucket|sum|count)
target_label: source_pod
- source_labels: [__name__]
action: replace
regex: sidecar_source_namespace_.*_source_kind_.*_source_name_.*_source_pod_.*_destination_namespace_(.*)_destination_kind_.*_destination_name_.*_destination_pod_.*_fsm_request_duration_ms_(bucket|sum|count)
target_label: destination_namespace
- source_labels: [__name__]
action: replace
regex: sidecar_source_namespace_.*_source_kind_.*_source_name_.*_source_pod_.*_destination_namespace_.*_destination_kind_(.*)_destination_name_.*_destination_pod_.*_fsm_request_duration_ms_(bucket|sum|count)
target_label: destination_kind
- source_labels: [__name__]
action: replace
regex: sidecar_source_namespace_.*_source_kind_.*_source_name_.*_source_pod_.*_destination_namespace_.*_destination_kind_.*_destination_name_(.*)_destination_pod_.*_fsm_request_duration_ms_(bucket|sum|count)
target_label: destination_name
- source_labels: [__name__]
action: replace
regex: sidecar_source_namespace_.*_source_kind_.*_source_name_.*_source_pod_.*_destination_namespace_.*_destination_kind_.*_destination_name_.*_destination_pod_(.*)_fsm_request_duration_ms_(bucket|sum|count)
target_label: destination_pod
- source_labels: [__name__]
action: replace
regex: .*(fsm_request_duration_ms_(bucket|sum|count))
target_label: __name__
- job_name: 'kubernetes-cadvisor'
scheme: https
tls_config:
ca_file: /var/run/secrets/kubernetes.io/serviceaccount/ca.crt
bearer_token_file: /var/run/secrets/kubernetes.io/serviceaccount/token
kubernetes_sd_configs:
- role: node
metric_relabel_configs:
- source_labels: [__name__]
regex: '(container_cpu_usage_seconds_total|container_memory_rss)'
action: keep
relabel_configs:
- action: labelmap
regex: __meta_kubernetes_node_label_(.+)
- target_label: __address__
replacement: kubernetes.default.svc:443
- source_labels: [__meta_kubernetes_node_name]
regex: (.+)
target_label: __metrics_path__
replacement: /api/v1/nodes/${1}/proxy/metrics/cadvisor
Use kubectl apply to update the Prometheus server configmap.
kubectl apply -f update-prometheus-configmap.yaml
Verify Prometheus is able to scrape the FSM mesh and API endpoints by using kubectl port-forward to forward the traffic between the Prometheus management application and your development computer.
export POD_NAME=$(kubectl get pods -l "app=prometheus,component=server" -o jsonpath="{.items[0].metadata.name}")
kubectl port-forward $POD_NAME 9090
Open a web browser to http://localhost:9090/targets to access the Prometheus management application and verify the endpoints are connected, up, and scrapping is running.

Stop the port-forwarding command.
Deploying a Grafana Instance
Use helm to deploy a Grafana instance to your cluster in the default namespace.
helm repo add grafana https://grafana.github.io/helm-charts
helm repo update
helm install grafana/grafana --generate-name
Use kubectl get secret to display the administrator password for Grafana.
export SECRET_NAME=$(kubectl get secret -l "app.kubernetes.io/name=grafana" -o jsonpath="{.items[0].metadata.name}")
kubectl get secret $SECRET_NAME -o jsonpath="{.data.admin-password}" | base64 --decode ; echo
Use kubectl port-forward to forward the traffic between the Grafana’s management application and your development computer.
export POD_NAME=$(kubectl get pods -l "app.kubernetes.io/name=grafana" -o jsonpath="{.items[0].metadata.name}")
kubectl port-forward $POD_NAME 3000
Open a web browser to http://localhost:3000 to access the Grafana’s management application. Use admin as the username and administrator password from the previous step. and verify the endpoints are connected, up, and scrapping is running.
From the management application:
- Select
SettingsthenData Sources. - Select
Add data source. - Find the
Prometheusdata source and selectSelect. - Enter the DNS name, for example
stable-prometheus-server.default.svc.cluster.local, from the earlier step inURL.
Select Save and Test and confirm you see Data source is working.
Importing FSM Dashboards
FSM Dashboards are available through FSM GitHub repository, which can be imported as json blobs on the management application.
To import a dashboard:
- Hover your cursor over the
+and selectImport. - Copy the JSON from the fsm-mesh-sidecar-details dashboard and paste it in
Import via panel json. - Select
Load. - Select
Import.
Confirm you see a Mesh and Sidecar Details dashboard created.
8 - Extending FSM with Plugins
8.1 - Identity and Access Management
In this demonstration, we will extend the IAM (Identity and Access Management) feature for the service mesh to enhance the security of the service. When service A accesses service B, it will carry the obtained token. After receiving the request, service B verifies the token through the authentication service, and based on the verification result, decides whether to serve the request or not.
Two plugins are required here:
token-injectorto inject the token into the request from service Atoken-verifyerto verify the identity of the request accessing service B.
Both of them handle outbound and inbound traffic, respectively.
Corresponding to this are two PluginChains:
token-injector-chaintoken-verifier-chain
Prerequisites
- Kubernetes cluster running Kubernetes v1.19.0 or greater.
- Have fsm installed.
- Have
kubectlavailable to interact with the API server. - Have
fsmCLI available for managing the service mesh. - Have
jqcommand available.
Deploy demo services
kubectl create namespace curl
fsm namespace add curl
kubectl apply -n curl -f https://raw.githubusercontent.com/flomesh-io/fsm-docs/main/manifests/samples/curl/curl.yaml
kubectl create namespace httpbin
fsm namespace add httpbin
kubectl apply -n httpbin -f https://raw.githubusercontent.com/flomesh-io/fsm-docs/main/manifests/samples/httpbin/httpbin.yaml
sleep 2
kubectl wait --for=condition=ready pod -n curl -l app=curl --timeout=90s
kubectl wait --for=condition=ready pod -n httpbin -l app=httpbin --timeout=90s
curl_pod=`kubectl get pod -n curl -l app=curl -o jsonpath='{.items..metadata.name}'`
httpbin_pod=`kubectl get pod -n httpbin -l app=httpbin -o jsonpath='{.items..metadata.name}'`
To view the content of the plugin chains for both services. The built-in plugins are located in the modules directory.
These built-in plugins are native functions provided by the service mesh and are not configured through plugin mechanism, but can be overridden via
pluginmechanism.
fsm proxy get config_dump -n curl $curl_pod | jq '.Chains."outbound-http"'
[
"modules/outbound-http-routing.js",
"modules/outbound-metrics-http.js",
"modules/outbound-tracing-http.js",
"modules/outbound-logging-http.js",
"modules/outbound-circuit-breaker.js",
"modules/outbound-http-load-balancing.js",
"modules/outbound-http-default.js"
]
fsm proxy get config_dump -n httpbin $httpbin_pod | jq '.Chains."inbound-http"'
[
"modules/inbound-tls-termination.js",
"modules/inbound-http-routing.js",
"modules/inbound-metrics-http.js",
"modules/inbound-tracing-http.js",
"modules/inbound-logging-http.js",
"modules/inbound-throttle-service.js",
"modules/inbound-throttle-route.js",
"modules/inbound-http-load-balancing.js",
"modules/inbound-http-default.js"
]
Test communication between the applications.
kubectl exec $curl_pod -n curl -c curl -- curl -Is http://httpbin.httpbin:14001/get
HTTP/1.1 200 OK
server: gunicorn/19.9.0
date: Sun, 05 Feb 2023 05:42:51 GMT
content-type: application/json
content-length: 304
access-control-allow-origin: *
access-control-allow-credentials: true
connection: keep-alive
Deploy authentication service
Deploy a standalone authentication service to authenticate requests and return 200 or 401. For simplicity, here we have hard-coded a valid token as 2f1acc6c3a606b082e5eef5e54414ffb
kubectl create namespace auth
kubectl apply -n auth -f - <<EOF
apiVersion: apps/v1
kind: Deployment
metadata:
labels:
app: ext-auth
name: ext-auth
spec:
replicas: 1
selector:
matchLabels:
app: ext-auth
strategy: {}
template:
metadata:
creationTimestamp: null
labels:
app: ext-auth
spec:
containers:
- command:
- pipy
- -e
- |2-
pipy({
_acceptTokens: ['2f1acc6c3a606b082e5eef5e54414ffb'],
_allow: false,
})
// Pipeline layouts go here, e.g.:
.listen(8079)
.demuxHTTP().to($ => $
.handleMessageStart(
msg => ((token = msg?.head?.headers?.['x-iam-token']) =>
_allow = token && _acceptTokens?.find(el => el == token)
)()
)
.branch(() => _allow, $ => $.replaceMessage(new Message({ status: 200 })),
$ => $.replaceMessage(new Message({ status: 401 }))
)
)
image: flomesh/pipy:latest
name: pipy
resources: {}
---
apiVersion: v1
kind: Service
metadata:
labels:
app: ext-auth
name: ext-auth
spec:
ports:
- port: 8079
protocol: TCP
targetPort: 8079
selector:
app: ext-auth
EOF
Enable plugin policy mode
To enable plugin policy, the mesh configuration needs to be modified as plugin policies are not enabled by default.
export fsm_namespace=fsm-system
kubectl patch meshconfig fsm-mesh-config -n "$fsm_namespace" -p '{"spec":{"featureFlags":{"enablePluginPolicy":true}}}' --type=merge
Declaring a plugin
Plugin token-injector:
metadata.name: the name of the plugin, which is also the name of the plugin script. For example, this plugin will be saved astoken-injector.jsstored in the plugins directory of the code repository.spec.pipyscript: the PipyJS script content, which is the functional logic code, stored in the script fileplugins/token-injector.js. Context metadata that is built-in to the system can be used within the script.spec.priority: the priority of the plugin, with optional values of 0-65535. The higher the value, the higher the priority, and the earlier the plugin is positioned in the plugin chain. The value here is115, which, based on the built-in plugin list in Helm values.yaml, will be positioned betweenmodules/outbound-circuit-breaker.jsandmodules/outbound-http-load-balancing.js, executed after the circuit breaker logic is processed and before the load balancer forwards to the upstream.
kubectl apply -f - <<EOF
kind: Plugin
apiVersion: plugin.flomesh.io/v1alpha1
metadata:
name: token-injector
spec:
priority: 115
pipyscript: |+
(
pipy({
_pluginName: '',
_pluginConfig: null,
_accessToken: null,
})
.import({
__service: 'outbound-http-routing',
})
.pipeline()
.onStart(
() => void (
_pluginName = __filename.slice(9, -3),
_pluginConfig = __service?.Plugins?.[_pluginName],
_accessToken = _pluginConfig?.AccessToken
)
)
.handleMessageStart(
msg => _accessToken && (msg.head.headers['x-iam-token'] = _accessToken)
)
.chain()
)
EOF
Plugin token-verifier
kubectl apply -f - <<EOF
kind: Plugin
apiVersion: plugin.flomesh.io/v1alpha1
metadata:
name: token-verifier
spec:
priority: 115
pipyscript: |+
(
pipy({
_pluginName: '',
_pluginConfig: null,
_verifier: null,
_authPaths: null,
_authRequred: false,
_authSuccess: undefined,
})
.import({
__service: 'inbound-http-routing',
})
.pipeline()
.onStart(
() => void (
_pluginName = __filename.slice(9, -3),
_pluginConfig = __service?.Plugins?.[_pluginName],
_verifier = _pluginConfig?.Verifier,
_authPaths = _pluginConfig?.Paths && _pluginConfig.Paths?.length > 0 && (
new algo.URLRouter(Object.fromEntries(_pluginConfig.Paths.map(path => [path, true])))
)
)
)
.handleMessageStart(
msg => _authRequred = (_verifier && _authPaths?.find(msg.head.headers.host, msg.head.path))
)
.branch(
() => _authRequred, (
$ => $
.fork().to($ => $
.muxHTTP().to($ => $.connect(()=> _verifier))
.handleMessageStart(
msg => _authSuccess = (msg.head.status == 200)
)
)
.wait(() => _authSuccess !== undefined)
.branch(() => _authSuccess, $ => $.chain(),
$ => $.replaceMessage(
() => new Message({ status: 401 }, 'Unauthorized!')
)
)
),
$ => $.chain()
)
)
EOF
Setting up plugin-chain
plugin chain token-injector-chain:
metadata.name: name of plugin chain resourcetoken-injector-chainspec.chainsname: name of the plugin chain, one of the 4 plugin chains, here it is outbound-http which is the HTTP protocol processing stage for outbound traffic.plugins: list of plugins to be inserted into the plugin chain, heretoken-injectoris inserted into the plugin chain.
spec.selectors: target of the plugin chain, using Kubernetes label selector scheme.podSelector: pod selector, selects pods with labelapp=curl.namespaceSelector: namespace selector, selects namespaces managed by the mesh, i.e.,flomesh.io/monitored-by=fsm.
kubectl apply -n curl -f - <<EOF
kind: PluginChain
apiVersion: plugin.flomesh.io/v1alpha1
metadata:
name: token-injector-chain
spec:
chains:
- name: outbound-http
plugins:
- token-injector
selectors:
podSelector:
matchLabels:
app: curl
matchExpressions:
- key: app
operator: In
values: ["curl"]
namespaceSelector:
matchExpressions:
- key: flomesh.io/monitored-by
operator: In
values: ["fsm"]
EOF
plugin chain token-verifier-chain:
kubectl apply -n httpbin -f - <<EOF
kind: PluginChain
apiVersion: plugin.flomesh.io/v1alpha1
metadata:
name: token-verifier-chain
spec:
chains:
- name: inbound-http
plugins:
- token-verifier
selectors:
podSelector:
matchLabels:
app: httpbin
namespaceSelector:
matchExpressions:
- key: flomesh.io/monitored-by
operator: In
values: ["fsm"]
EOF
After applying the plugin chain configuration, the plugin chains of the two applications can be viewed now. From the results, we can see the two plugins located in the plugins directory. Our declared plugins have been configured in the two applications through the configuration of the plugin chain.
fsm proxy get config_dump -n curl $curl_pod | jq '.Chains."outbound-http"'
[
"modules/outbound-http-routing.js",
"modules/outbound-metrics-http.js",
"modules/outbound-tracing-http.js",
"modules/outbound-logging-http.js",
"modules/outbound-circuit-breaker.js",
"plugins/token-injector.js",
"modules/outbound-http-load-balancing.js",
"modules/outbound-http-default.js"
]
fsm proxy get config_dump -n httpbin $httpbin_pod | jq '.Chains."inbound-http"'
[
"modules/inbound-tls-termination.js",
"modules/inbound-http-routing.js",
"modules/inbound-metrics-http.js",
"modules/inbound-tracing-http.js",
"modules/inbound-logging-http.js",
"modules/inbound-throttle-service.js",
"modules/inbound-throttle-route.js",
"plugins/token-verifier.js",
"modules/inbound-http-load-balancing.js",
"modules/inbound-http-default.js"
]
After applying the plugin configuration, but we haven’t yet make changes to plugin configuration, the application curl can still access httpbin.
kubectl exec $curl_pod -n curl -c curl -- curl -Is http://httpbin.httpbin:14001/get
HTTP/1.1 200 OK
server: gunicorn/19.9.0
date: Sun, 05 Feb 2023 06:34:33 GMT
content-type: application/json
content-length: 304
access-control-allow-origin: *
access-control-allow-credentials: true
connection: keep-alive
Setting up plugin configuration
We will first apply the configuration of the plugin token-verifier. Here, the authentication service ext-auth.auth:8079 and the request /get that needs to be authenticated are configured.
spec.configcontains the contents of the plugin configuration, which will be converted to JSON format. For example, the configuration applied to thetoken-verifierplugin exists in the following JSON form:{ "Plugins": { "token-verifier": { "Paths": [ "/get" ], "Verifier": "ext-auth.auth:8079" } } }
kubectl apply -n httpbin -f - <<EOF
kind: PluginConfig
apiVersion: plugin.flomesh.io/v1alpha1
metadata:
name: token-verifier-config
spec:
config:
Verifier: 'ext-auth.auth:8079'
Paths:
- "/get"
plugin: token-verifier
destinationRefs:
- kind: Service
name: httpbin
namespace: httpbin
EOF
At this time, the application curl cannot access the httbin /get path because a access token has not been configured for curl yet.
kubectl exec $curl_pod -n curl -c curl -- curl -Is http://httpbin.httpbin:14001/get
HTTP/1.1 401 Unauthorized
content-length: 13
connection: keep-alive
But accessing /headers path doesn’t require any authentication.
kubectl exec $curl_pod -n curl -c curl -- curl -Is http://httpbin.httpbin:14001/headers
HTTP/1.1 200 OK
server: gunicorn/19.9.0
date: Sun, 05 Feb 2023 06:37:05 GMT
content-type: application/json
content-length: 217
access-control-allow-origin: *
access-control-allow-credentials: true
connection: keep-alive
Next, the configuration of the plugin token-injector is applied to configure the access token 2f1acc6c3a606b082e5eef5e54414ffb for the application’s requests. This token is also a valid token hardcoded in the authentication service.
kubectl apply -n curl -f - <<EOF
kind: PluginConfig
apiVersion: plugin.flomesh.io/v1alpha1
metadata:
name: token-injector-config
spec:
config:
AccessToken: '2f1acc6c3a606b082e5eef5e54414ffb'
plugin: token-injector
destinationRefs:
- kind: Service
name: httpbin
namespace: httpbin
EOF
After applying the configuration for the token-injector plugin, the requests from the curl application will now have the access token 2f1acc6c3a606b082e5eef5e54414ffb configured. As a result, when accessing the /get path of httpbin, the requests will pass authentication and be accepted by httpbin.
kubectl exec $curl_pod -n curl -c curl -- curl -Is http://httpbin.httpbin:14001/get
HTTP/1.1 200 OK
server: gunicorn/19.9.0
date: Sun, 05 Feb 2023 06:39:54 GMT
content-type: application/json
content-length: 360
access-control-allow-origin: *
access-control-allow-credentials: true
connection: keep-alive
8.2 - HTTP Header Modifier
In daily network interactions, HTTP headers play a very important role. They can pass various information about the request or response, such as authentication, cache control, content type, etc. This allows users to precisely control incoming and outgoing request and response headers to meet various security, performance and business needs.
FSM does not provide HTTP header control functionality out of box, but we can provide with Plugin Extending feature easily.
Enable plugin policy mode
To utilize plugin to extend mesh, we should enable the plugin policy mode first, because it’s disabled by default.
Execute the command below to enable it.
kubectl patch meshconfig fsm-mesh-config -n "$fsm_namespace" -p '{"spec":{"featureFlags":{"enablePluginPolicy":true}}}' --type=merge
Deploy sample application
Deploy client application:
# Create the curl namespace
kubectl create namespace curl
# Add the namespace to the mesh
fsm namespace add curl
# Deploy curl client in the curl namespace
kubectl apply -f https://raw.githubusercontent.com/flomesh-io/fsm-docs/main/manifests/samples/plugins/curl.yaml -n curl
Deploy service application:
# Create a namespace
kubectl create ns httpbin
# Add the namespace to the mesh
fsm namespace add httpbin
# Deploy the application
kubectl apply -f https://raw.githubusercontent.com/flomesh-io/fsm-docs/main/manifests/samples/httpbin/httpbin.yaml -n httpbin
Check the communication between apps.
curl_client="$(kubectl get pod -n curl -l app=curl -o jsonpath='{.items[0].metadata.name}')"
kubectl exec ${curl_client} -n curl -c curl -- curl -s http://httpbin.httpbin:14001/headers
Declaring a plugin
For header modification, we provide a script which can be applied with command bellow.
kubectl apply -f https://raw.githubusercontent.com/flomesh-io/fsm-docs/main/manifests/samples/plugins/header-modifier.yaml
Check the plugin declared or not.
kubectl get plugin
NAME AGE
header-modifier 5s
Setting up plugin-chain
Following the PluginChain API doc, the new plugin works in chain inbound-http and available on resources which is labelled by app=httpbin or app=curl in namespace monitored by mesh.
kubectl apply -f - <<EOF
kind: PluginChain
apiVersion: plugin.flomesh.io/v1alpha1
metadata:
name: header-modifier-chain
namespace: pipy
spec:
chains:
- name: inbound-http
plugins:
- header-modifier
selectors:
podSelector:
matchExpressions:
- key: app
operator: In
values:
- httpbin
- curl
namespaceSelector:
matchExpressions:
- key: flomesh.io/monitored-by
operator: In
values: ["fsm"]
EOF
Apply plugin configuration
Once applied Plugin and PluginChain, we need to configure it. In the command bellow, we make Service httpbin to modify HTTP headers for request owning header version=v2. When route matched, the plugin will remove header version and add a new header x-canary-tag=v2 from/in request, and add a new header x-carary=true in response.
kubectl apply -f - <<EOF
kind: PluginConfig
apiVersion: plugin.flomesh.io/v1alpha1
metadata:
name: header-modifier-config
namespace: httpbin
spec:
config:
Matches:
- Headers:
Exact:
version: 'v2'
Filters:
- Type: RequestHeaderModifier
RequestHeaderModifier:
Remove:
- version
Add:
- Name: x-canary-tag
Value: v2
- Type: ResponseHeaderModifier
ResponseHeaderModifier:
Add:
- Name: x-canary
Value: 'true'
plugin: header-modifier
destinationRefs:
- kind: Service
name: httpbin
namespace: httpbin
EOF
Testing
Let’s send a request again, but attach a header this time.
kubectl exec ${curl_client} -n curl -c curl -- curl -ksi http://httpbin.httpbin:14001/headers -H "version:v2"
In the request which httpbin received, the header version is removed and new header X-Canary-Tag appeared.
In response, we can get the new header x-canary.
HTTP/1.1 200 OK
server: gunicorn
date: Fri, 01 Dec 2023 10:37:14 GMT
content-type: application/json
access-control-allow-origin: *
access-control-allow-credentials: true
x-canary: true
content-length: 211
connection: keep-alive
{
"headers": {
"Accept": "*/*",
"Connection": "keep-alive",
"Host": "httpbin.httpbin:14001",
"Serviceidentity": "curl.curl",
"User-Agent": "curl/8.4.0",
"X-Canary-Tag": "v2"
}
}
8.3 - Fault Injection
Fault injection testing is a software testing technique that intentionally introduces errors into a system to verify its ability to handle and bounce back from error conditions. This testing method is usually performed before deployment to identify any possible faults that may have arisen during production. This demo demonstrates on how to implement Fault Injection functionality via a plugin.
Prerequisites
- Kubernetes cluster running Kubernetes v1.19.0 or greater.
- Have fsm installed.
- Have
kubectlavailable to interact with the API server. - Have
fsmCLI available for managing the service mesh.
Deploy demo services
kubectl create namespace curl
fsm namespace add curl
kubectl apply -n curl -f https://raw.githubusercontent.com/flomesh-io/fsm-docs/main/manifests/samples/plugins/curl.yaml
kubectl create namespace pipy
fsm namespace add pipy
kubectl apply -n pipy -f https://raw.githubusercontent.com/flomesh-io/fsm-docs/main/manifests/samples/plugins/pipy-ok.pipy.yaml
# Wait for pods to be up and ready
sleep 2
kubectl wait --for=condition=ready pod -n curl -l app=curl --timeout=180s
kubectl wait --for=condition=ready pod -n pipy -l app=pipy-ok -l version=v1 --timeout=180s
kubectl wait --for=condition=ready pod -n pipy -l app=pipy-ok -l version=v2 --timeout=180s
Enable plugin policy mode
kubectl patch meshconfig fsm-mesh-config -n "$fsm_namespace" -p '{"spec":{"featureFlags":{"enablePluginPolicy":true}}}' --type=merge
Declaring a plugin
kubectl apply -f https://raw.githubusercontent.com/flomesh-io/fsm-docs/main/manifests/samples/plugins/fault-injection.yaml
Setting up plugin-chain
kubectl apply -f - <<EOF
kind: PluginChain
apiVersion: plugin.flomesh.io/v1alpha1
metadata:
name: http-fault-injection-chain
namespace: pipy
spec:
chains:
- name: inbound-http
plugins:
- http-fault-injection
selectors:
podSelector:
matchLabels:
app: pipy-ok
matchExpressions:
- key: app
operator: In
values: ["pipy-ok"]
namespaceSelector:
matchExpressions:
- key: flomesh.io/monitored-by
operator: In
values: ["fsm"]
EOF
Setting up plugin configuration
In below configuration, we need to have either of delay or abort
kubectl apply -f - <<EOF
kind: PluginConfig
apiVersion: plugin.flomesh.io/v1alpha1
metadata:
name: http-fault-injection-config
namespace: pipy
spec:
config:
delay:
percentage:
value: 0.5
fixedDelay: 5s
abort:
percentage:
value: 0.5
httpStatus: 400
plugin: http-fault-injection
destinationRefs:
- kind: Service
name: pipy-ok
namespace: pipy
EOF
Test
Use the below command to perform a test
curl_client="$(kubectl get pod -n curl -l app=curl -o jsonpath='{.items[0].metadata.name}')"
date; kubectl exec ${curl_client} -n curl -c curl -- curl -ksi http://pipy-ok.pipy:8080 ; echo ""; date
Run the above command a few times, and you will see that after a few more visits, and there is approximately a 50% chance of receiving the following result (HTTP status code 400, with a delay of 5 seconds).
Thu Mar 30 06:47:58 UTC 2023
HTTP/1.1 400 Bad Request
content-length: 0
connection: keep-alive
Thu Mar 30 06:48:04 UTC 2023
8.4 - Traffic Mirroring
Traffic mirroring, also known as shadowing, is a technique used to test new versions of an application in a safe and efficient manner. It involves creating a mirrored service that receives a copy of live traffic for testing and troubleshooting purposes. This approach is especially useful for acceptance testing, as it can help identify issues in advance, before they impact end-users.
One of the key benefits of traffic mirroring is that it occurs outside the primary request path for the main service. This means that end-users are not affected by any changes or issues that may occur during the testing process. As such, traffic mirroring is a powerful and low-risk approach for validating new versions of an application.
By using traffic mirroring, you can get valuable insights into how your application will perform in a live environment, without putting your users at risk. This approach can help you identify and address issues quickly and efficiently, which can ultimately improve the overall performance and reliability of your application.
Prerequisites
- Kubernetes cluster running Kubernetes v1.19.0 or greater.
- Have fsm installed.
- Have
kubectlavailable to interact with the API server. - Have
fsmCLI available for managing the service mesh.
Deploy demo services
kubectl create namespace curl
fsm namespace add curl
kubectl apply -n curl -f https://raw.githubusercontent.com/flomesh-io/fsm-docs/main/manifests/samples/plugins/curl.yaml
kubectl create namespace pipy
fsm namespace add pipy
kubectl apply -n pipy -f https://raw.githubusercontent.com/flomesh-io/fsm-docs/main/manifests/samples/plugins/pipy-ok.pipy.yaml
# Wait for pods to be up and ready
sleep 2
kubectl wait --for=condition=ready pod -n curl -l app=curl --timeout=180s
kubectl wait --for=condition=ready pod -n pipy -l app=pipy-ok -l version=v1 --timeout=180s
kubectl wait --for=condition=ready pod -n pipy -l app=pipy-ok -l version=v2 --timeout=180s
Enable plugin policy mode
kubectl patch meshconfig fsm-mesh-config -n "$fsm_namespace" -p '{"spec":{"featureFlags":{"enablePluginPolicy":true}}}' --type=merge
Declaring a plugin
kubectl apply -f https://raw.githubusercontent.com/flomesh-io/fsm-docs/main/manifests/samples/plugins/traffic-mirror.yaml
Setting up plugin-chain
kubectl apply -f - <<EOF
kind: PluginChain
apiVersion: plugin.flomesh.io/v1alpha1
metadata:
name: traffic-mirror-chain
namespace: pipy
spec:
chains:
- name: outbound-http
plugins:
- traffic-mirror
selectors:
podSelector:
matchLabels:
app: curl
matchExpressions:
- key: app
operator: In
values: ["curl"]
namespaceSelector:
matchExpressions:
- key: flomesh.io/monitored-by
operator: In
values: ["fsm"]
EOF
Setting up plugin configuration
kubectl apply -f - <<EOF
kind: PluginConfig
apiVersion: plugin.flomesh.io/v1alpha1
metadata:
name: traffic-mirror-config
namespace: curl
spec:
config:
namespace: pipy
service: pipy-ok-v2
port: 8080
percentage:
value: 1.0
plugin: traffic-mirror
destinationRefs:
- kind: Service
name: pipy-ok-v1
namespace: pipy
EOF
Test
Use the below command to perform a test
curl_client="$(kubectl get pod -n curl -l app=curl -o jsonpath='{.items[0].metadata.name}')"
kubectl exec ${curl_client} -n curl -c curl -- curl -ksi http://pipy-ok-v1.pipy:8080
Accessing service pipy-ok-v1 should be mirrored to pipy-ok-v2, so we should be seeing access logs in both services.
Testing pipy-ok-v1 logs
pipy_ok_v1="$(kubectl get pod -n pipy -l app=pipy-ok,version=v1 -o jsonpath='{.items[0].metadata.name}')"
kubectl logs pod/${pipy_ok_v1} -n pipy -c pipy
You will see something similar
[2023-03-29 08:41:04 +0000] [1] [INFO] Starting gunicorn 19.9.0
[2023-03-29 08:41:04 +0000] [1] [INFO] Listening at: http://0.0.0.0:8080 (1)
[2023-03-29 08:41:04 +0000] [1] [INFO] Using worker: sync
[2023-03-29 08:41:04 +0000] [14] [INFO] Booting worker with pid: 14
127.0.0.6 - - [29/Mar/2023:08:45:35 +0000] "GET / HTTP/1.1" 200 9593 "-" "curl/7.85.0-DEV"
Testing pipy-ok-v2 logs
pipy_ok_v2="$(kubectl get pod -n pipy -l app=pipy-ok,version=v2 -o jsonpath='{.items[0].metadata.name}')"
kubectl logs pod/${pipy_ok_v2} -n pipy -c pipy
You will see something similar
[2023-03-29 08:41:09 +0000] [1] [INFO] Starting gunicorn 19.9.0
[2023-03-29 08:41:09 +0000] [1] [INFO] Listening at: http://0.0.0.0:8080 (1)
[2023-03-29 08:41:09 +0000] [1] [INFO] Using worker: sync
[2023-03-29 08:41:09 +0000] [15] [INFO] Booting worker with pid: 15
127.0.0.6 - - [29/Mar/2023:08:45:35 +0000] "GET / HTTP/1.1" 200 9593 "-" "curl/7.85.0-DEV"
8.5 - Cross-Origin Resource Sharing (CORS)
CORS stands for Cross-Origin Resource Sharing. It is a security feature implemented by web browsers to prevent web pages from making requests to a different domain than the one that served the web page.
The same-origin policy is a security feature that allows web pages to access resources only from the same origin, which includes the same domain, protocol, and port number. This policy is designed to protect users from malicious scripts that can steal sensitive data from other websites.
CORS allows web pages to make cross-origin requests by adding specific headers to the HTTP response from the server. The headers indicate which domains are allowed to make cross-origin requests, and what type of requests are allowed.
However, configuring CORS can be challenging, especially when dealing with complex web applications that involve multiple domains and servers. One way to simplify the CORS configuration is to use a proxy server.
A proxy server acts as an intermediary between the web application and the server. The web application sends requests to the proxy server, which then forwards the requests to the server. The server responds to the proxy server, which then sends the response back to the web application.
By using a proxy server, you can configure the CORS headers on the proxy server instead of configuring them on the server that serves the web page. This way, the web application can make cross-origin requests without violating the same-origin policy.
Prerequisites
- Kubernetes cluster running Kubernetes v1.19.0 or greater.
- Have fsm installed.
- Have
kubectlavailable to interact with the API server. - Have
fsmCLI available for managing the service mesh.
Deploy demo services
kubectl create namespace curl
fsm namespace add curl
kubectl apply -n curl -f https://raw.githubusercontent.com/flomesh-io/fsm-docs/main/manifests/samples/plugins/curl.yaml
kubectl create namespace pipy
fsm namespace add pipy
kubectl apply -n pipy -f https://raw.githubusercontent.com/flomesh-io/fsm-docs/main/manifests/samples/plugins/pipy-ok.pipy.yaml
# Wait for pods to be up and ready
sleep 2
kubectl wait --for=condition=ready pod -n curl -l app=curl --timeout=180s
kubectl wait --for=condition=ready pod -n pipy -l app=pipy-ok -l version=v1 --timeout=180s
kubectl wait --for=condition=ready pod -n pipy -l app=pipy-ok -l version=v2 --timeout=180s
Enable plugin policy mode
kubectl patch meshconfig fsm-mesh-config -n "$fsm_namespace" -p '{"spec":{"featureFlags":{"enablePluginPolicy":true}}}' --type=merge
Declaring a plugin
kubectl apply -f https://raw.githubusercontent.com/flomesh-io/fsm-docs/main/manifests/samples/plugins/cors.yaml
Setting up plugin-chain
kubectl apply -f - <<EOF
kind: PluginChain
apiVersion: plugin.flomesh.io/v1alpha1
metadata:
name: cors-policy-chain
namespace: pipy
spec:
chains:
- name: inbound-http
plugins:
- cors-policy
selectors:
podSelector:
matchLabels:
app: pipy-ok
matchExpressions:
- key: app
operator: In
values: ["pipy-ok"]
namespaceSelector:
matchExpressions:
- key: flomesh.io/monitored-by
operator: In
values: ["fsm"]
EOF
Setting up plugin configuration
kubectl apply -f - <<EOF
kind: PluginConfig
apiVersion: plugin.flomesh.io/v1alpha1
metadata:
name: cors-policy-config
namespace: pipy
spec:
config:
allowCredentials: true
allowHeaders:
- X-Foo-Bar-1
allowMethods:
- POST
- GET
- PATCH
- DELETE
allowOrigins:
- regex: http.*://www.test.cn
- exact: http://www.aaa.com
- prefix: http://www.bbb.com
exposeHeaders:
- Content-Encoding
- Kuma-Revision
maxAge: 24h
plugin: cors-policy
destinationRefs:
- kind: Service
name: pipy-ok
namespace: pipy
EOF
Test
Use the below command to perform a test
curl_client="$(kubectl get pod -n curl -l app=curl -o jsonpath='{.items[0].metadata.name}')"
kubectl exec ${curl_client} -n curl -c curl -- curl -ksi http://pipy-ok.pipy:8080 -H "Origin: http://www.bbb.com"
You will see response similar to:
HTTP/1.1 200 OK
access-control-allow-credentials: true
access-control-expose-headers: Content-Encoding,Kuma-Revision
access-control-allow-origin: http://www.bbb.com
content-length: 20
connection: keep-alive
Hi, I am PIPY-OK v1!
Run another command to perform a test
curl_client="$(kubectl get pod -n curl -l app=curl -o jsonpath='{.items[0].metadata.name}')"
kubectl exec ${curl_client} -n curl -c curl -- curl -ksi http://pipy-ok.pipy:8080 -H "Origin: http://www.bbb.com" -X OPTIONS
You will see response similar to:
HTTP/1.1 200 OK
access-control-allow-origin: http://www.bbb.com
access-control-allow-credentials: true
access-control-expose-headers: Content-Encoding,Kuma-Revision
access-control-allow-methods: POST,GET,PATCH,DELETE
access-control-allow-headers: X-Foo-Bar-1
access-control-max-age: 86400
content-length: 0
connection: keep-alive